Homemade stretchy slime
A stretchy putty that stretches, bounces and drips slowly, made in 10 minutes with PVA glue, bicarbonate of soda and contact lens solution containing boric acid: the borate ions link the glue's long chains together and turn it into a gel.
What they will learn
- What a polymer is: very long molecules, like spaghetti, that make up the glue.
- What cross-linking is: chemical bridges (borate ions) that tie the chains to each other and turn a liquid into a gel.
- That some materials are neither solid nor liquid: slime bounces if you throw it fast and drips if you leave it still (viscoelastic).
- To measure quantities accurately and to change only one thing at a time so you can compare.
Prepare beforehand
- Read the contact lens solution label: it must say «boric acid» and «sodium borate». If it doesn't, don't buy anything else: it won't work.
- Cover the table with a plastic tablecloth and keep kitchen roll handy.
- Put each child in old clothes or an apron: the colouring stains.
- Print label A for the jar and ruler B for measuring the stretch.
- Have a clean jar with a lid ready to store the slime when you finish.
Materials and tools
- PVA glue — ½ cup (120 ml ≈ 125 g)
school PVA glue or non-waterproof wood glue, with PVA (polyvinyl acetate) on the label - Bicarbonate of soda — ½ teaspoon (≈ 2.5 g)
baking bicarbonate of soda; makes it firmer and raises the pH so the borate works - Contact lens solution — 1 tablespoon (15 ml), maximum 1½ (22 ml) buy
must have BORIC ACID and SODIUM BORATE in the list of ingredients - Food colouring — 3–5 drops
liquid or gel - Water — 2 tablespoons (30 ml), optional
tap water; makes a softer, stretchier slime - Glitter, beads or foam (optional) — 1 teaspoon
to experiment with textures - Jar with lid or zip-lock bag — 1
airtight, for storing it
Tools
- Medium glass or plastic bowl — mixing (don't use one you eat from, or wash it very well afterwards)
- Spoon or silicone spatula — stirring
- Measuring cup (240 ml) and measuring spoons — measuring glue, bicarbonate and solution
- Plastic tablecloth or tray — protecting the table
- Kitchen scales (optional) — weighing the slime for the experiments
Pieces and templates
- A · Jar label ×1 — 80 gsm paper or sticker
- B · Stretch ruler (24 cm) ×1 — card (200 gsm), laminated with wide tape
Step by step
Check the contact lens solution adult
Read the ingredients on the contact lens solution bottle with an adult. Look for the words «boric acid» and «sodium borate». If both are there, it will work; if not, stop: the slime won't form.
1 With an adult, read the ingredients on the solution bottle 2 Look for «boric acid» and «sodium borate»: if both are there, it works 3 If they're not there, stop: that solution won't make slime Check: Both words are on the label.Put the glue in the bowl
Fill the measuring cup to ½ cup (120 ml) with PVA glue and empty it into the bowl. Scrape the cup with the spoon to get it all out. If you want a softer slime, add 2 tablespoons (30 ml) of water and stir.
1 Fill the measuring cup with PVA glue up to ½ (120 ml) 2 Empty it into the bowl; scrape the cup with the spoon to get it all out 3 For a softer slime, add 2 tablespoons (30 ml) of water Add colour
Add 3–5 drops of food colouring and stir for 30 seconds until the colour is even, with no streaks.
1 Add 3 to 5 drops of food colouring 2 Stir for 30 seconds without stopping 3 The colour must be the same all over the bowl, with no streaks Tip: If you're using glitter or beads, add them now: later they don't spread well.Add the bicarbonate
Add ½ level teaspoon (2.5 g) of bicarbonate of soda and stir for 1 minute until you can't see any white lumps.
1 Fill ½ teaspoon with bicarbonate and level it with a knife 2 Tip it into the bowl and stir for 1 minute 3 Keep stirring until there are no white lumps left First dose of solution
Add 1 teaspoon (5 ml) of contact lens solution and stir hard for 30 seconds. The mixture starts to thicken and form strands.
1 Fill 1 teaspoon (5 ml) with contact lens solution 2 Tip it into the bowl and stir hard for 30 seconds 3 When you lift the spoon, thick strings fall, not drops Check: When you lift the spoon, thick strings fall instead of drops.Second dose
Add another teaspoon (5 ml) and keep stirring for 1 minute. The mixture gathers into a ball and starts to come away from the sides of the bowl.
1 Add another teaspoon (5 ml) and stir for 1 minute 2 The mixture gathers into a ball and comes away from the sides Take it out and knead
Take it out of the bowl and knead it with your hands for 2–3 minutes, stretching and folding. At first it sticks to your fingers: that's normal, keep kneading.
1 Put 2 or 3 drops of solution on your palms: it sticks less 2 Take it out of the bowl and knead it: stretch, fold and stretch again 3 Knead for 2 to 3 minutes even if it sticks at first Tip: Put 2–3 drops of solution on your palms before kneading: it will stick much less.Adjust (only if needed)
If it's still very sticky after 3 minutes of kneading, add ½ teaspoon (2.5 ml) more solution and knead for another minute. Don't go over 1½ tablespoons (22 ml) in total: it would turn hard and snap.
1 Still very sticky after 3 minutes? Add ½ teaspoon more 2 Knead for 1 more minute; don't go over 22 ml of solution in total 3 It comes cleanly off your hands and stretches 20–30 cm without breaking Check: It comes cleanly off your hands and the table, and stretches 20–30 cm without breaking.Let it rest
If it's still a bit sticky, leave it in the covered bowl for 5 minutes: the bonds finish forming and it becomes less sticky without adding more solution.
1 Cover the bowl and let the slime rest for 5 minutes 2 It becomes less sticky without adding more solution Test its properties
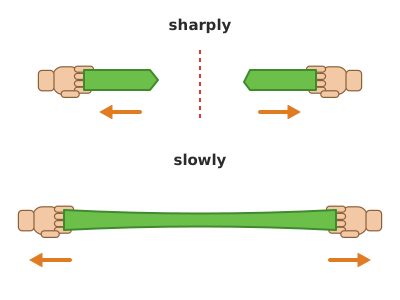
Make a ball and drop it from 30 cm: it bounces a little. Leave it still on the table for 2 minutes: it flattens like a liquid. Pull both ends sharply: it snaps cleanly. Stretch it slowly: it gets very long.
1 Make a ball and drop it from 30 cm: it bounces a little 2 Leave it still for 2 minutes: it flattens like a liquid 3 Pull sharply: it snaps cleanly. Stretch slowly: it gets very long Store it and clean up
Put the slime in the jar with a lid and stick on label A. Wash your hands with soap and water. Clean the bowl with hot water and throw the leftovers in the bin, not down the sink.
1 Put it in the jar, close it tightly and stick on label A 2 Wash your hands well with soap and water 3 Throw the leftovers in the bin, never down the sink: they block it
Does it work? The test
Measure its stretchiness with ruler B: make a 20 g ball, stick its top to the 0 holding it with two fingers and let it hang and stretch under its own weight. Also drop it from 30 cm and stretch it slowly between your hands.
What should happen: A well-made slime hangs and slowly lengthens to 15–24 cm before breaking, bounces 2–4 cm when dropped from 30 cm and stretches 50 cm–1 m between your hands if pulled slowly. If you pull sharply, it snaps with a clean edge.
If something goes wrong
- It stays liquid even when you add solution — The solution doesn't contain boric acid/borate, or the glue isn't PVA. Solution: Check both labels. Change the solution or the glue; don't keep adding more.
- It sticks to your hands terribly — Not quite enough activator, or it hasn't been kneaded enough. Solution: Knead for 2 more minutes with a few drops of solution on your hands; if it's still the same, add ½ teaspoon and wait 5 minutes.
- It's hard and snaps when stretched — Too much solution (more than 1½ tablespoons). Solution: Add 1 tablespoon of glue or warm water and knead for 3 minutes: it partly recovers.
- It has hard lumps — The solution was added all at once and gelled in patches. Solution: Knead with a little warm water until they blend in. Next time add the solution 5 ml at a time while stirring.
- The next day it's hard or dry — It was left uncovered. Solution: Always store it in an airtight jar. If it has dried out a little, knead it with a few drops of water.
- It smells bad or gets spots — Mould from handling it with dirty hands. Solution: Throw it in the bin and make another. It lasts 1–2 weeks if handled with clean hands.
Safety
- Slime is NOT for eating and must not go in the mouth. Don't make it with children under 3 or with children who still put everything in their mouths.
- Contact lens solution contains boron compounds: an adult measures it out and it is kept out of children's reach. Wash your hands before and after playing.
- If anyone has sensitive skin, cuts or eczema on their hands, they should wear nitrile gloves or not touch it. If it itches or goes red, wash with water and stop using it.
- Don't use borax powder directly or detergents: they are much more concentrated than contact lens solution.
- Don't put the slime or the leftovers down the sink: they can block the pipes. They go in the bin.
- It stains fabrics and carpets: if it sticks, apply white vinegar, wait 5 minutes and rub.
The science behind it
For children
PVA glue is made of loads of really, really long chains, like a plate of cooked spaghetti swimming in water: that's why it's runny and drips. The contact lens solution brings tiny bits that work like hands: they grab one spaghetti strand with one hand and another with the other, and that's how they tie them together. When all the spaghetti is tied up, it makes a network, like a squishy spider's web, and the glue stops being a liquid: it turns into slime. But the hands let go and grab hold again, which is why slime stretches and drips slowly.
For the adult
PVA glue is a dispersion of partially hydrolysed polyvinyl acetate (PVAc), with hydroxyl groups (–OH) along chains thousands of units long. The boric acid in the contact lens solution, in a basic medium (the bicarbonate raises the pH to ≈ 8–9), becomes the borate ion B(OH)₄⁻, which forms reversible diester bonds with pairs of –OH groups on different chains: this is dynamic cross-linking. The result is a viscoelastic physical gel: under fast stresses (a tug, a bounce) the bonds don't have time to rearrange and the material behaves like an elastic solid and fractures cleanly; under slow stresses (gravity, gentle stretching) the bonds continually break and re-form and it flows like a very viscous liquid (a non-Newtonian fluid). The amount of activator controls the cross-link density: too little, sticky and runny; too much, stiff and brittle. The boric acid concentration in contact lens solutions (≈ 0.5–1 %) is far lower than that of borax powder, which is why it is the recommended option for children, although European toy regulations limit boron and it must not be swallowed.
- polymer: a very long molecule made of many identical repeated pieces, like a bead necklace.
- cross-linking: bridges that join chains to each other, forming a network.
- activator: a substance that creates those bridges (here, the borate in the contact lens solution).
- viscoelastic: a material that flows slowly like a liquid but bounces and stretches like a solid.
- gel: a network of chains that traps lots of water inside.
By age
- 5–7 years: The adult measures and adds the contact lens solution; the child pours in the glue, colouring and bicarbonate, stirs and kneads. Constant supervision so they don't put it in their mouth. Focus on «liquid before, dough after».
- 8–10 years: They make it on their own, with the label checked by an adult. Have them compare two slimes with different amounts of solution and describe the differences.
- 11–12 years: Have them design a controlled experiment (changing only the solution, or only the water) and measure stretch and bounce with the ruler. Challenge: explain why the bicarbonate is needed (pH).
In a group or in class
Individually or in pairs (each with their own cup). Per pair: a plastic cup with 60 ml of glue, ¼ teaspoon of bicarbonate, colouring and a small cup with 8 ml of contact lens solution already measured by the adult (half the recipe: have them pour it in a little at a time; 5–6 ml is usually enough) (don't leave the big bottle on the tables). Cover the tables with plastic. 40-min session: 5 min explaining the «spaghetti», 15 min making the slime, 15 min of tests (bounce, stretch with ruler B on the wall), 5 min tidying up and washing hands. Have jars with lids and A labels so they can take it home.
Challenges
- Make the stretchiest slime in the class without it breaking, changing only the amount of water.
- Make a clear slime with clear glue and put small objects inside so they can be seen.
- Make a colour-changing slime: mix two halves of different colours and count how many kneads it takes to become even.
- Design a «fluffy» slime by adding 1 cup of shaving foam before the activator and compare its density by weighing a tablespoon.
- Find out what other polymers there are at home (bags, bottles, rubber bands) and how they are like glue.
More free projects
- Bouncy egg without a shell
- Coloured carnations
- Fizzy drink and sweets fountain
- Foaming volcano
- Giant yeast foam
- Hidden colours in ink
- Moving colours in milk
- Oil bubble lamp
- Raisins that rise and sink
- Red cabbage acid indicator
- Secret messages with lemon juice
- Self-inflating ghosts
- Cubic salt crystals
- Rock candy on a string