Giant yeast foam
A 500 ml bottle with chemist's hydrogen peroxide, washing-up liquid and food colouring; when you tip dissolved yeast into it, a column of warm foam pours out of the neck and keeps gushing for almost a minute.
What they will learn
- That hydrogen peroxide breaks down on its own very slowly into water and oxygen, and that a catalyst (the catalase in yeast) speeds that reaction up enormously without being used up.
- That a gas takes up much more space than the liquid it comes from: 120 ml of 3 % hydrogen peroxide releases ≈ 1.3 litres of oxygen.
- That soap traps the gas in bubbles and makes foam; without soap the oxygen escapes unseen.
- That some chemical reactions give off heat (exothermic): the bottle feels warm.
- To work with a safety routine (goggles, gloves, tray, waste).
Prepare beforehand
- Buy 3 % (10 volume) hydrogen peroxide and BAKER'S yeast. Check the use-by date on both: hydrogen peroxide that was opened months ago loses its strength.
- Print at 100 % and cut out funnel A and scale B. Assemble the funnel and line the inside with sticky tape so it doesn't get wet.
- Choose the spot: outdoors, a kitchen worktop or the bath. Put the tray down and keep a cloth and a bucket of water handy.
- Stick scale B upright on a wall, a box or a full bottle next to the tray, with the 0 level with the mouth of the bottle.
- Explain the rules beforehand: goggles on the whole time, nobody leans over the bottle, the foam is not to be eaten.
Materials and tools
- Narrow-necked plastic bottle — 1
500 ml, water or fizzy drink bottle, clean and without its cap; neck ≈ 21 mm inside diameter - Hydrogen peroxide — 120 ml buy
3 % (also sold as «10 volume»), from the chemist or supermarket - Dried baker's yeast — 1 sachet (≈ 5–7 g, about 2 level teaspoons) buy
active dried or fast-action bread yeast; NOT baking powder - Lukewarm water — 45 ml (3 tablespoons)
35–40 °C: warm when poured on your wrist, not hot - Washing-up liquid — 15 ml (1 tablespoon)
the kind for washing up by hand; the more concentrated, the more foam - Liquid food colouring — 6 drops (of 1 or 2 colours)
gel or liquid - Large tray with a rim — 1
at least 40 × 30 cm with a 3 cm rim (baking tray, washing-up bowl, plastic box lid) - Safety goggles — 1 per person nearby
DIY or swimming goggles - Nitrile or washing-up gloves — 1 pair per person who touches anything
a size that fits the child - Small glass and spoon — 1 + 1
100–200 ml glass for the yeast - Card — 1 A4 sheet
180–220 gsm, for the funnel (A) and the scale (B) - Sticky tape — 20 cm
to close the funnel and line it inside (waterproof)
Tools
- Measuring jug or 20 ml syringe — measure 120 ml of hydrogen peroxide and 45 ml of water adult
- Tablespoon (15 ml) — measure the washing-up liquid and the water for the yeast
- Scissors — cut out the funnel and the scale
- Kitchen thermometer (optional) — check the lukewarm water and measure the heat of the reaction
Pieces and templates
- A · Quick-pour funnel ×1 — card 200 gsm
- B · Foam height scale ×1 — paper or card
Step by step
Prepare the area
Place the tray (at least 40 × 30 cm) on a flat surface, outdoors, on the worktop or in the bath. Put the 500 ml bottle without its cap in the middle and scale B behind it, with the 0 level with the mouth.
1 Put down the 40 × 30 cm tray and the uncapped bottle in the middle 2 Stick scale B behind it: the 0 level with the mouth Goggles and gloves
Everyone within 1 m puts on safety goggles. Anyone who is going to touch anything wears nitrile or washing-up gloves. Tie back long hair.
1 Goggles for everyone watching and gloves for whoever touches 2 Put your goggles on and tie your hair back before you start Check: Nobody starts without goggles: hydrogen peroxide in the eyes stings a lot.Pour in the hydrogen peroxide adult
The adult measures 120 ml of 3 % hydrogen peroxide in the measuring jug and pours it into the bottle using funnel A. There should be about 4 cm of liquid: a quarter of the bottle.
1 The adult measures 120 ml of 3 % hydrogen peroxide in the measuring jug 2 Pour it into the bottle using funnel A 3 There are about 4 cm of liquid: a quarter of the bottle Check: The liquid comes up about 4 cm from the bottom and the rest of the bottle is empty.Add soap and colour
Add 1 tablespoon (15 ml) of washing-up liquid and 6 drops of food colouring to the bottle. Swirl the bottle gently for 5 seconds to mix, without shaking it (if you make foam now, it is wasted).
1 Add 1 tablespoon (15 ml) of washing-up liquid 2 Add 6 drops of food colouring 3 Swirl the bottle gently for 5 seconds, without shaking it Tip: For striped foam, let drops of two colours run down the inside walls of the neck without mixing.Check the lukewarm water
Put 3 tablespoons (45 ml) of warm tap water in the small glass. It should be 35–40 °C: a drop on your wrist feels lukewarm, not at all hot.
1 Put 3 tablespoons (45 ml) of warm tap water in the glass 2 A drop on your wrist should feel lukewarm: 35–40 °C Check: If you have a thermometer, between 35 and 40 °C. Above 55 °C ruins the yeast.Dissolve the yeast
Empty 1 sachet of baker's yeast (5–7 g) into the glass of lukewarm water and stir with the spoon for 30 seconds, squashing the lumps against the side, until it looks like a light brown milkshake.
1 Empty 1 sachet of baker's yeast into the lukewarm water 2 Stir for 30 seconds, squashing the lumps against the side 3 Not like this: lumpy yeast reacts worse. Ready when it looks like a milkshake Check: There are no dry lumps left. If there are any, keep stirring: lumpy yeast reacts more slowly.Put the funnel in place
Put the tip of funnel A into the neck of the bottle. Whoever is pouring stands side-on, with their arm stretched out and their face away from the mouth of the bottle.
1 Put the tip of funnel A into the neck of the bottle 2 Stand side-on, with your arm stretched out and your face away 3 Never put your face over the bottle Tip the yeast in all at once
Empty the whole glass of yeast into the funnel in one movement and remove the funnel within 1–2 seconds, before the foam reaches it.
1 Empty the whole glass of yeast into the funnel in one go 2 Remove the funnel straight away, before the foam reaches it Tip: If you hesitate halfway through pouring, the foam comes out through the funnel. A quick pour is better, even if it splashes a little.Step back and watch
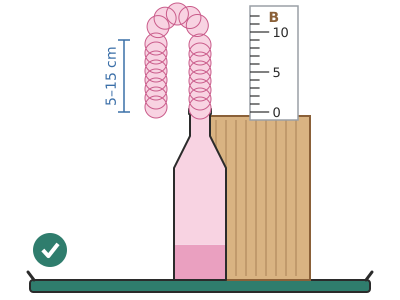
Take a step back. Within 2–5 seconds the foam rises up the neck, shoots out as a 5–15 cm column, bends over and keeps gushing for 30–60 seconds. Look at scale B or film it on a phone.
1 Take a step back: within 2–5 seconds the foam appears 2 Look at scale B: it rises as a column, bends over and keeps coming Check: If nothing comes out within 10 seconds, look at the troubleshooting table (it is almost always the yeast).Feel the heat
When the foam stops coming out, touch the bottle with your gloved hand. It is warm: the reaction has given off heat. If you have a thermometer, put the tip into the foam and note down the temperature.
1 Touch the bottle with your glove on: it is warm 2 Put the thermometer into the foam and note down the temperature Touch the foam (with gloves)
With your gloves on, pick up a handful of foam. It is just water, soap, yeast and oxygen bubbles. Don't put it in your mouth or near your eyes, and don't touch it without gloves: some unreacted hydrogen peroxide may be left.
1 Pick up a handful of foam with your glove on 2 Not without gloves, and never in your mouth or eyes Clean up adult
Wait 10 minutes for the foam to break down. Pour everything down the sink or the toilet with plenty of tap water, rinse the bottle and the tray, and wash your hands after taking off your gloves.
1 Wait 10 minutes for the foam to break down 2 Pour everything down the sink with plenty of tap water 3 Take off your gloves and wash your hands well
Does it work? The test
Do the experiment with scale B behind it and film the moment of pouring on a phone. Time from when the yeast goes in until the foam comes out, and until it stops.
What should happen: The foam appears at the mouth within 2–5 s, rises 5–15 cm as a column before bending over and keeps coming for 30–60 s. In total ≈ 1 litre of foam gushes out (twice the volume of the bottle). The bottle warms up by about 5–10 °C.
If something goes wrong
- Hardly any foam comes out, just a few bubbles — Baking powder or out-of-date yeast was used. Solution: Use BAKER'S yeast (dried or fresh) and check the date. Test: a pinch in hydrogen peroxide should fizz instantly.
- The foam comes out very slowly and stays in the neck — Old hydrogen peroxide (already broken down) or cold yeast water. Solution: Use a freshly opened bottle and water at 35–40 °C. With 6 % hydrogen peroxide (adult only) the reaction is twice as fast.
- Big bubbles that burst, no thick foam — Too little soap or very watery soap. Solution: Increase to 2 tablespoons of concentrated washing-up liquid.
- The foam comes out before you finish pouring and overflows through the funnel — Pouring too slowly. Solution: Tip everything in at once and remove the funnel within 1–2 s. With young children, the adult holds the bottle while the child pours.
- The foam just overflows, with no column — Wide-mouthed bottle or too much liquid inside. Solution: Use a narrow-necked 500 ml bottle only ¼ full of liquid: the gas needs to push through a narrow neck to come out fast.
- Lumps of yeast floating and little reaction — The yeast didn't dissolve properly. Solution: Stir for 30–60 s, squashing the lumps, before pouring.
Safety
- Safety goggles are compulsory for everyone nearby: 3 % hydrogen peroxide stings in the eyes. If it splashes, rinse with plenty of water for 10 minutes.
- The adult measures and pours the hydrogen peroxide. Do not mix it with other cleaning products (bleach, vinegar, ammonia).
- Never use hydrogen peroxide stronger than 6 % at home: 30 % is corrosive and is only used in laboratories.
- The foam must not be eaten or drunk; touch it only with gloves.
- Nobody leans over the mouth of the bottle during the reaction.
- Keep the hydrogen peroxide in its original container, closed and out of reach of young children.
The science behind it
For children
Hydrogen peroxide is water with an extra «bit of oxygen», and it wants to let it go, but it does so very, very slowly. Yeast has tiny helpers called enzymes that work like magic scissors: they snip off that extra oxygen super fast. That oxygen is a gas and needs lots of room, so it gets into the soap and makes millions of bubbles. As the bottle is too small, the foam squirts out of the neck like toothpaste from an elephant's tube. And as it breaks apart, the reaction gives off a little heat: that's why the bottle gets warm.
For the adult
Hydrogen peroxide breaks down spontaneously (2 H₂O₂ → 2 H₂O + O₂, ΔH ≈ −98 kJ per mol of H₂O₂), but at room temperature the reaction is extremely slow. Catalase, an enzyme found in yeast (and in almost all cells, which use it to get rid of the peroxide produced by their metabolism), speeds it up millions of times: it is a biological catalyst that is not used up. 120 ml at 3 % contains ≈ 3.6 g of H₂O₂ (0.106 mol), which releases 0.053 mol of O₂ ≈ 1.3 litres at room temperature. The surfactant in the washing-up liquid stabilises the bubbles and turns that gas into foam; since it doesn't fit in the ≈ 320 ml of free space in the bottle (500 − 120 − 15 − 45), it comes out through the neck, which acts as a nozzle. The heat released (≈ 10 kJ) would warm the liquid by about 14 °C if none were lost; in practice you notice a rise of 5–10 °C. Catalase is denatured above ~55 °C, which is why the yeast water must be lukewarm. The «laboratory» version uses 30 % H₂O₂ and potassium iodide as the catalyst: ten times more gas, more heat (steam) and it is corrosive; it is not for home.
- catalyst: a substance that speeds up a reaction without being used up.
- enzyme: a catalyst made by living things; the one in yeast is called catalase.
- decomposition: a reaction in which a substance breaks down into simpler ones.
- exothermic reaction: a reaction that gives off heat.
- surfactant: the part of soap that lets it form bubbles and foam.
By age
- 5–7 years: The adult measures and pours the hydrogen peroxide; the child (with goggles and gloves) adds the soap, the colouring and the yeast. Focus on «the yeast makes the hydrogen peroxide give off a gas that makes bubbles».
- 8–10 years: They follow all the steps except the hydrogen peroxide. Have them measure the height with the scale and compare two different bottles.
- 11–12 years: Have them come up with a hypothesis and a variable (amount of yeast, water temperature, shape of container), do three repeats and draw a graph. Challenge: work out the volume of oxygen from the grams of H₂O₂.
In a group or in class
Best as a demonstration in stations: 4–5 stations with a tray each and one adult per station, teams of 4–5 children. Per station: 2 bottles of 500 ml, 250 ml of hydrogen peroxide, 2 sachets of yeast, washing-up liquid, food colouring, goggles for everyone and gloves. 40 min session: 10 min of explanation and rules, 20 min (two reactions per team, changing one variable), 10 min of sharing results and cleaning up. Do it in the playground or in the lab with a floor that can be mopped.
Challenges
- Get the tallest column of foam by changing just one thing (bottle, temperature, amount of yeast) and prove it with the scale.
- Design a foam with three coloured stripes.
- Work out how many litres of oxygen should come from 120 ml at 3 % and compare it with the foam collected in a measuring bowl.
- Look for other kitchen catalysts: try a piece of raw potato or liver in hydrogen peroxide and compare the bubbles with the yeast.
More free projects
- Bouncy egg without a shell
- Coloured carnations
- Fizzy drink and sweets fountain
- Foaming volcano
- Hidden colours in ink
- Homemade stretchy slime
- Moving colours in milk
- Oil bubble lamp
- Raisins that rise and sink
- Red cabbage acid indicator
- Secret messages with lemon juice
- Self-inflating ghosts
- Cubic salt crystals
- Rock candy on a string