Hidden colours in ink
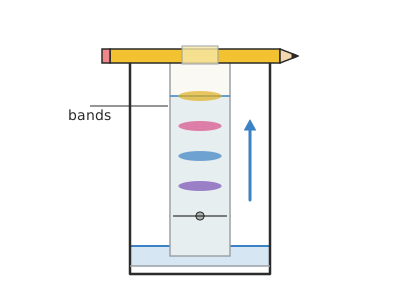
A strip of coffee filter with a black felt-tip dot, hung with its tip in a finger's depth of water, turns in 15–20 minutes into a band of blues, violets, pinks and yellows: chromatography separates the inks that make up the black.
What they will learn
- That many colours (especially the black and brown of felt-tip pens) are mixtures of several inks.
- That water climbs up paper on its own by capillary action, through the gaps between the fibres.
- That each ink moves at a different speed depending on how much it dissolves in water and how much it sticks to the paper, and that is how they separate.
- How to measure the distance travelled by each colour and compare it with the water's (Rf).
Prepare beforehand
- Print template A on ordinary paper and cut it out: it will be your guide for cutting the strips from the filter.
- Open the coffee filters along the seams to get flat sheets.
- Check that the pens have water-based ink: draw a line on some paper and wet it with a finger; if it runs, it will work.
- Mark a line on the outside of each glass, 10 mm above the inside bottom (water level).
Materials and tools
- Coffee filters — 3–4 filters (2 strips per side)
white paper, size 1×4 or similar; the sides must be ≥ 12 cm - Water-based felt-tip pens — 3 black ones of different brands + brown, green and purple
school pens with washable water-based ink (not permanent) - Clear glasses — 3–6
about 10.5 cm tall with a mouth ≥ 6 cm wide (jam jar, drinking glass); if it is shorter, roll more of the strip round the pencil; if it is taller, hang the strip from a peg - Tap water — ≈ 20–30 ml per glass
up to 10 mm deep - Pencils or wooden skewers — 1 per glass
longer than the mouth of the glass - Sticky tape or clothes pegs — 1 per strip
to hold the tab on the pencil - Surgical spirit / rubbing alcohol 70–96 % — 20 ml (optional)
only for the permanent marker experiment
Tools
- Scissors — cutting the strips
- Ruler — measuring strips, water level and colour distances
- Graphite pencil — marking the start line and writing the pen's name
- Stopwatch — timing the 15–20 min
Pieces and templates
- A · Chromatography strip (guide) ×6 — coffee filter or absorbent paper
Step by step
Cut the strips
Lay template A on the opened coffee filter, hold it down with two fingers and cut around it. Make 6 strips of 30 × 120 mm.
1 Lay template A on the opened filter 2 Hold it with two fingers and cut around it 3 Make 6 strips of 30 × 120 mm, without creases Check: Each strip measures 30 × 120 mm and has no creases.Mark the start line
With a graphite pencil, draw a thin line 20 mm from the bottom end of each strip. At the top, also in pencil, write the name of the pen you are going to test.
1 With pencil and ruler, draw a line 20 mm from the bottom end 2 Write the pen's name in pencil, never in biro Tip: Never use a biro or felt-tip: its ink would move too.Make the ink dot
On the line, in the centre, make a 3–4 mm dot with the felt-tip. Let it dry for 30 seconds and go over it 2 more times so it holds plenty of ink without getting bigger.
1 Make a 3–4 mm dot in the centre of the line 2 Wait 30 s and go over it 2 more times in the same place 3 Small, dark dot, not a big blot Check: Dark, round dot no larger than 4 mm.Fold the tab
Fold the top 20 mm of the strip over the pencil and hold it with sticky tape or a clothes peg.
1 Place the pencil just below the 20 mm line 2 Fold the tab behind the pencil 3 Fix the tab to the pencil with tape or a peg Set the height while dry
With the glass still empty, rest the pencil on the rim: the tip of the strip should be 5 mm from the bottom (below the 10 mm mark). If it is too long, slide the strip by rolling more of it round the pencil.
1 With the glass empty, rest the pencil on the rim 2 If the strip is too long, turn the pencil to roll it up 3 The tip sits 5 mm from the bottom, straight and not touching Check: The strip hangs straight, without touching the sides of the glass.Pour in the water
Lift out the pencil with the strip. Pour water into the glass up to the 10 mm mark (one finger's depth, roughly). As the tip sits 5 mm from the bottom, the dot (20 mm higher up) will be 15 mm above the water.
1 Lift out the pencil with the strip 2 Pour water up to the 10 mm mark Hang the strip
Put the pencil back across the glass, slowly and without splashing. The tip of the strip dips 5 mm into the water and the ink dot stays out of the water.
1 Put the pencil back slowly, without splashing 2 The tip dips 5 mm; the dot stays 15 mm above the water 3 Not like this: if the dot gets wet, the ink goes into the water Check: The dot does NOT touch the water. If it does, take the strip out and start another.Wait and watch
Do not move the glass. The water climbs up the paper: in 10 minutes it travels about 6 cm and then moves more and more slowly. As it passes the dot, it carries the inks along and they separate into coloured bands.
1 Do not move the glass: the water climbs the paper on its own 2 As it passes the dot, the water separates the inks 3 Set up several strips at once, one per glass Tip: Set up several strips at once, one per glass, with different pens.Take the strip out in time
When the water front (the wet line) reaches the STOP mark, 1 cm from the pencil and about 8.5 cm above the water (15–20 min; if it has not got there after 25 min, take it out anyway), take the strip out and mark in pencil how far the water reached.
1 When the water reaches the STOP mark, 1 cm from the pencil 2 Take it out and mark in pencil how far the water reached Dry and measure
Leave the strip to dry for 10 minutes, hanging or on kitchen roll. Measure in millimetres from the start line to the centre of each coloured band and to the water front.
1 Leave it to dry for 10 min on kitchen roll 2 Measure from the start to each colour and to the front Check: At least one black pen has separated into 2 or more colours.
Does it work? The test
Coffee filter strip with a dot of water-based black felt-tip, tip dipped 5 mm into 10 mm of water, for 15–20 minutes.
What should happen: The water climbs about 8.5 cm, up to the STOP mark (7 cm above the start line). The black dot separates into 2–4 bands: usually a blue or violet appears near the start and pinks, yellows or turquoises higher up (depending on the brand). A pen with a single dye (yellow, for example) climbs as a single spot.
If something goes wrong
- The ink goes into the water and the glass turns coloured — The dot was below the water level. Solution: Use less water (10 mm) or raise the strip: the dot must be at least 10 mm above the water.
- The dot does not move — Permanent marker (ink that does not dissolve in water). Solution: Use washable pens, or try the same strip with alcohol instead of water (experiment 3).
- The water does not climb, or climbs crookedly — The strip does not touch the water, or it touches the sides of the glass. Solution: Adjust the height so it dips 5 mm and hangs straight in the centre of the glass.
- The colours come out blurry and mixed — Dot too big, or two-ply kitchen roll. Solution: Make a small dot (3–4 mm) gone over several times and use coffee filter.
- All the colours bunch up at the very top — The strip was left in too long and the water reached the pencil. Solution: Take the strip out when the front is 1 cm from the pencil.
- The black comes out as a single colour — That pen uses a single black ink. Solution: It is not a failure: try other brands; it is a good result for comparing.
Safety
- Alcohol is flammable: only with an adult, in a small glass, away from flames and with the window open. It is not for drinking.
- Inks stain clothes: wear an apron or old clothes.
- The inky water can be poured down the sink.
- Keep glass tumblers on the table, not at the edge; plastic cups are better with little ones.
The science behind it
For children
Paper is made of tiny threads with little gaps between them. Water squeezes into those little gaps and climbs up on its own, like when you dip the corner of a napkin in water. When the water reaches the black dot, it takes the inks for a ride. But every ink is different: some let the water carry them very easily and go a long way, and others cling to the paper and stay behind. That is how we find out that the black was really a mixture of blue, pink, yellow...
For the adult
This is paper chromatography. The stationary phase is the cellulose of the paper (with water held between its fibres) and the mobile phase is the water rising by capillary action: surface tension pulls the water into the pores, which behave like tubes a few tens of microns wide (the advance slows over time, roughly as the square root of time). As it passes the spot, the water dissolves the dyes in the ink. Each dye is continuously shared between the moving water and the surface of the cellulose: those that are very soluble in water and have little affinity for paper move almost with the front; those that are adsorbed more strongly (through hydrogen bonds or their charge) lag behind. The ratio Rf = dye distance ÷ front distance is characteristic of each dye in a given system (paper, solvent, temperature), and does not depend on the “weight” of the molecule. The black inks of water-based felt-tips are usually mixtures of blue, violet, red and yellow dyes. Permanent markers use dyes that are poorly soluble in water and need a less polar solvent such as alcohol. The technique is used in laboratories to identify substances (food colourings, inks in forensic examinations, plant pigments).
- chromatography: a technique for separating the substances in a mixture by making them travel through paper or another material.
- capillary action: a liquid rising through very fine gaps, like water through paper.
- mixture: several substances together that can be separated again.
- dissolve: to make a substance spread through a liquid until you can no longer see any bits.
- front: the line showing how far the water has reached on the paper.
By age
- 5–7 years: The adult cuts the strips and sets the height; the child makes the dot, pours the water up to the mark and counts the colours that appear. Message: “black is a mixture”.
- 8–10 years: They do the whole set-up with the template and compare 3 black pens. They measure with a ruler how far each colour gets.
- 11–12 years: They work out the Rf of each band, set up the “mystery note” case and compare water with alcohol (with an adult).
In a group or in class
Pairs, 3 plastic cups and 6 strips per pair (36 cups for 24 children, or shared cups with 2 strips each hung from two pencils). Collect pens from the class and give each pair different brands. Have the strips cut beforehand. 40 min: 10 setting up, 20 waiting (use it to explain capillary action by wetting a napkin) and 10 measuring and sticking the strips on a shared wall chart.
Challenges
- Invent a secret ink by mixing two pens and challenge a classmate to work out which ones they are with a strip.
- Manage to separate the colours of a colour-coated sweet (a drop of water on the sweet, and that drop as the dot).
- Do circular chromatography: a dot in the centre of a whole filter and water coming in through a wick of rolled-up paper. What pattern appears?
- Find a black pen that does NOT separate and another that gives at least 4 colours.
More free projects
- Bouncy egg without a shell
- Coloured carnations
- Fizzy drink and sweets fountain
- Foaming volcano
- Giant yeast foam
- Homemade stretchy slime
- Moving colours in milk
- Oil bubble lamp
- Raisins that rise and sink
- Red cabbage acid indicator
- Secret messages with lemon juice
- Self-inflating ghosts
- Cubic salt crystals
- Rock candy on a string