Whirlpool between two bottles
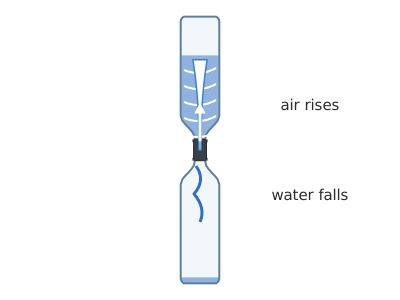
Two 1.5-litre bottles joined mouth to mouth, with a 9 mm washer between them: when you swirl the whole thing, the water at the top drains down in a whirlpool with a funnel of air in the centre, just like a tornado.
What they will learn
- What a vortex is: spinning water forms a funnel with a hollow of air in the centre.
- That water and air need to «take turns» to get through a narrow neck, and that the whirlpool opens a path for each of them: water round the outside, air up the centre.
- That as the water gets closer to the centre it spins faster and faster (like a skater pulling in her arms).
- How to measure and compare draining times by repeating the test.
Prepare beforehand
- Remove the labels from the bottles (hot water and soap) and dry the outsides: tape won't stick to wet plastic.
- Print template A, stick it onto the plastic lid and cut out the washer; make the 9 mm centre hole.
- Cut 4 strips of electrical tape 30 cm long (1.2 m in total) and leave them stuck by one end to the edge of the table.
- Work over a sink, a tray or outdoors in case the joint leaks on the first test.
Materials and tools
- Plastic bottles — 2 identical
1.5 l, clear, smooth, label removed, with the standard fizzy drink/water mouth (≈ 27 mm thread) - Plastic washer — 1 (piece A)
Ø 25 mm with a 9 mm centre hole, cut from a plastic tub lid (ice cream, large yoghurt) or a plastic folder - Electrical tape — 1–1.4 m
PVC, 15–19 mm wide (stretchy and watertight) - Tap water — 1.1 l (¾ of a bottle)
at room temperature - Food colouring — 3–4 drops
blue or green - Visible bits (optional) — 1 teaspoon
aluminium foil rolled into 2–3 mm balls, large sequins or plastic confetti, to see the spin - A few drops of washing-up liquid (optional) — 1 drop
so the air funnel looks cleaner
Tools
- Strong scissors — cut the washer out of the plastic
- Hole punch or awl and nail scissors — make the washer's 9 mm hole adult
- Measuring jug and funnel — pour in 1.1 l without spilling
- Stopwatch — time how long it takes to drain
Pieces and templates
- A · Flow washer ×1 — plastic from a tub lid or folder (0.5–1 mm)
Step by step
Fill the first bottle
Put the funnel in a 1.5 l bottle and fill it with 1.1 litres of water, up to about 4 cm below where the shoulder begins (where the bottle starts to narrow towards the neck): three quarters of the bottle.
1 Put the funnel in the bottle and measure 1.1 l in the jug 2 Pour the water through the funnel, slowly 3 Stop 4 cm below the shoulder: 400 ml of air is left Check: There are about 400 ml of air left at the top: the whirlpool needs it to form the funnel.Add colour
Add 3–4 drops of food colouring and, if you like, a teaspoon of little aluminium foil balls or sequins. You can add 1 drop of washing-up liquid.
1 Drip 3–4 drops of colouring into the mouth 2 Add a teaspoon of foil balls (optional) 3 Coloured water with bits in it: the spin will be easy to see Cut out the washer adult
Cut out washer A, Ø 25 mm, from tub-lid plastic and make the 9 mm centre hole with the awl and nail scissors.
1 Stick the template onto the lid and cut out the 25 mm circle 2 Pierce the centre of the washer with the awl, on a piece of wood 3 Widen the hole in a circle up to 9 mm Check: The washer covers the rim of the bottle mouth exactly, sticking out no more than 1 mm.Position the washer
Dry the mouth of the full bottle thoroughly and rest the washer on top, centred. If you want it to stay put, hold it with a small piece of tape on two sides.
1 Dry the mouth of the full bottle well with a cloth 2 Rest the washer centred on the mouth 3 If you like, hold it with two small pieces of tape Add the second bottle
Place the second bottle, empty and dry, upside down on the washer, with the two mouths lined up as if they were one long bottle.
1 Lower the empty bottle, upside down, onto the washer 2 Look from the side: the two bottles form a straight line 3 Not like this: if they are crooked, the joint leaks Check: Look from the side: the two bottles form a straight line.First turns of tape adult
While someone holds the bottles straight, wrap 4 turns of well-stretched electrical tape right over the joint between the mouths, pressing with your fingers so there are no wrinkles.
1 Have someone hold the bottles straight; stick the end on the joint 2 Wrap 4 turns of well-stretched tape right over the joint 3 Press with your fingers: no wrinkles or gaps Strengthen the joint
Carry on taping in a spiral upwards and downwards until you cover both threads and both neck rings, about 1–1.4 m of tape in total. Finish with 2 turns over the joint.
1 Carry on in a spiral upwards and downwards 2 Cover both threads and the rings; finish with 2 turns 3 Test it for 10 s over the sink: it must not drip Check: Hold the whole thing with the full bottle on top over the sink for 10 seconds: it must not drip. If it drips, add more tight turns over the joint.Turn it over
Turn everything over so the bottle with water is on top. Hold the bottom bottle with one hand and the joint with the other. You'll see the water glug down slowly.
1 Turn the whole thing over: the bottle with water on top 2 Hold the bottom and the joint: the water glugs down Make the whirlpool
With one hand on the top bottle and the other on the joint, make 5–6 quick horizontal circles about 10 cm across in 3 seconds, as if you were stirring a saucepan. Then stop and hold the whole thing still and upright.
1 Make 5–6 quick 10 cm circles, like stirring 2 Stop and hold it still and upright Tip: If the funnel doesn't appear, make smaller, faster circles.Watch the tornado
Within 2–3 seconds a funnel of air forms in the centre and reaches down to the neck, and the water spirals down. Look closely and follow a foil ball with your eyes.
1 Within 2–3 s a funnel of air forms in the centre 2 Follow a ball: near the centre it spins faster Check: The funnel reaches from the surface to the neck and the water drains without glugging.Repeat the other way
When all the water is at the bottom, turn the whole thing over and repeat, now swirling the opposite way. Time the draining both times.
1 When it's all at the bottom, turn it over again 2 Now swirl the other way and time the draining
Does it work? The test
With 1.1 l of water and the 9 mm washer, time the draining with the bottle held still (no swirl) and then with the whirlpool.
What should happen: Without a swirl the water glugs down and takes 40 s or more (sometimes it almost stops). With the whirlpool the funnel forms in 2–3 s and the bottle drains in about 15–25 s, continuously.
If something goes wrong
- The joint leaks — Tape not tight enough, mouths wet or out of line. Solution: Dry the mouths, line up the bottles and wrap 4 more well-stretched turns right over the joint.
- The funnel doesn't form — Swirling too slowly or too widely, or the bottle moves at the end. Solution: 10 cm circles, fast, 5–6 turns, then hold the bottle still.
- The water rushes down in 3–4 s with no tornado — The washer is missing or its hole is too big. Solution: Fit the washer with an 8–10 mm hole.
- The water hardly goes down, even when swirled — The washer hole is too small (< 6 mm) or covered by tape. Solution: Widen the hole to 9 mm and check that the tape isn't blocking the opening.
- The joint bends — Not enough tape or bottles too heavy. Solution: Cover both threads with tape and, when swirling, always keep one hand on the joint and the other on the top bottle; use 1.5 l bottles.
- The funnel is hard to see — Uncoloured water or bottles with a pattern moulded in. Solution: Add colouring and foil balls; use smooth bottles.
Safety
- The full bottles weigh 1.2 kg: the youngest children should swirl them sitting down, resting the bottom one on the table or on their lap.
- Do the tests over a sink or a tray: if the joint comes apart, more than a litre spills and the floor gets slippery.
- The awl and the hole punch are used by an adult, with the lid resting on a piece of wood.
- Don't use loose glitter that ends up down the drain; keep small pieces (sequins, balls) away from children under 3.
The science behind it
For children
When the bottle is still, the water wants to go down and the air below wants to go up, but they both try to get through the little hole at the same time and push against each other: that's why it goes «glug-glug» and drains slowly. When you swirl the bottle, the water starts going round like a merry-go-round and presses against the sides, leaving an empty tunnel in the middle. The air goes up that tunnel, and the water goes down round the outside. Each one has its own path! That spinning funnel is called a vortex, and it's the same thing that happens in a tornado or when you empty the bath.
For the adult
With the bottle still, water can only leave if an equal volume of air enters through the same opening: this produces an unstable, glugging flow (bubbles rise one at a time) and a low flow rate. Swirling gives the water angular momentum. As it moves down towards the opening, its radius of rotation decreases and, because angular momentum is conserved (v·r ≈ constant, free vortex), the tangential speed increases sharply near the axis. Keeping to that curved path requires a centripetal force, provided by a pressure gradient: pressure is lower in the centre, the free surface dips and the funnel forms (roughly hyperbolic in shape). This air core connects the two bottles, air rises through the centre without interrupting the water, and draining becomes continuous and faster. Talking about «centrifugal force» is the way of describing it from the point of view of the spinning water (a non-inertial frame). The 9 mm washer limits the flow so the vortex has time to form and can be seen for 15–25 s. Atmospheric tornadoes intensify in a similar way, by concentrating rotation into a narrow column; the direction of spin in the bottle is decided by your hand, not the hemisphere (the Coriolis effect is negligible at this scale).
- vortex: a fluid spinning around an axis, forming a whirlpool.
- fluid: something that can flow and change shape, like water or air.
- centrifugal force: the feeling of being pushed outwards when something spins.
- pressure: how hard a fluid pushes; it is lower in the centre of the whirlpool.
- angular momentum: the «amount of spin»: if something spinning pulls itself in, it spins faster.
By age
- 5–7 years: The adult prepares the washer and the joint; the child fills with the funnel, adds colour and swirls. Key idea: «the air goes up the middle and the water goes down spinning round».
- 8–10 years: They build everything except the hole in the washer. Have them time it with and without a swirl and average 3 tests.
- 11–12 years: Experiment with one variable (hole or amount of water), a table and a graph. Challenge: explain the funnel using conservation of angular momentum.
In a group or in class
Pairs, one tornado per pair (ask each family for 2 identical 1.5 l bottles). Prepare the washers (1 per pair) and the cut tape in advance. Fill the bottles at a station with a washing-up bowl and jugs. 40-minute session: 10 min building, 15 min testing and timing, 15 min sharing results with a table on the board (everyone's times with and without a swirl). Set up tables with trays or do the activity in the playground.
Challenges
- Make the tornado last as long as possible by changing just one thing.
- Make a reusable connector with two bottle caps glued together and a 9 mm hole (with an adult's help).
- Add 2 tablespoons of cooking oil: what happens to the oil inside the whirlpool?
- Make a tornado in a 500 ml bottle and compare which is «faster» per litre of water.