Layered water filter
A 1.5 L bottle cut and turned upside down with layers of cotton wool, sand and stones: when you pour in muddy water, it comes out the bottom much clearer. It is for seeing how water is filtered, not for drinking.
What they will learn
- That a filter separates solid particles from water according to their size: the gaps between the grains are the «net».
- That the order of the layers matters: the coarse ones on top stop the big bits and protect the fine sand, which holds back the small ones.
- To tell the difference between clear water and drinking water: germs and dissolved substances get through this filter.
- To measure and compare: filtering time, volume recovered and clarity using a reading scale.
Prepare beforehand
- Wash the fine sand, the coarse sand and the stones in the sieve under the tap until the water runs almost clear (5 minutes). This is the secret to making it work.
- Make the dirty water in a jar: 250 ml of water + 1 tablespoon of soil; stir for 30 s. Also fill a control glass with the same dirty water (unfiltered) for comparison.
- Print strip A and card B at 100 %.
- Work at the sink or on a tray: water and sand will spill.
- Have a bucket handy to throw away the dirty sand at the end (in the garden or the bin, never down the sink: it blocks it).
Materials and tools
- Plastic bottle — 1
1.5 L water bottle, smooth and clear (Ø ≈ 9 cm), without its cap - Thin fabric — 1 square, 10 × 10 cm
thin cotton, gauze or a piece of tights - Rubber band — 1
to hold the fabric on the neck - Cotton wool — ≈ 5 g (a fist-sized ball or 6 cotton pads)
absorbent - Fine sand — ≈ 300 g (≈ 200 ml)
from the beach, a playground or an aquarium, grains < 1 mm, washed - Coarse sand or fine gravel — ≈ 150 g (≈ 120 ml)
2–4 mm grains, washed - Small stones — ≈ 250 g (≈ 180 ml)
5–15 mm, washed - Garden or potting soil — 1 tablespoon (≈ 15 g)
to make the water dirty; best with some clay in it (makes it very cloudy) - Clear glasses — 3
250 ml: dirty water, filtered water and control sample - Measuring jug — 1
to measure 250 ml - Fine sieve — 1
to wash the sand - Sticky tape — 30 cm
to cover the cut edge of the bottle
Tools
- Craft knife — start the cut in the bottle adult
- Scissors — finish the cut and cut the fabric
- Permanent marker — mark the cutting line and the layer heights
- Spoon — add the sand and stones without bashing the cotton wool
- Stopwatch (mobile phone) — time the filtering
Pieces and templates
- A · Layer height strip ×1 — paper
- B · Turbidity card ×1 — white paper
Step by step
Mark the cut
Take the label off the 1.5 L bottle. With a ruler and marker, draw a line round the bottle 12 cm from the base (make 6 marks at that height and join them up).
1 Take the label off the 1.5 L bottle 2 With the ruler, make 6 marks 12 cm from the base 3 Rest the marker at 12 cm and turn the bottle: the line comes out straight Tip: Rest the marker on a pile of books or a box 12 cm high and turn the bottle against the tip: you get a perfect line.Cut the bottle adult
An adult makes a 2 cm starting cut on the line with the craft knife; then carry on round with scissors. Cover the cut edge of both parts with sticky tape folded over it.
1 The adult starts a 2 cm cut on the line with the craft knife 2 Carry on with scissors along the line, turning the bottle 3 Cover both edges with folded tape: they mustn't prick Check: The edges don't prick when you run your finger along them.Put the fabric on the neck
Take off the cap. Cover the mouth of the neck on the outside with the 10 × 10 cm square of fabric and hold it in place with the rubber band, wrapping it round 2–3 times.
1 Take off the cap and cut a 10 × 10 cm square of fabric 2 Cover the neck with the fabric and hold it with the band (2–3 turns) 3 Pull the fabric gently: it stays taut and doesn't come off Check: The fabric is taut and doesn't come off when you pull gently.Assemble the stand
Turn the top part over (neck down) and tape strip A to the outside, with «NECK» level with the neck and «EDGE» at the cut. Then slot it into the bottom part, which acts as the reservoir: the part of the strip near the neck ends up inside, but you can read it through the plastic.
1 Turn the top part over: the neck points down 2 Tape strip A on, with «NECK» level with the neck 3 Slot it into the base: the neck sits about 4 cm from the bottom Check: The whole thing stands up on its own and the neck sits about 4 cm above the bottom.Cotton wool layer
Put the cotton wool in from the top and push it down with the spoon handle until it fills the neck, up to the 30 mm mark. It should be neither loose nor squashed, like a cushion.
1 Put the cotton wool in from the top of the bottle 2 Push it down with the spoon handle to the 30 mm mark 3 It should be neither loose nor squashed, like a cushion Tip: If the cotton wool is packed too tightly, the water will take ages; if it is loose, the sand will escape.Fine sand layer
Spoon in the washed fine sand, without dropping it from a height, up to the FINE mark (70 mm layer, ≈ 300 g). Tap the bottle gently with your hand to level it.
1 Spoon in the fine sand, without dropping it from a height 2 Fill to the FINE mark and tap gently to level it Coarse sand layer
Add the coarse sand or fine gravel up to the next mark, COARSE (20 mm layer, ≈ 150 g). Level it with the spoon.
1 Spoon in the coarse sand or fine gravel 2 Reach the next mark and level it with the spoon Small stone layer
Spoon the small stones on top, up to the STONES mark (30 mm layer, ≈ 250 g). That leaves about 6 cm free at the top for pouring in the water.
1 Spoon the small stones on top 2 Reach the STONES mark: 6 cm left free at the top 3 Check you can see the 4 separate layers Check: You can see the 4 separate layers through the plastic.Rinse the filter
Slowly pour in 250 ml of clean tap water and wait until it stops dripping. Lift the top part out, throw away the water in the reservoir (it comes out a bit cloudy from the sand dust) and repeat with another 250 ml. Empty the reservoir when you finish.
1 Slowly pour in 250 ml of clean tap water 2 Throw away the reservoir water and repeat with another 250 ml 3 By the end of the rinse the water comes out almost clear Check: The water at the end of the rinse comes out almost clear.Tip: Always empty the reservoir between pourings: with about 250 ml the water already reaches the neck (4 cm from the bottom) and would wet the filter from below.Set up the comparison
Stir the dirty water (250 ml + 1 tablespoon of soil). Fill a glass with 100 ml as the control sample and keep it for comparison.
1 Mix 250 ml of water with 1 tablespoon of soil and stir 2 Fill a glass with 100 ml: this is the control sample Filter
Pour the remaining 150 ml very slowly onto the stones, in a thin stream, and start the stopwatch. Wait until drops stop falling from the neck.
1 Pour the 150 ml in a thin stream and start the stopwatch 2 Wait until drops stop falling from the neck 3 If the water reaches the rim, stop pouring and wait Tip: If the water reaches the rim, stop and wait: don't let it overflow.Compare
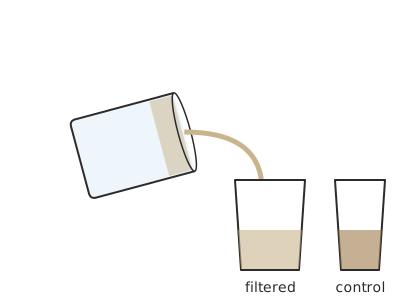
Pour the filtered water into a clear glass identical to the control one, with the same amount (100 ml, about 2.5 cm of water); if there is some left over, leave it in the reservoir. Put each glass on card B and write down which line you can read with each one. Also look at the sediment left on top of the stones.
1 Pour the filtered water into a glass identical to the control 2 Put each glass on card B and write down the line you can read 3 Look at the mud left on top of the stones Check: The filtered water lets you read at least 2 more lines than the control.Filter again
In a clean jar, combine the water from the glass with the water left in the reservoir, empty the reservoir and pour all that water through the filter again. Compare 100 ml again in an identical glass on the card. When you finish, pour the water down the sink and put the sand and stones in a plant pot or the bin.
1 Pour the filtered water through the filter again 2 Compare it with the card again: you can read even more 3 Pour the water down the sink and the sand in a pot: not for drinking
Does it work? The test
Using the turbidity card, compare the control water (unfiltered), the water filtered once and the water filtered twice, in identical glasses with the same depth of water.
What should happen: With the control water you can barely read «WATER 1»; after one filtering you can read up to «water 4» or «water 5»; after two, almost everything. The 150 ml take between 1 and 4 minutes to pass through the filter. If there is a lot of clay, the water stays slightly milky: the particles are so fine that they slip between the grains.
If something goes wrong
- The water comes out dirtier than it went in — Unwashed sand, or the filter wasn't rinsed beforehand. Solution: Wash the sand in the sieve until the water runs clear and run 500 ml of clean water through before the test.
- Sand comes out of the neck — Cotton wool not packed enough or fabric loose. Solution: Add more cotton wool, tighten the fabric with the rubber band and use a more closely woven fabric.
- It takes ages or nothing comes out — Cotton wool packed too tightly, or sand with a lot of clay that clogs it. Solution: Loosen the cotton wool; use coarser sand; don't add more than 1 tablespoon of soil.
- The water comes out very fast and almost as cloudy — Fine sand layer too thin, or channels in the sand. Solution: Make the fine sand up to 70 mm and pour slowly onto the stones so you don't dig holes.
- The filtered water is still light brown — There are dissolved substances or very fine clay particles that the sand doesn't hold back. Solution: That's normal: filter it again or add a 2 cm layer of activated charcoal (capsules from the chemist's) under the fine sand.
- The top part falls into the reservoir — Cut too low or bottle very floppy. Solution: Cut at exactly 12 cm from the base or rest the top part on a wide glass.
Safety
- The filtered water is NOT safe to drink: it contains germs and dissolved substances. Do not drink it or use it for cooking. To make water safe to drink it must be boiled for at least 1 minute or disinfected.
- An adult makes the cut with the craft knife; cover the cut edges with tape.
- Wash your hands with soap after touching the soil and the dirty water.
- Don't pour the sand down the sink: it blocks the pipes.
- Use garden or potting soil, never soil from areas with animal droppings.
The science behind it
For children
Dirty water has tiny bits of soil floating in it. When it falls onto the stones, the big bits stay on top, like when a net catches the big fish. Then it reaches the sand, which has teeny-tiny gaps between its grains, and that's where the smaller bits get trapped. The cotton wool and the fabric are the last net. But watch out! There are little bugs so, so small that you can't see them and they get through all the nets: that's why you don't drink this water.
For the adult
Granular bed filtration retains particles by several mechanisms: straining (particles larger than the pores, which measure roughly 15–20 % of the grain diameter), sedimentation within the pores, interception and adsorption onto the grain surfaces. With ≈ 0.5 mm sand, silts and most of the turbidity are retained, but not colloidal clays (< 2 µm), bacteria (≈ 1 µm), viruses or dissolved substances. The coarse layers on top act as a pre-filter and as a diffuser that stops the stream from scouring the sand; the fine sand is the effective filter; the cotton wool and fabric support the bed. The flow rate follows Darcy's law: Q = K·A·Δh/L; that is why a deeper or finer layer filters better but more slowly. Real water treatment plants combine coagulation-flocculation, settling, sand filtration (with graded gravel as support) and disinfection with chlorine or ozone.
- filter: to separate solids from a liquid by passing it through something with small gaps.
- sediment: solid particles that settle or get trapped.
- turbidity: how «cloudy» water is because of the particles in it.
- drinkable: water that is safe to drink.
- pore: a small gap between grains that water passes through.
By age
- 5–7 years: The adult cuts the bottle and washes the sand. The child puts on the fabric, puts in the cotton wool, spoons in the layers and pours the water. Focus on «the nets catch the dirt» and on the fact that this water is not for drinking.
- 8–10 years: They do everything except the cutting. Have them record times and card results in a table and compare with another team using a different layer order.
- 11–12 years: Experimental design: change a single variable (sand depth, grain size, amount of soil) and measure time and turbidity. Challenge: add activated charcoal and check whether it removes the colour from water with a few drops of tea in it.
In a group or in class
Teams of 3–4 (one filter per team). Beforehand: collect bottles, cut them (adult), wash all the sand and stones in bulk and share them out into glasses labelled for each team. Make one big jug of shared dirty water (2 L + 8 tablespoons of soil) so everyone filters the same thing. 50-minute session: 5 min explanation, 15 min building, 20 min filtering and measuring, 10 min sharing results with all the glasses lined up on their cards. Each team can try a different layer order. Work on trays and with a bucket for the leftovers.
Challenges
- Design the filter that lets you read «water 6» in a single pass.
- Manage to filter 150 ml in less than 60 s without making the clarity worse.
- Add a 2 cm layer of activated charcoal and test it with water coloured with tea: does it remove the colour?
- Build a cascade filter from three bottles and compare it with a single one.
- Find out how drinking water is treated in your town and draw the journey of a drop from the river to your tap.