Bottle diver
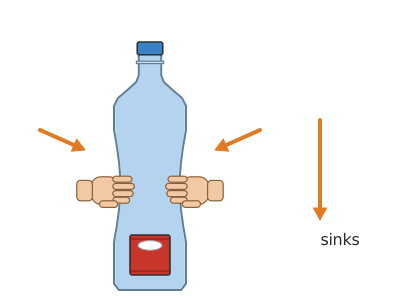
A ketchup sachet (or a folded straw with a paperclip) floats inside a closed bottle full of water: squeeze the bottle with your hands and it sinks, let go and it rises, and with practice it stays still halfway down like a submarine.
What they will learn
- That an object floats or sinks depending on whether it weighs more or less than the water it displaces (Archimedes).
- That air can be compressed and water practically cannot.
- That the pressure you apply with your hands is passed on to all the water in the bottle, including the diver (Pascal).
- How a submarine or a fish changes its buoyancy by taking in or letting out air.
- That adjusting something 'to the limit' (so it only just floats) is the key to making it work.
Prepare beforehand
- Remove the label from the bottle and wash it: the diver needs to be clearly visible.
- Get 3–4 different sachets (cafés, takeaway trays) so you have a choice.
- Print depth scale B at 100 %.
- Do the glass test with a sachet yourself before the session so you know whether a paperclip needs adding.
Materials and tools
- Plastic bottle with cap — 1
mineral water bottle, 1.5 l or 0.5 l, with smooth, soft sides, no label and a cap that closes tightly - Ketchup sachets — 3–4 (to choose the best one)
single-serve, 9–12 g, with no holes; pick one with an air bubble you can feel when you touch it - Tap water — 1.5 l + a glass for testing
at room temperature - Metal paperclips — 4–5
small, 28 mm (≈ 0.5 g each) - Sticky tape — 10 cm
clear, to hold the paperclips on the sachet - Bendy plastic straw — 1 (alternative diver)
Ø 6 mm, plastic (paper ones get soggy) - Modelling clay — a 1–2 g ball
to adjust the weight of the straw diver - Tall clear glass — 1
300 ml or more, for the float test
Tools
- Scissors — cutting the straw and the scale
- Tray or sink — to work over: water spills when you fill the bottle to overflowing
- Jug with a spout — filling the bottle to the brim
Pieces and templates
- A · Straw diver (alternative) ×1 — plastic straw Ø 6 mm
- B · Depth scale ×1 — paper
Step by step
Prepare the bottle
Remove the label from a 1.5 l or 0.5 l water bottle and wash it. Check that the cap closes tightly by turning the bottle upside down over the sink when full of water.
1 Remove the label from the bottle and wash it 2 Fill it, close it and turn it upside down over the sink Check: Not a single drop should leak from the cap.Test the sachets in a glass
Fill a tall glass with water and drop each ketchup sachet into it. Watch how it settles: sunk, floating very high or floating with just one corner out.
1 Drop each sachet into a tall glass of water 2 Choose the sachet with only 1–3 mm above the water Check: The ideal sachet floats with only 1–3 mm showing above the water.Choose or adjust the sachet
If a sachet sinks, discard it. If it floats too much (more than 3 mm showing), stick a paperclip to its bottom edge with a 2 cm piece of sticky tape and test it in the glass again.
1 Stick a paperclip to the bottom edge with 2 cm of tape 2 Test it again: now only 1–3 mm should show Tip: Add paperclips one at a time. If it sinks with one paperclip, remove it and stick on a smaller ball of modelling clay instead (0.2–0.3 g, the size of a lentil) or use a smaller paperclip; don't try to cut the paperclip, you would need pliers.Fill the bottle
Stand the bottle in the sink or on a tray and fill it from the jug to 2 cm below the rim. Let the water settle for 1 minute so the bubbles rise.
1 On a tray, fill it from the jug to 2 cm below the rim 2 Wait 1 minute for the bubbles to rise Put the diver in
Gently roll the sachet up lengthways, like a tube, without squashing the air bubble, and push it in through the mouth of the bottle. Inside, it unrolls by itself and rises.
1 Roll it up lengthways, like a tube, without squashing the bubble 2 Push it in through the mouth of the bottle 3 Inside, it unrolls by itself and rises Tip: If it won't go through the mouth, use a wide-mouthed bottle (from juice or a smoothie) or straw diver A.Top up until it overflows
Finish filling the bottle until the water reaches the very rim and forms a curved droplet on top. That way there is no air left under the cap.
1 Finish filling slowly from the jug 2 Stop when the water forms a curved droplet at the rim Check: The diver floats at the top, touching the surface.Close it tightly
Screw the cap on tightly; a little water may overflow, that is normal. Dry the outside of the bottle so it doesn't slip in your hands.
1 Screw the cap on tightly; a little may overflow 2 If there is a bubble bigger than a chickpea, top up and close Check: If there is an air bubble under the cap bigger than a chickpea, open it, top it up and close it again.Squeeze and let go
Hold the bottle round the middle with both hands and squeeze it hard. The diver should go down to the bottom. Let go slowly: the diver rises again.
1 Squeeze the bottle round the middle with both hands 2 Let go slowly: the diver rises again 3 Look closely: when you squeeze, the bubble shrinks Check: With a 1.5 l bottle, a firm squeeze with both hands is enough; with a 0.5 l bottle, one hand will do.Fine-tuning
If the diver doesn't go down when you squeeze as hard as you can, you need to add a paperclip; if it stays on the bottom when you let go, you need to remove one. To get the sachet out, open the bottle, pour water into the sink until the sachet is 3–4 cm from the mouth and pull it out by pinching it with the straw folded into a V (or with two fingers if the mouth is wide); it will have unrolled inside, so roll it up again to put it back in. Repeat until it goes down with a medium squeeze, and top up until it overflows again before closing.
1 If it won't go down with a hard squeeze, add a clip; if it won't rise, remove it 2 Repeat until it goes down with a medium squeeze Tip: The finer the adjustment (almost sinking at rest), the less force you need and the easier it is to control.Make the straw diver
Cut 100 mm of straw, fold it into a U and join the ends with a paperclip. Stick a 1 g ball of modelling clay under the paperclip and test it in the glass: adjust the clay until 2–3 mm of the fold shows.
1 Cut 100 mm of straw 2 Fold it into a U, join the ends with a paperclip and stick on the clay 3 Adjust the clay until 2–3 mm of the fold shows Check: When you squeeze the bottle you will see water go into the legs of the straw and the bubble get shorter.Stick on the scale and practise
Stick scale B on the outside of the bottle with 0 level with the water under the cap. Try to stop the diver at 10 cm by easing the pressure just as it gets there.
1 Stick on scale B with 0 level with the water 2 Ease off just before 10 to keep it still there Tip: Ease off a little before it reaches the mark: the diver has inertia and, what's more, the deeper it goes, the more it tends to sink.
Does it work? The test
With the bottle closed and the diver adjusted, squeeze it harder and harder and then let go. Then try to keep it still level with the 10 cm mark on scale B for as long as possible.
What should happen: The diver goes down in 1–3 s with a firm squeeze and rises in 1–2 s when you let go. If you look closely, you can see the bubble in the sachet (or straw) shrink as you squeeze. Keeping it still halfway down is tricky: with practice you can manage 3–10 seconds.
If something goes wrong
- However hard I squeeze, the diver won't go down — The diver floats too much (a lot of air or too little weight), or there is air under the cap absorbing the pressure. Solution: Add a paperclip and fill the bottle to the brim before closing it. Check again that only 1–3 mm shows in the glass.
- The diver stays on the bottom even when I'm not squeezing — It is too heavy or the sachet has lost air (it has a hole). Solution: Remove a paperclip. If it still sinks, try another sachet: if the sachet has a hole, it fills with water and can't be fixed.
- The sachet won't go through the mouth of the bottle — The mouth of an ordinary bottle is about 21 mm across on the inside. Solution: Roll it up lengthways without squeezing the bubble, or use a wide-mouthed bottle or straw diver A.
- None of my sachets float — Thick sauces (soy, barbecue) and sachets with no air sink. Solution: Try mustard or ketchup. You can also dissolve 2 tablespoons of salt in the water in the bottle: salty water is denser and pushes up harder.
- It works at first, but after a while it won't go down — The water has warmed up in your hands (the air expands) or some water has escaped. Solution: Open it, top it up to the brim with cold water and close it again.
- The straw diver loses its bubble — The paperclip doesn't close the ends properly or the straw has unfolded and the air escapes. Solution: Fold the straw with a sharp crease and hook the paperclip onto both legs 5 mm from the end.
Safety
- Sauce sachets must not be opened or sucked after the experiment: put them in the recycling bin when you have finished.
- Paperclips, nuts and modelling clay are small parts: keep them out of reach of children under 3.
- Work over the sink or a tray: water spilt on the floor is slippery.
- Don't use glass bottles: they can break when squeezed or dropped.
The science behind it
For children
The diver has a tiny air bubble inside that works like a rubber ring. When you squeeze the bottle, you push the water, and the water pushes the bubble and makes it smaller, because air can be squashed like a sponge. With a smaller rubber ring, the diver can't float any more and it goes down. When you let go, the bubble puffs up again and the diver rises. Submarines do the same thing: they let water or air into tanks to go down or up.
For the adult
A submerged body receives an upthrust equal to the weight of the water it displaces (Archimedes). The diver is adjusted so that its average density is just below 1 g/cm³ thanks to the small pocket of air it contains. When you squeeze the bottle, the water, which is practically incompressible, passes the increase in pressure on to the whole volume (Pascal); in a full PET bottle, a firm squeeze raises the pressure by about 10–30 kPa (0.1–0.3 atm). According to Boyle's law (p·V = constant at a fixed temperature), the air pocket shrinks in the same proportion (by 10–25 %): the diver's total volume falls, the upthrust decreases and its weight, which doesn't change, makes it sink. That is why the adjustment is critical: if the diver floats with a lot in reserve, the reduction in volume you can achieve with your hands isn't enough. Equilibrium halfway down is unstable: as it descends, the hydrostatic pressure increases (1 kPa every 10 cm), the bubble shrinks a little more and the diver becomes heavier still; as it rises, the opposite happens. That is why keeping it still requires constantly correcting the pressure of your hand, just as a real submarine uses its ballast tanks and diving planes.
- buoyancy: something's ability to float; whether it rises or sinks in water.
- upthrust: the upward force that water exerts on whatever is in it.
- compression: making a gas smaller by squeezing it.
- pressure: how much force pushes on each little bit of surface.
- ballast: weight added so that something sinks just the right amount (here, the paperclip).
By age
- 5–7 years: The adult adjusts the diver; the child puts it in, closes the bottle and controls it using a 0.5 l bottle. Talk about 'the rubber-ring bubble' getting smaller.
- 8–10 years: They do the glass test themselves and adjust the paperclips. They compare the sachet and the straw and explain in their own words why it goes down.
- 11–12 years: They link it to Archimedes and Boyle. They count how many paperclips are needed and work out the added mass (≈ 0.5 g each). Challenge: the record for a still diver, and explaining why the equilibrium is unstable.
In a group or in class
Pairs with 1 bottle of 0.5 l, 2 sachets or a straw, 3 paperclips and modelling clay. A shared station with 3–4 test glasses and a jug. Work over trays or in the playground. Duration: 30 min (5 demonstration, 15 adjusting and assembling, 10 still-diver competition with scale B). Have spare sachets: some will have holes.
Challenges
- Get your diver to stay still for more than 10 seconds at the 10 cm mark.
- Make a diver that sinks on its own when you put the bottle in the fridge and rises again when you take it out (think about what happens to air in the cold).
- Put in three divers adjusted differently and make them go down one by one, like a lift.
- Make a submarine-shaped diver from modelling clay around a straw and decorate it with a permanent marker.
- Use salty water in one bottle and fresh water in another with the same diver: in which one is it harder to sink?