Five-liquid column
Five liquids from the kitchen and the first-aid kit (honey, washing-up liquid, coloured water, oil and surgical spirit) stacked in a tall glass in 40 ml layers that do not mix, because each one floats on the denser one below. Then you drop objects in to see which layer they stop at.
What they will learn
- That density is the mass that fits in a volume (g/cm³), and that a less dense liquid floats on a denser one.
- To predict the order of the layers from a table of densities and to check it by weighing 40 ml of each liquid.
- The difference between miscible liquids (water, honey, washing-up liquid, alcohol: they end up mixing) and immiscible ones (oil and water never mix).
- That a solid object stops just above the first layer that is denser than it.
- To pour with control (spoon, side of the glass) so the layers do not mix: a real laboratory technique.
Prepare beforehand
- Print the layer ruler (A) and the labels (B) at 100%; check that the ruler measures 120 mm from 0 to 12.
- Measure 40 ml of each liquid into labelled cups (8 teaspoons of 5 ml or 4 syringes of 10 ml). Having everything measured avoids rushing when you pour.
- Colour the water and the alcohol in their cups before you start: 3–4 drops of colouring, stir and leave to stand for 1 minute.
- If the honey has crystallised, warm it in a bain-marie and let it cool down: hot honey goes straight through the layers.
- Put the glass on a tray, on a steady table, in front of a window or a white background so you can see the colours clearly.
- Keep the alcohol out of children's reach until it is needed; there must be no candles or flames lit nearby.
Materials and tools
- Tall clear glass — 1
plain, inside Ø 50–65 mm and 130–150 mm high (a 300–350 ml highball glass); the narrower it is, the thicker the layers look - Honey — 40 ml (≈ 56 g, about 3 tablespoons)
runny, not crystallised; if it is hard, warm the jar in a bain-marie for 5 min and let it cool down - Washing-up liquid — 40 ml
concentrated and coloured (green or blue); do not shake the bottle, so it has no bubbles - Tap water — 40 ml
at room temperature - Food colouring — 3–4 drops (water) + 2–3 drops (alcohol)
liquid; choose colours different from the washing-up liquid (e.g. blue for the water and red for the alcohol) - Sunflower oil — 40 ml
light-coloured (olive oil also works but is darker) - Surgical spirit (pharmacy alcohol) — 40 ml
96% ethanol (0.80 g/cm³) or 70% (≈ 0.88 g/cm³): both are less dense than the oil - Small cups for measuring and colouring — 5
yoghurt pots or shot glasses, one per liquid, labelled - Kitchen roll — 4–5 sheets
to wipe the side of the glass and to soak up the oil at the end - Objects to test — 4–5
bottle cork, 1 cm piece of candle, a grape, a steel nut or washer
Tools
- Dessert spoon (≈ 5 ml) — measuring in teaspoonfuls and pouring over its back
- 10 ml needle-free syringe (from children's medicine) — measuring the 40 ml and pouring the water and alcohol very gently (optional, but a big help)
- Small funnel or straw — getting the honey to the bottom without smearing the side
- Kitchen scales (optional) — weighing 40 ml of each liquid and working out its density
Pieces and templates
- A · Layer ruler ×1 — paper (or thin card)
- B · Layer labels ×1 — paper
Step by step
Prepare the glass and the ruler
Stick ruler A to the outside of the glass with clear tape, with the 0 level with the inside bottom. Cut out the 5 labels B and leave them face down to one side, without sticking them on: that way they do not give away the order before the prediction. You will stick them on at the end.
1 Cut out ruler A and the sheet of labels B 2 Stick A on the outside with the 0 level with the inside bottom 3 Keep labels B face down; the glass clean and dry inside Check: The glass is clean and dry inside: a drop of water on the side would make the honey stick.Measure the five liquids
Measure 40 ml of each liquid into its cup (8 teaspoons of 5 ml or 4 syringes of 10 ml). Colour the water blue with 3–4 drops of colouring and the alcohol red with 2–3 drops.
1 Measure 40 ml of each liquid: 4 syringes or 8 teaspoons 2 Colour the water blue and the alcohol red (an adult measures this one) 3 Five labelled cups, 40 ml in each, away from the edge Tip: An adult measures the alcohol, and the cup stays well away from the edge of the table.Predict the order
Before pouring, ask each child to put the 5 cups in order from “heaviest” to “lightest” by lifting them in their hand or weighing them (40 ml of honey ≈ 56 g; of oil ≈ 37 g). Write down the prediction.
1 Weigh or feel 40 ml of each liquid: which is heaviest? 2 Put them in order from heaviest to lightest and write down your prediction Check: If you weigh them: honey > washing-up liquid > water > oil > alcohol, in that order.Pour the honey into the bottom
Pour the 40 ml of honey into the centre of the glass without touching the sides (use a funnel or let the thread of honey fall from 2–3 cm). Wait 1 minute for the surface to level out.
1 Pour the honey into the centre, with a funnel, without touching the sides 2 Wait 1 minute: the honey reaches 14 mm and settles flat Check: The honey reaches the 14 mm mark on the ruler. If it has smeared the side, clean it with kitchen roll wrapped round a stick.Add the washing-up liquid
Tilt the glass slightly and pour the 40 ml of washing-up liquid slowly, letting it run down the side. It is thick: it falls slowly and spreads over the honey on its own. Stand the glass upright and wait 1 minute for the bubbles to come out.
1 Tilt the glass and let the washing-up liquid run down the side 2 Stand the glass upright and wait 1 minute: two clean layers, at 28 mm Check: You can see two clean layers and the surface reaches ≈ 28 mm.Position the spoon
Put the spoon in with its back (the curved side) facing up and rest its tip against the side of the glass, 5–10 mm above the surface of the washing-up liquid. Hold the glass with your other hand.
1 Hold the spoon with the curved side (the back) facing up 2 Rest the tip against the side, 5–10 mm above the soap; hold the glass Tip: If your hand shakes, rest your elbow on the table.Pour the water very slowly
Pour the coloured water onto the back of the spoon at a rate of 1 teaspoon (5 ml) every 3–4 seconds, so that it runs down the side and spreads out in a thin sheet. Raise the spoon as the level rises. It takes about 30 seconds.
1 Pour the water onto the back: 1 teaspoon every 3–4 seconds 2 Raise the spoon as the level rises 3 The green-blue line is sharp (a 2–3 mm band is normal) Check: The line between the green and the blue is sharp. A cloudy band of 2–3 mm is normal; if it is more than 5 mm, you poured too quickly.Tip: It is even easier with the syringe: nozzle against the side and push the plunger little by little.Add the oil
Pour the 40 ml of oil over the back of the spoon as well. Here you can go a bit faster (5 ml every 2 s): oil does not mix with water and stays floating on top even if it gets stirred up a little.
1 Pour the oil over the spoon, a bit faster: 5 ml every 2 s 2 The oil floats on the water: the surface reaches 56 mm Check: The surface reaches ≈ 56 mm on the ruler.Top it off with the alcohol adult
The adult pours the 40 ml of coloured alcohol over the spoon, very slowly and close to the side, like the water. The alcohol must always stay on top of the oil: if it goes through it and touches the water, it mixes with it.
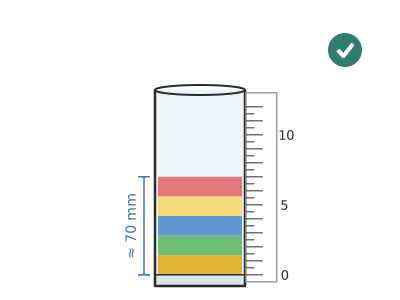
1 The adult pours the alcohol very slowly over the spoon 2 Five layers: the tower is about 70 mm high 3 Not like this: if the alcohol goes through the oil, it mixes with the water Check: You can see 5 layers and the tower is about 70 mm high. If a drop of alcohol sinks into the oil, wait: it usually rises again. But if it touches the water, it mixes with it and does not come back up.Observe and measure
Wait 1 minute without touching the glass. Measure the thickness of each layer with ruler A and compare: they should all be ≈ 14 mm because they have the same volume. Turn labels B over, compare them with your prediction and tape each one next to its layer, on the opposite side from the ruler.
1 Wait 1 minute without touching the glass 2 Measure the thickness of each layer with the ruler: ≈ 14 mm 3 Stick each label B next to its layer, on the other side from the ruler Drop the objects in
Drop in, one at a time and from 1 cm above the surface, a cork, a 1 cm piece of candle, a grape and a nut. Before letting go of each one, ask: which layer will it stop at? Wait up to 2 minutes: the honey slows things down a lot.
1 Ask where it will stop and let go 1 cm above the surface 2 Wait up to 2 min: cork at the top, candle, grape on the honey, nut at the bottom Check: Cork right at the top, candle between alcohol and oil, grape on the honey, nut at the bottom.Tidy up and clean adult
When you have finished, soak up the oil and alcohol layer with 4–5 sheets of kitchen roll and put them in the bin. The rest (honey, soap and water) can go down the sink with plenty of water. Wash the glass with hot water.
1 The adult soaks up the oil and alcohol layer with kitchen roll 2 Paper in the bin; honey, soap and water down the sink with plenty of water
Does it work? The test
With the tower freshly made, look at the glass from the side at eye level and use ruler A to measure where each dividing line is.
What should happen: Five layers in the order honey – washing-up liquid – water – oil – alcohol, each ≈ 14 mm (± 3 mm). The water/washing-up liquid line is the most blurred; the water/oil and oil/alcohol lines are completely sharp. The tower holds well for 2–3 hours; by the next day the honey, washing-up liquid and water start to blur together.
If something goes wrong
- The water mixes with the washing-up liquid, leaving a cloudy, foamy band — It was poured too quickly or from too high: the stream goes through the soap layer, which dissolves in water. Solution: Pour more slowly, with the tip of the spoon touching the side and 5–10 mm above the layer, or use a syringe. If the cloudy band is more than 5 mm, start again.
- The honey sticks to the side and leaves streaks — The honey touched the side as it was poured. Solution: Pour it into the centre or through a funnel. Clean the side with kitchen roll wrapped round a stick before carrying on.
- The alcohol disappears and the water layer gets bigger — The alcohol went through the oil and mixed with the water (they are miscible). Solution: Pour it very slowly and close to the side. A thicker layer of oil (50–60 ml) acts as a cushion.
- The honey goes through the washing-up liquid or mixes with it — The honey was still hot, or the washing-up liquid went in before the honey. Solution: Honey always first and at room temperature. Keep to the order from most to least dense.
- You cannot tell the washing-up liquid layer from the water layer — They are the same colour or the washing-up liquid is colourless. Solution: Colour the water a contrasting colour (red or blue if the soap is green).
- The nut sits still on top of the honey — Honey is very viscous: the nut does sink, but very slowly. Solution: Wait 2–5 minutes or use a heavier nut (M8 or bigger). It is a good chance to talk about viscosity, which is not the same as density.
Safety
- Surgical spirit is flammable: only an adult handles it, with no candles, hobs or lighters lit nearby, and it is put away closed when you finish.
- Nothing in the tower is to be drunk: washing-up liquid and alcohol are toxic. Put up a “DO NOT DRINK” sign if there are young children nearby.
- If washing-up liquid or alcohol splashes into the eyes, rinse with plenty of water for 10 minutes.
- Hot honey burns: if you warm it in a bain-marie, let it cool before a child touches it.
- Grapes, nuts and corks are small parts: keep an eye on children under 3.
- Used oil does not go down the sink: soak it up with paper and put it in the bin, or take it to the oil recycling bin if you use a lot.
The science behind it
For children
All liquids look like water, but some are more “squashed together” than others: in the same spoonful, honey has much more stuff inside it than oil, so it weighs more. When we put them together, the heavier ones go to the bottom and the lighter ones stay at the top, like on the bus when the bigger children sit at the back and the little ones at the front. Oil and water are also like two children who have fallen out: even if you put them together, they never mix. That is why the tower stays in layers.
For the adult
Density ρ = m/V measures how much mass takes up a given volume. In a container at rest, a less dense fluid settles on top of a denser one because this lowers the system's centre of mass (minimum potential energy). Here: honey ≈ 1.42 g/cm³ (≈ 80 % dissolved sugars), washing-up liquid ≈ 1.03–1.05, water 1.00, oil ≈ 0.92 and 96 % alcohol ≈ 0.80 (pure ethanol, 0.79; 70 % alcohol ≈ 0.88). There are two kinds of interface: oil/water and oil/alcohol are immiscible (non-polar molecules versus polar ones linked by hydrogen bonds), so the boundary is sharp and comes back even after shaking. Honey, washing-up liquid, water and ethanol, on the other hand, are miscible: their separation is only temporary and holds because diffusion is slow and the high viscosity of the honey and the soap slows down mixing; that is why you must pour without turbulence (a sheet running down the side) and why the layers blur by the next day. The alcohol must never touch the water: it would mix and, what's more, a water-ethanol mixture has an intermediate density. A solid sinks as long as ρ(object) > ρ(liquid) and stops at the interface where this is no longer true (Archimedes' principle); viscosity only changes how fast it gets there.
- density: how much mass there is in a volume; measured in grams per cubic centimetre (g/cm³).
- miscible: able to mix with another liquid until they become one (water and alcohol).
- immiscible: does not mix even if you stir it (water and oil).
- viscosity: how thick a liquid is, how hard it finds it to flow (honey is very viscous).
- float: to stay on top of a liquid because you are less dense than it.
By age
- 5–7 years: The adult measures the liquids and pours the water and the alcohol; the child pours the honey, washing-up liquid and oil, puts on the labels and drops in the objects. Focus on “heavy at the bottom, light at the top” and on guessing where each object will stop.
- 8–10 years: They build the whole tower except the alcohol. They weigh 40 ml of each liquid, put them in order from heaviest to lightest before pouring and measure the thickness of each layer with the ruler.
- 11–12 years: They work out the density of each liquid (mass ÷ volume), draw a bar chart and predict where objects will end up by measuring their mass and their volume by water displacement in a syringe. Challenge: add a sixth layer (salt water or milk) in the right place.
In a group or in class
Teams of 3–4 children, one tower per team (a glass, 5 labelled cups, spoon and syringe). Prepare the measured liquids in cups beforehand (for 6 teams: 250 ml of honey, 250 ml of washing-up liquid, 250 ml of oil) and keep the alcohol only on the teacher's table; the teacher goes round pouring it team by team. 45-minute session: 10 min of prediction (weighing and ordering), 20 min building, 10 min with objects and 5 min tidying up with kitchen roll. Put trays or newspaper under each glass.
Challenges
- Build a 7-layer tower by adding salt water (between water and washing-up liquid) and whole milk (≈ 1.03).
- Get a raw egg to float halfway up a glass using only water and salt in two layers.
- Make the tower in a narrow tube (a measuring cylinder or an effervescent tablet tube) and work out how many ml you need for 20 mm layers.
- Make a “submarine” from a blob of modelling clay and a small piece of cork that stays right in the water layer.