Tabletop chain reaction
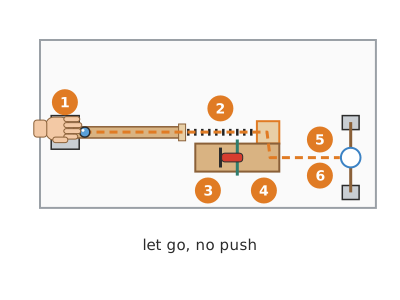
A 6-stage chain reaction on a table: a marble rolls down a ramp and knocks over a row of dominoes, the last one falls onto a seesaw that tips and releases a toy car, the car hits a hanging cup and the keys inside it ring like a bell. About 3–5 seconds of energy passing from one object to the next to do a single thing.
What they will learn
- That energy passes from one object to another (potential → motion → sound) and that a little is lost at every step, which is why each stage must start lower than the previous one or get a big enough push.
- How a lever works: a small weight far from the pivot can move a bigger one close to it (moment = weight × distance).
- That a complex system is built and debugged stage by stage, starting from the end, and that reliability is measured by repeating (3 out of 3).
- To measure and record: distances between dominoes, ramp angles, times for the whole chain.
Prepare beforehand
- Clear a sturdy table of at least 120 × 60 cm, away from where people walk (any knock to the table sets off the dominoes).
- Print the templates at 100 % and check the red 50 mm line in the header of each sheet. Pieces A and C are longer than 27 cm: draw them on the cardboard with a ruler.
- Test the car: put it on a folder tilted at 10° (one end on a 3 cm book, 20 cm of folder) and check that it rolls down on its own.
- Roll the modelling clay into 1 cm balls (≈ 1 g each) for tuning the seesaw.
- If you are working with several children, share out the stages: each one builds and tests theirs before joining them up.
Materials and tools
- Corrugated cardboard — 2 sheets of 50 × 40 cm
single-wall, 3–4 mm (shipping box) - Marbles — 2 (1 spare)
glass, Ø 16 mm (≈ 5 g); a Ø 25 mm one is even better if you have it - Dominoes — 10–15
from a standard set, ≈ 48 × 24 × 7 mm (≈ 8 g) - Toy car — 1
Hot Wheels or Matchbox type, ≈ 75 × 30 mm, wheels that spin freely - Plastic cup — 1–2
disposable or reusable, 200 ml (≈ 9 cm tall) - Keys or a jingle bell — 1 small bunch (2–3 keys) or 1 jingle bell
so the cup rings like a bell - Strong thread — 40 cm
thin string or kite line - Books — 6–8
to make one 20 cm stack and two 18 cm stacks (cup bridge) - Wooden skewer or ruler — 1, 30 cm long
crossbar of the bridge the cup hangs from - Modelling clay — ≈ 20 g
for the seesaw counterweights and to hold the ramp block in place - Sticky tape — 1 roll
masking tape (comes off without damaging books or the table) - PVA glue or hot glue — a little
to close the fulcrum prism and glue on the stop and the plate
Tools
- Craft knife, metal ruler and cutting mat — cutting channels and cardboard pieces adult
- Empty ballpoint pen — scoring folds
- Scissors — cutting out templates and small pieces
- Tape measure — placing each stage in its spot on the layout
- Mobile phone — timing and filming in slow motion
Pieces and templates
- A · Ramp channel 1 ×1 — 3 mm corrugated cardboard
- B · Ramp exit block (25 mm) ×1 — 3 mm corrugated cardboard
- C · Seesaw track (lever) ×1 — 3 mm corrugated cardboard
- D · Car stop ×1 — 3 mm corrugated cardboard
- E · Fulcrum (triangular prism) ×1 — 3 mm corrugated cardboard
- F · Domino impact plate ×1 — 3 mm corrugated cardboard
- G · Cardboard dominoes (if you have no dominoes) ×24 — 3 mm corrugated cardboard
- H · Block for end S (20 mm) ×5 — 4 mm corrugated cardboard
- I · Domino spacing ruler ×1 — paper or card
Step by step
Choose the final action and plan
The final action will be “ringing the bell”: a hanging cup with keys inside. Copy the table layout onto an A4 sheet (see diagram) and mark the position of each stage on the table with masking tape.
1 Copy the table layout onto an A4 sheet 2 Mark each stage's spot on the table with numbered tape Tip: Write the stage number on each piece of tape: 1 ramp, 2 dominoes, 3 seesaw, 4 car, 5 cup, 6 bell.Build the bell (stages 5 and 6)
Make two 18 cm stacks of books 25 cm apart and lay the skewer or ruler across the top as a bridge. Tie 2–3 keys to a 3 cm piece of thread and tape its other end inside the bottom of the cup, so that they hang freely and hit the sides. Tie the long thread to the bottom on the outside and hang the cup upside down from the bridge, with the rim 15 mm above the table.
1 Make two 18 cm stacks 25 cm apart and lay the skewer on top 2 Hang the keys from a short thread taped inside the bottom; the cup's thread goes outside 3 Push the car from 20 cm: the cup moves and the keys jingle Check: Push the car by hand towards the cup from 20 cm away: the cup should swing and the keys should jingle. Repeat 3 times.Build the seesaw track adult
Cut out piece C (100 × 300 mm), score the folds at 20 and 80 mm and fold it into a U. Glue stop D on the 210 mm line and plate F on the outer face of one wall, at end X.
1 Cut out C (100 × 300 mm) and score folds at 20 and 80 mm 2 Fold the 20 mm walls up: a U-shaped channel 3 Glue stop D 210 mm from X and plate F outside, at end X Check: The car fits in the channel and rolls along the base without its wheels rubbing the walls.Make the fulcrum and the block
Fold piece E into a triangular prism with 35 mm sides and close it with its tab. Glue the five H layers together to make a block 20 mm tall.
1 Score the three folds of E every 35 mm with an empty pen 2 Close the prism with the tab: 30 mm tall up to the edge 3 Glue the five layers of H: a block 20 mm tall Check: With the prism resting on one face, it measures 30 mm up to the edge.Set up the seesaw
Put the fulcrum on its mark, at right angles to the car's direction. Rest the track with its 150 mm line on the edge and join them with a 5 cm strip of tape that acts as a hinge. Put block H under end S. End X should be 25–30 cm from the cup, pointing at it.
1 Rest the middle of the track on the edge and tape them together 2 Put block H under S: X rises to 40 mm and points at the cup Check: With end S on the block, end X sits about 40 mm above the table.Tune the balance (the tricky stage) adult
Place the car on the track resting against stop D. Stick 1 g balls of modelling clay under end S until the track stays still on the block, but when you drop a domino onto plate F from 5 cm it tips and the car rolls off.
1 Car against stop D and 1 g balls of modelling clay under S 2 Drop a domino onto F from 5 cm: X goes down and the car rolls off 3 If it goes off on its own, add 1 g; if the domino can't, remove 1 g Check: 3 out of 3: three times in a row it stays still, and three times in a row a domino triggers it.Tip: If it goes off on its own, add 1 g at S. If the domino doesn't move it, remove 1 g. You usually need between 2 and 5 g.Test seesaw + car + bell
With everything in place, drop a domino onto plate F. The seesaw tips, the car rolls down, travels 25–30 cm across the table and hits the cup. Correct the aim by turning the track slightly.
1 Drop a domino on F: the car rolls down and hits the cup 2 Turn the track slightly to aim; the tape guides the car Check: The keys jingle 3 times out of 3. If the car veers off, put two strips of tape on the table as “crash barriers”.Set up the dominoes
Lay ruler I on the table, parallel to the track (in the lane next to it) and pointing at plate F. Stand 10 dominoes, one on each line, with the last one 20 mm from the edge of the plate. Remove the ruler by sliding it out slowly.
1 Lay ruler I beside the track and a domino on each line 2 Leave out domino 5 and slide the ruler away 3 Push domino 1: they all fall and the last lands on plate F Check: Push domino 1 with a finger: they all fall and the last one lands on plate F and triggers the seesaw.Tip: Leave a “safety gap” by leaving out domino 5 while you place the rest, and put it in at the end: that way an accidental knock won't set everything off.Build the marble ramp adult
Cut out piece A (90 × 400 mm), score the folds at 25 and 65 mm and fold it into a U. Fold block B into a 25 × 25 mm tube and close it with tape.
1 Cut out A (90 × 400 mm) and score the folds at 25 and 65 mm 2 Fold it into a U: 40 mm base and 25 mm walls 3 Fold block B into a 25 × 25 mm tube and close it with tape Check: The marble rolls all the way along the channel without falling out.Set up the ramp
Make a 20 cm stack of books. Rest the TOP end of the channel on it and the EXIT on block B, lined up with the row of dominoes and 5 mm from the first domino. Fix both supports with tape.
1 Rest the ramp on 20 cm of books and the exit on block B 2 The marble hits the upper half of the domino and knocks it over Check: Let go of the marble: it should hit the upper half of the first domino and knock it forwards (test with that domino alone, without the rest).Test the whole chain
Set everything up, check that domino 5 is in place and let go of the marble at the top without pushing it. Watch each stage and note down which one fails if something doesn't work.
1 Put in domino 5, which you left out 2 Let go of the marble at the top without pushing and watch each stage 3 It has to work 3 times in a row; if it fails, test that link Check: The whole chain works 3 times in a row. If it fails, test just the link that failed.Fix in place and film
Once it works 3 out of 3, mark the exact position of each piece on the table with tape so you can set it up again in 2 minutes. Film it from the side with a mobile phone, in slow motion if possible, and time it from when you let go of the marble until the keys jingle.
1 Mark the exact position of each piece on the table with tape 2 Film it from the side and time it from marble to keys
Does it work? The test
Set up the chain 5 times and let go of the marble each time. Time it from when you let go until the keys jingle, and note at which stage each failed attempt broke down.
What should happen: The whole chain lasts about 3–5 s and works at least 4 times out of 5. The stage that fails most often is usually the seesaw (it needs the modelling clay readjusting by 1 g) or the first domino (the marble arrives at an angle).
If something goes wrong
- The marble doesn't knock over the first domino (it pushes it or misses it) — It hits too low or arrives from the side. Solution: Make sure the exit is on the 25 mm block B and 5 mm from the domino, lined up; use a bigger marble if you have one.
- The row of dominoes stops halfway — Dominoes too far apart or one is crooked. Solution: Use ruler I (25 mm); on curves, turn each domino only a few degrees relative to the one before.
- The seesaw goes off on its own — Not enough weight at end S, or the table is shaking. Solution: Add 1 g of modelling clay at S and don't touch the table while setting up the rest.
- The domino lands on the plate but the seesaw doesn't move — Too much counterweight at S, or the domino lands on the edge of the plate. Solution: Remove 1 g of modelling clay; move the last domino to 15–20 mm from the plate so it lands in the centre.
- The car doesn't leave or stops on the track — The wheels rub the walls or the slope is too shallow. Solution: Check that the base measures 60 mm; raise the fulcrum with a 5 mm piece of cardboard underneath for a steeper slope after triggering.
- The car doesn't reach the cup or misses it — Uneven table or the track is badly aimed. Solution: Move the cup closer (20 cm) and put tape crash barriers or two rulers on the table.
- The cup moves but doesn't ring — The keys don't hang freely (they are stuck to the cup or their thread is too short) or the hit is too weak. Solution: Hang them from a 3 cm thread taped to the bottom so they hit the sides; lower the cup so the car hits its rim.
Safety
- Only an adult uses the craft knife, with a metal ruler and a cutting mat.
- Marbles and small dominoes: choking hazard for children under 3; pick them all up when you finish.
- Stable stacks of books (no more than 25 cm) and away from the edge of the table so they don't fall on anyone's feet.
- Don't step on loose marbles: pick them up off the floor straight away to avoid slipping.
The science behind it
For children
When you put the marble at the top of the ramp, you give it stored energy, like a squashed spring. When you let go, that energy turns into movement and passes to the dominoes, which push each other like a row of children falling over. The last one presses on the seesaw, which is like a two-seater see-saw in the playground: one side goes down and the other goes up, and the car, which was waiting, rolls downhill. In the end the energy reaches the cup and the keys turn it into sound. A tiny bit is lost at every step, which is why each stage starts a little lower down.
For the adult
Each stage is an energy conversion with a “trigger” that releases stored energy. The marble (5 g) at 20 cm has Ep = m·g·h ≈ 0.01 J; as it rolls, 5/7 of that energy becomes translation (v ≈ 1.7 m/s). The dominoes amplify: each one releases its own potential energy as it falls (centre of mass from 24 mm to ~4 mm), so the wave propagates with almost constant energy even if the initial push is small; the optimum spacing is between 0.5 and 0.7 times the domino's height. The seesaw is a first-class lever in near-neutral equilibrium: the condition for staying at rest is Σ(m·d) at S > Σ(m·d) at X, and an extra moment of ~1,000 g·mm (an 8 g domino 12 cm from the pivot) plus the impulse of the impact is enough to reverse it. When it tips, the car is left on a slope of ≈ 11° (30 mm of fulcrum over a 150 mm arm) and drops about 4 cm, reaching ≈ 0.9 m/s; its weight, as it moves towards X, reinforces the tipping (a bistable system). The cup works as a pendulum: the car's kinetic energy is transferred to the cup and the keys dissipate it as sound. A graph of height per stage shows that, without an external input, each stage must start from lower potential energy than the previous one, unless it releases stored energy of its own (dominoes, loaded seesaw).
- chain reaction: a series of events in which each one causes the next.
- potential energy: energy stored by being high up (or by being in unstable balance, like a standing domino).
- kinetic energy: the energy an object has because it is moving.
- lever: a bar that turns on a support point (fulcrum) and lets you move weights.
- fulcrum: the support point a lever turns on.
- trigger: a small push that releases energy that was stored.
By age
- 5–7 years: The adult builds the seesaw and the ramp; the children place the dominoes with the ruler, hang the cup and release the marble. Cut it down to 4 stages: ramp, dominoes, car pushed by the last domino, cup.
- 8–10 years: They build all the pieces with help on the craft knife and tune the seesaw themselves with modelling clay, noting how many grams they used. Work in pairs, one stage per pair.
- 11–12 years: Have them design and add 2 stages of their own (pulley with thread, second marble, LED), calculate the reliability and document the machine with a scale drawing.
In a group or in class
One machine per class, split into 6 teams, one per stage, each with its own test station on a table. Beforehand: print and pre-cut the pieces, prepare 2 domino sets, 2 cars and books. Session 1 (60 min): each team builds and tests its stage on its own (3 out of 3). Session 2 (60 min): join the stages from back to front on a long table, testing each link. Finale: film the whole chain with the entire class in silence.
Challenges
- Make the chain do a U-turn with dominoes on a curve.
- Add a stage with a pulley: a cup that drops with a marble inside raises a cardboard flag.
- Get the machine to work 10 times out of 10.
- Make the final action useful: pouring cereal into a bowl or flipping round a “GOOD MORNING” sign.
- Double the chain: have the marble set off two branches that finish at the same time.