Castle drawbridge
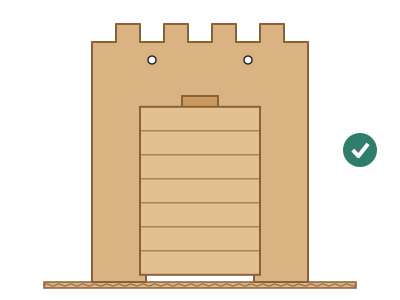
An 18 × 10 × 21.5 cm cardboard castle with a 14 cm drawbridge that pivots on a straw-and-skewer hinge: pull a string that runs through two guides at the top of the wall and the bridge rises until it covers the gate; let go and it comes down on its own.
What they will learn
- That the bridge is a lever: it turns around the hinge, and the string pulls from the tip, the furthest point, so you need less force.
- That a raised guide changes the direction of the force (like a fixed pulley): you pull backwards and the bridge goes up.
- Why the guide has to be higher than the length of the bridge for it to close fully.
- How a real hinge is made, with an axle turning inside bearings (the straws).
Prepare beforehand
- Wall A measures 380 × 215 mm and does not fit on an A4 sheet: print it on two sheets and join them with tape, or draw it directly with a ruler following the dimensions.
- Pre-cut the gate and battlements with a craft knife if the children are under 9.
- Check that the skewer turns freely inside the straw.
- Cut the strings: 2 lengths of 40 cm.
- If you use PVA glue, have clothes pegs ready to hold things while it dries.
Materials and tools
- Corrugated cardboard — 2 sheets: 40 × 22 cm (wall) and 30 × 26 cm (base) + offcuts
single-wall, 3–4 mm (a large flattened shipping box) - Straight straws — 2
Ø 6 mm (hinge and guides) - Wooden skewer — 1
Ø 3 mm, straight, cut to 160 mm - Thin string — 1 m
kitchen string, cotton or twine, 1–2 mm - Pull handle — 1
bottle cap or key ring, to tie the strings to at the back - Sticky tape — 1 roll
masking tape or packing tape - PVA glue or hot glue sticks — 1 bottle / 2 sticks
for the wall, the base and the straws - Felt-tip pens or poster paints — as you like
stones, bridge planks, blue moat - Toilet roll tubes (optional) — 2
as decorative towers at the sides of the wall
Tools
- Craft knife, metal ruler and cutting mat — cutting the wall, the gate and the battlements adult
- Scissors — cutting straws, bridge and string
- Awl or sharp pencil — guide holes (6 mm) and bridge corner holes (3 mm) adult
- Empty ballpoint pen — scoring the wall folds
- Hot glue gun (optional) — gluing the hinge and the wall to the base more quickly adult
Pieces and templates
- A · U-shaped wall ×1 — corrugated cardboard 3–4 mm
- B · Bridge ×1 — corrugated cardboard 3–4 mm
- C · Base with moat ×1 — corrugated cardboard 3–4 mm
- D · Hinge straws ×3 — straw Ø 6 mm
- E · Hinge axle ×1 — wooden skewer Ø 3 mm
- F · String guides ×2 — straw Ø 6 mm
- G · Stop block ×5 — corrugated cardboard 3–4 mm
Step by step
Cut out the wall adult
Draw wall A (380 × 215 mm with 20 × 15 mm battlements) on the cardboard with the flutes running vertically. Cut the outline, the 90 × 130 mm gate and the V-notch on the left edge.
1 Draw wall A, 380 × 215 mm, with the flutes running vertically 2 The adult cuts the outline and gate with a craft knife and metal ruler 3 90 mm gate centred and V-notch on the left edge Check: The gate is centred on the centre panel and is 90 mm wide.Pierce the guides adult
Pierce the two guide holes, 185 mm above the bottom edge and 40 mm either side of the centre of the gate, widening them with a pencil until a straw fits (6 mm). Push a 12 mm length of straw into each one and glue it with a drop of glue.
1 Mark the two guides 185 mm from the base and 40 mm from the centre 2 The adult pierces from the outside and twists to widen to 6 mm 3 Push in a 12 mm length of straw F and glue it with a drop Check: A string passes through each guide without catching.Fold the wall into a U
Score the two folds (100 mm from each end) with the empty ballpoint pen and the ruler. Fold both sides backwards to 90°: the wall forms a U with the gate at the front.
1 Score the folds 100 mm from each end with pen and ruler 2 Fold both sides backwards (view from above) 3 You get a U at 90° with the gate at the front Glue the wall to the base adult
Glue the U onto base C following the marked outline, with the front wall on the line 120 mm from the back edge. Use glue or hot glue and reinforce the inside with tape.
1 The adult applies hot glue on the U marked on base C 2 Stand the U on the lines and press until it holds 3 Check with a set square that the wall is upright Check: The wall stands upright: check it with a set square or a book.Prepare the bridge adult
Cut out bridge B (100 × 140 mm) with the flutes running lengthwise. Draw the planks. An adult uses the awl to pierce the two 3 mm holes, 10 mm from the tip and 10 mm from each side.
1 Cut out bridge B, 100 × 140 mm, with the flutes running lengthwise 2 Draw the planks every 20 mm 3 Pierce two 3 mm holes 10 mm from the tip and the sides Glue on the bridge knuckle adult
Cut a 96 mm length of straw (D) and glue it with glue or hot glue along the hinge edge of the bridge, on the underside, right at the edge.
1 Cut a 96 mm length of straw D 2 The adult applies hot glue along the hinge edge 3 The straw is glued underneath, right at the edge Assemble the hinge adult
Push the 160 mm skewer (E) through the bridge straw. Thread a 20 mm length of straw (D) onto each end. Place the bridge in front of the gate, resting on the base, and glue the two short straw lengths to the wall, on either side of the bridge, right against the base.
1 Push the skewer through and thread a 20 mm length onto each end 2 Glue the short lengths to the wall, at the sides, next to the base 3 Lift it with your finger: it turns freely from flat to upright Check: Lift the bridge with your finger: it turns freely from flat to upright without rubbing the wall.Glue on the stop block
Glue 5 cardboard rectangles of 30 × 20 mm on top of each other (15 mm thick) and glue block G to the wall, centred above the gate, 135 mm from the base. This way the bridge stops at about 84° and lowers again by itself.
1 Glue 5 rectangles of 30 × 20 mm on top of each other 2 Glue it centred above the gate, 135 mm from the base 3 The bridge stops at the block, short of upright Tie the strings
Pass a 40 cm string through each hole at the tip of the bridge and tie a double knot underneath. Take each string upwards and thread it through its guide, from outside to inside the castle.
1 Pass a string through each hole and tie a double knot underneath 2 Take each string up and through its guide, from outside to inside 3 The two strings run straight up and parallel Check: The two strings run straight up and parallel, without crossing.Tie the strings to the handle
With the bridge lowered, pull both strings taut at the same time behind the castle and tie them together to the cap or ring, at the same length. Trim the excess 2 cm from the knot.
1 With the bridge lowered, pull both strings taut at the back 2 Tie them together to the ring or cap and trim the excess to 2 cm Tip: If the bridge rises crooked, undo the knot and shorten the string on the side that stays down.Test the mechanism
Slowly pull the handle backwards: the bridge should rise straight up to the block and cover the gate. Let go gradually: it should lower by itself until it rests on the base.
1 Pull the handle backwards, slowly 2 The bridge rises straight up to the block and covers the gate 3 Let go gradually: it lowers by itself to the base Check: It goes up and down 10 times in a row without jamming.Hook it to keep it raised
With the bridge up, take the strings to the back edge of the left wall and slot them into the V-notch: the bridge stays closed. To lower it, take them out of the notch.
1 With the bridge up, take the strings to the V-notch 2 The string stays slotted in and the bridge stays up; remove it to lower Decorate and add the moat
Paint the stones of the wall and the blue moat on the base in front of the gate (from 30 to 120 mm from the wall). Glue the toilet roll tubes at the sides as towers, without covering the guides or the strings.
1 Paint the blue moat from 30 to 120 mm in front of the wall 2 Paint the stones and glue on the towers without covering guides or strings
Does it work? The test
Raise and lower the bridge 10 times by pulling and releasing. Then put a ≈ 10 g toy figure on the tip and raise it again.
What should happen: The bridge rises straight up to ≈ 84°, completely covering the gate (90 × 130 mm), with a pull of about 17 cm of travel; when released it lowers by itself. With the figure on top it still rises, needing a little more force at the start.
If something goes wrong
- The bridge does not rise fully — The guides are lower than the length of the bridge, or the string rubs on the edge of the hole. Solution: Check that the guides are 185 mm high and have their length of straw. If you changed the measurements, the guide must be at least 3 cm higher than the bridge is long.
- It rises crooked — The two strings are not the same length. Solution: Retie the strings to the handle with the bridge lowered, pulling both taut at the same time.
- The hinge rubs or jams — The wall knuckles are not lined up with the bridge straw, or there is glue inside. Solution: Unstick one knuckle and glue it back with the skewer in place, so that it lines up. Turn the bridge while the glue dries.
- The bridge does not lower when released — It has ended up upright or leaning against the wall (its weight falls inwards). Solution: Glue on stop block G (or add another layer) so that it stops before upright.
- The wall bends when you pull — Thin cardboard, or folds badly glued to the base. Solution: Glue a cardboard reinforcement on the inside of the corners of the U, and pull backwards, not upwards.
- The string slips out of the notch — Notch too wide. Solution: Wrap the string once around a clothes peg glued to the wall.
Safety
- The craft knife is used by an adult with a metal ruler and cutting mat; the corners of the gate are cut outwards, never towards the hand.
- Hot glue burns: the adult applies it.
- Cut off the sharp point of the skewer before fitting it.
- Do not wrap the string around your fingers or neck; only pull on the handle.
The science behind it
For children
The bridge is like a seesaw with only one half: it turns around the hinge, which is its pivot. If you lift it by pulling the tip, it takes little effort, just as a door opens easily if you push far from the hinges. The string goes up to a high hole in the wall and changes direction there: you pull backwards and the bridge goes upwards. When you let go, the weight of the bridge brings it back down.
For the adult
The bridge is a second-class lever: the fulcrum is the hinge, the load (its weight) acts at the centre, at 70 mm, and the string's force at the tip, at 130 mm. What matters is the moment: T·d = P·70·cos θ, where d is the perpendicular distance from the hinge to the line of the string. With the guide 185 mm high and the bridge horizontal, d = 130·185/√(130² + 185²) ≈ 106 mm, so the tension needed is T ≈ 0.66·P; as it rises, the moment of the weight decreases with cos θ and lifting becomes easier. The guide works like a fixed pulley: it does not reduce the force, but it changes its direction and point of application. To close fully, the guide must be higher than the tip of the upright bridge (185 mm > 130 mm + hinge height); otherwise d tends to zero before reaching 90° and the force needed shoots up: that is why proportions such as a 30 cm bridge and a 25 cm tower do not allow it to be raised fully. The stop at ≈ 84° keeps the centre of mass outside the pivot axis, so the torque from the weight returns the bridge to the lowered position when released. The straws act as plain bearings on the skewer.
- lever: a bar that turns on a pivot and helps move things with less force.
- hinge: a joint that lets a piece turn around an axle, as on doors.
- pulley: a wheel or guide that changes the direction of a rope.
- moment: how much a force makes something turn: force times distance from the axis.
- stop: a part that halts a movement at a certain point.
By age
- 5–7 years: The adult cuts the wall, gate and bridge and assembles the hinge; the child glues in the guide straws, ties the strings, tests the mechanism and decorates the castle and moat.
- 8–10 years: They build everything except the craft-knife cuts; they adjust the strings themselves so it rises straight.
- 11–12 years: They calculate the force needed with the moment formula and compare it with the rubber-band force meter. Challenge: add a winch with a crank (skewer and spool) to raise the bridge by turning.
In a group or in class
Teams of 3, one castle per team. Beforehand: pre-cut walls (gates with a craft knife), bases and bridges; cut skewers and strings. 75-min session: 10 min explanation using a ruler as a lever, 45 min assembly, 20 min testing and decorating. At the end, join the castles into a «walled city» with a shared moat of blue paper.
Challenges
- Build a winch with a crank: a horizontal skewer through the sides of the castle that the strings wind around.
- Add a portcullis (gate grille) that slides up and down vertically in straw guides behind the gate.
- Make the bridge rise with a counterweight (a bag of coins hanging from the string) so a little push is enough.
- Design a two-leaf bridge that opens in the middle, like Tower Bridge.