Table that seems to float
A 14 × 14 cm cardboard mini table whose top seems to float 15 cm above the bottom, with no legs: a central thread holds it hanging from a hook and four threads at the corners pull it down so it does not tip over.
What they will learn
- That a thread can only pull (tension) and a stick or piece of cardboard can push (compression), and how to combine them to hold up a weight.
- That a structure stays still when all the forces balance: the central thread pulls up and the corner threads pull down.
- Why a square base needs 4 corner threads (with 3 the table tips towards the free corner).
- That precision matters: a 2–3 mm difference in one thread is enough to make the table skew.
Prepare beforehand
- Print the templates at 100 % and check the 50 mm red line in the header.
- Cut the thread into 4 pieces of 30 cm (corners) and 1 of 20 cm (central). They are deliberately too long.
- If the children are young, cut the 4 base layers and the 4 arm layers with a craft knife beforehand.
- Find two 15 cm tall props that can stand upright on the base, between the edge and the post (15 mm thick at most and 10 cm wide): small books, little boxes or cardboard blocks. They hold up the top base while you tie the threads.
- Keep 4 clothes pegs to hand to hold the layers while the glue dries.
Materials and tools
- Corrugated cardboard — 1 sheet, 30 × 45 cm
single-wall, 3–4 mm (shipping box), flat and without creases - Wooden skewers — 2
Ø 3 mm, straight, cut to 105 mm - Strong thread — 1.5 m
embroidery thread, kite line or thin string (0.5–1 mm) that doesn't stretch - Sticky tape — 1 roll
parcel tape or duct tape: holds the threads on the outside of the bases - Glue sticks — 2
for a hot glue gun - Glue stick — 1
to stick the paper templates onto the cardboard
Tools
- Craft knife, metal ruler and cutting mat — cutting bases, arms and brackets adult
- Scissors — cutting out templates and cutting the thread
- Hot glue gun — gluing the layers, the arms and the brackets adult
- Awl or wooden skewer — piercing the 3 mm holes at the corners and hooks
- Set square or a box — checking that the arms are vertical
- Darning needle — threading through the holes (optional)
Pieces and templates
- A · Base layer ×4 — corrugated cardboard 3–4 mm
- B · L-shaped arm (hook) ×4 — corrugated cardboard 3–4 mm
- C · Reinforcing bracket ×4 — corrugated cardboard 3–4 mm
- D · Post reinforcement ×2 — wooden skewer Ø 3 mm
- E · Threads ×5 — embroidery thread or thin string
Step by step
Cut the bases adult
Stick template A onto the cardboard and cut 4 squares of 140 × 140 mm with a craft knife and ruler. Glue two layers with the flutes crossed to make the bottom base, and the other two for the top base.
1 The adult cuts 4 squares A of 140 × 140 mm with a ruler 2 Glue two layers with the flutes crossed; make two bases 3 Hold the base by a corner: it must stay flat and stiff Check: Each base doesn't bend when you hold it by one corner.Pierce the corners
With the template still on top, pierce the 4 holes of 3 mm in each base, 12 mm from each edge, going through both layers with an awl or the tip of a skewer.
1 Mark the 4 holes 12 mm from each edge 2 Pierce through both layers with an awl 3 Put one base on the other: the holes must line up Check: Put one base on top of the other: the 8 holes line up.Cut the arms and insert the skewer adult
Cut 4 L-shaped pieces B with the flutes vertical. In two of them, push a 105 mm skewer into the flute that matches the guide line on the post, pushing from the foot until it no longer sticks out.
1 The adult cuts 4 L-shaped pieces B with flutes vertical 2 Push the 105 mm skewer into the flute on the guide line 3 Push until it doesn't stick out of the foot; make two like this Tip: If the skewer won't go in, open the flute first with a thinner skewer or a piece of wire.Glue the double arms adult
Glue each piece B with a skewer onto a piece B without one, neatly lined up, to make 2 arms 6 mm thick. Pierce the 3 mm hook hole again through both layers.
1 Put glue on the B with the skewer and cover it with another B 2 Pierce the hook hole again through both layers 3 Put one arm on the other: they must be identical Check: The two arms are identical: put one on top of the other and they match.Glue the arm to the bottom base adult
Glue the foot of one arm, edge-on, onto the footprint marked on the bottom base (18 to 42 mm from the left edge, on the centre line), with the hook pointing towards the centre. Hold it upright while the hot glue cools.
1 Put hot glue on the arm footprint, next to the left edge 2 The adult glues it edge-on, hook towards the centre 3 Check 90° and that the hole is above the centre Check: With the set square: the post is at 90° to the base and the hook hole is right above the centre cross, at a height of 100 mm.Add the brackets adult
Glue a bracket C to each wide face of the post (one in front and one behind), at right angles to the arm, with the 40 mm side vertical against the post and the other against the base. Repeat steps 5 and 6 with the other arm on the top base.
1 Put hot glue on both straight sides of each bracket C 2 Glue a C on each side of the post, against post and base 3 Push the hook: it doesn't move. Repeat on the other base Check: Gently push the hook down: the arm doesn't move.Cross the hooks
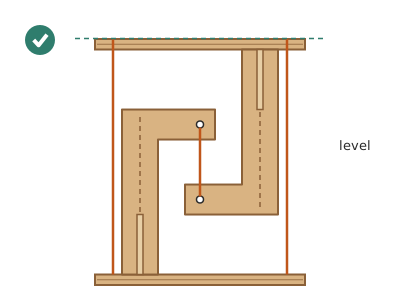
Stand two 15 cm tall props on the bottom base (small books, little boxes or cardboard blocks 15 mm thick at most and 10 cm wide): one by the left edge, between the edge and the post, and the other by the right edge, centred so they don't cover the corner holes. Turn the top base upside down (arm pointing down), rotate it so its post is on the opposite side to the bottom one and rest it on the props: the two hooks cross in the centre and the top hole sits 50 mm below the bottom one.
1 Turn the top base upside down: the arm points down 2 Rest it on two 15 cm props standing on the bottom base 3 The hooks cross without touching: about a 30 mm gap Check: Seen from the side, the two hooks are in the same plane, one above the other, without touching (≈ 30 mm gap). There are 150 mm between the two bases at all 4 corners.Tie the central thread
Thread the 200 mm piece through the bottom hook's hole and tie it with a double knot. Pass the other end through the top hook's hole and, with the top base resting on the props, tie it so the thread is just taut: 50 mm between holes.
1 Tie the 200 mm thread to the bottom hook's hole 2 Pass it through the top hook and tie it just taut 3 Put a drop of glue on each knot Tip: Put a drop of glue on each knot so it doesn't come undone.Thread the corner threads
Pass a 300 mm thread through a corner hole of the bottom base and fix it underneath with a big knot and a piece of tape. Take the thread up and pass it through the hole in the same corner of the top base, leaving it loose on top. Repeat at all 4 corners.
1 Thread the bottom corner; fix it with a knot and tape 2 Take the thread up through the same corner of the top base 3 Repeat at all 4 corners: one loose thread at each Tension crosswise
With the props still in place, pull one corner thread until it is straight and tape it down on top. Do the same with the diagonally opposite corner, then with the other two. That way the top base doesn't tilt while you adjust.
1 Tension in this order: one corner, then the opposite one 2 Pull the thread until it is straight and tape it on top 3 One holds the base level, the other tensions: four hands Tip: One person holds the top base level and the other tensions and tapes: it's a job for four hands.Remove the props
Slowly take the props away. The top base should stay suspended: the central thread pulls it up and the 4 corner threads, straight and taut, hold it down.
1 Slowly take the props away, one at a time 2 The base floats: check 150 mm at all 4 corners Check: All 5 threads are taut (they vibrate when plucked). The top base is parallel to the bottom one: measure a 150 mm gap at all 4 corners.Adjust anything crooked
If one corner is higher, peel off its tape, pull the thread 1–2 mm and tape it again. If a thread is slack, it is too long: shorten it. When everything is right, tie a knot on top of each piece of tape and trim the excess, leaving 2 cm.
1 If a corner is high, peel off the tape and pull 1–2 mm 2 Tie a knot over the tape and trim, leaving 2 cm 3 Finished table: taut threads and a parallel base
Does it work? The test
Gently push the top base to one side and let go; then put objects of known weight on top (a rubber ≈ 20 g, a plastic cup with 100 ml of water, a pencil case).
What should happen: When pushed it sways and returns to its position on its own. It holds 100–200 g well centred without skewing. If the weight is placed on a corner, it tilts a little but doesn't tip over as long as the 4 threads stay taut.
If something goes wrong
- The top base tips towards one corner — A corner thread is slack or missing (with 3 threads it tips towards the free corner). Solution: Fit all 4 threads and tension the slack one by peeling off the tape.
- The central thread is slack and the top base falls when you remove the props — The central thread is too long or the hooks don't cross: if the bottom hook's hole isn't above the top hook's hole, the central thread can't hang the base. Solution: Put the props back. Check that the lower hook's hole is 50 mm above the upper one's and shorten the central thread until it is just taut with the base resting on the props.
- The table is crooked (one corner lower) — Corner threads of different lengths. Solution: Measure the gap at each corner with a ruler and tighten or loosen the thread that doesn't measure 150 mm.
- An arm bends or comes unstuck — Single cardboard, skewer not inserted or no brackets. Solution: Make the arm from double cardboard with the skewer inside and glue on both brackets C.
- The thread breaks or a knot comes undone — Thin sewing thread or a single knot. Solution: Use embroidery thread or string, a double knot and a drop of glue.
- The hooks bump into each other — Both posts are on the same side. Solution: Rotate the top base 180°: the posts must be on opposite sides.
Safety
- Only an adult uses the craft knife, with a metal ruler and cutting mat; double cardboard is hard to cut and the blade slips.
- Hot glue burns: the adult glues the arms and the child holds with a clothes peg, not with their fingers.
- Awls and skewers are sharp: cut the points off the skewers before giving them to the children.
- Don't put glass objects or hot drinks on the table: if a thread comes loose, it falls.
The science behind it
For children
A thread only knows how to pull, like in tug of war; it can't push. Cardboard can push, like a column. In this table, the top part hangs from a hook, just like a swing hangs from a branch. But a swing sways, so we add four threads at the corners that hold it down. Up and down pull equally hard, and that's why the table stays still in mid-air.
For the adult
It is a tensegrity structure (tensional integrity): some elements work only in tension (threads) and others in compression and bending (arms and bases). The top base, of weight P, is subject to the tension T₀ of the central thread (upwards) and the tensions T₁…T₄ of the corner threads (downwards). In vertical equilibrium: T₀ = P + ΣTᵢ; as the corner threads are pretensioned, T₀ is greater than the weight. In moment equilibrium, any rotation of the top base shortens the distance between some anchor points and lengthens it between others: the threads that would be stretched increase their tension and generate a restoring torque, which is why the structure springs back after a push. A thread only resists if something tries to stretch it; with a square base and 3 threads there is a rotation (about the diagonal opposite the free corner) that stretches no thread, and the table tips: 4 are needed. The hooks must cross (the lower anchor point above the upper one) for the central thread to work in tension. The post of each arm works in bending because of the hook's overhang (moment ≈ T₀ × 40 mm), hence the double cardboard, the skewer and the brackets. Tensegrity appears in domes, bridges, Kenneth Snelson's sculpture and the human body (bones in compression, tendons in tension).
- tension: the force with which a thread pulls on whatever is tied to it.
- compression: a force that squeezes or pushes on a part, like a column holding up a roof.
- equilibrium: when all the forces cancel out and nothing moves.
- tensegrity: a structure held up by taut threads and rigid parts that don't touch each other.
- cantilever: a part that sticks out, held at one end only, like the hook.
By age
- 5–7 years: This is not a project for them to do on their own at this age. The adult builds the bases and arms; the child threads the holes, sticks the tape and tests what happens when a thread is cut (on a test table).
- 8–10 years: They assemble everything except the craft-knife cuts and hot glue. They adjust the threads in a pair with an adult. Focus on «a thread can only pull».
- 11–12 years: Let them build it on their own and measure the maximum weight. Challenge: design a version with a triangular base and 3 threads, or a double-height one with two storeys.
In a group or in class
Teams of 3 (one holds, one tensions, one sticks tape). Per team: 30 × 45 cm of cardboard, 2 skewers, 1.5 m of thread and the template. Before the session, the adult cuts the bases and arms and glues the arms with hot glue (it's the slowest part). 60-minute session: 10 min demonstration with a finished table (cutting a corner thread so they see it tip over), 35 min fitting and adjusting threads, 15 min weight competition with water in cups.
Challenges
- Make a table with a triangular base and only 3 corner threads.
- Build a tower with two floating storeys, one above the other.
- Make a table twice as big (28 × 28 cm) and check whether it holds twice the weight.
- Replace the central thread with a rubber band: what changes when you add weight?
- Design a tensegrity with 3 sticks that don't touch each other, joined only by rubber bands (Snelson's prism).