Lever catapult
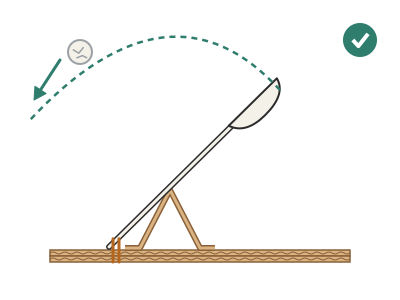
A tabletop catapult with a plastic spoon that rocks on a 4 cm cardboard trestle: push the bowl down, let go, and a rubber band pulls the handle and launches an aluminium foil ball 1–3 m.
What they will learn
- What a lever and its fulcrum are, and how a short arm moved quickly makes the long arm move even faster.
- That a stretched rubber band stores energy (elastic energy) and gives it back when released.
- That the launch angle changes the distance: there is one angle that goes furthest.
- How to measure distances, repeat tests and compare results in a table.
Prepare beforehand
- Print the templates at 100 % and check the red 50 mm line in the header with a ruler.
- Bend the spoon a little with your hands: if it creaks or turns white, it is polystyrene and may break; keep a spare or a lolly stick to reinforce it.
- Make 5–6 tightly squeezed aluminium foil balls, about 2 cm across.
- Find a corridor or playground with at least 3 m clear of fragile objects and mark the launch line with tape.
Materials and tools
- Corrugated cardboard — 1 sheet, 25 × 30 cm
single-wall, 3–4 mm (shipping box) - Plastic spoon — 1 (+1 spare)
dessert or regular, 12–17 cm; polypropylene is best (the kind that bends without snapping) - Thin rubber band — 2
office type, Ø 60–80 mm unstretched, ≈ 1.5 mm wide - Plastic bottle caps — 2
from water bottles, Ø ≈ 30 mm, ≈ 12 mm high (stops to set the angle) - Duct tape or cloth tape — ≈ 20 cm
for the spoon hinge (holds better than clear tape) - PVA glue or hot glue — a little
to glue the base layers and the trestle - Aluminium foil — 3 pieces, 15 × 15 cm
to make balls Ø 15–20 mm (≈ 1–2 g) - Masking tape — 1 m
to mark the launch line and each metre on the floor
Tools
- Ruler and pencil — marking the base lines and folds
- Scissors — cutting the trestle and the notches
- Craft knife and cutting mat — cutting the straight bases adult
- Empty ballpoint pen — scoring the trestle folds
- Tape measure — measuring the distance of each launch
Pieces and templates
- A · Base with notches for the rubber band ×2 — corrugated cardboard 3–4 mm
- B · Trestle (40 mm fulcrum) ×1 — corrugated cardboard 3–4 mm
- C · Scoring target ×1 — paper or card
- D · Projectiles ×5 — aluminium foil
Step by step
Cut and glue the base adult
Cut the 2 pieces A, 100 × 200 mm, with their V-notches 44 mm from one end. Glue one on top of the other with the corrugations crossed and put a book on top for 10 minutes.
1 Mark two pieces A, 100 × 200 mm, with their V-notches 2 Cut with a metal ruler and craft knife on the cutting mat 3 Glue them with corrugations crossed and add a book for 10 minutes Check: The base does not bend when you hold it by one corner.Mark the lines
Stick the template on top or mark with a ruler: rubber band (notches) 44 mm from the handle end, trestle ridge at 80 mm and the trestle edges at 60 and 100 mm.
1 Measure from the handle end and mark at 44 and 80 mm 2 You now have the band line, the ridge and the two edges Fold the trestle
Score the 3 folds of piece B with the empty ballpoint pen and the ruler. Fold the centre one upwards (little roof) and the two 10 mm tabs outwards.
1 Score the 3 folds of B with a ruler and empty ballpoint pen 2 Fold the centre upwards and the tabs outwards 3 A roof 40 mm high with a 40 mm base Check: The roof is 40 mm high and its base 40 mm wide.Glue the trestle
Glue the trestle tabs onto the base, with the ridge exactly above the 80 mm line and parallel to it. Hold for 5 minutes while it dries (or use hot glue).
1 Put glue on the tabs and lower the ridge onto the 80 line 2 Press both tabs and hold for 5 minutes while it dries 3 The ridge is horizontal and centred across the width Check: Seen from the side, the ridge is horizontal and centred across the width of the base.Position the spoon
Rest the spoon on the ridge, with the bowl towards the long end of the base and the hollow of the bowl facing up. Slide the spoon until 57 mm of handle sticks out behind the ridge, measured along the spoon.
1 Measure 57 mm from the handle tip and make a mark 2 Rest it with the mark right on the ridge and the bowl on the long side 3 57 mm of handle is left behind the ridge Tip: If your spoon is short (12 cm), still leave 5–6 cm of handle behind the ridge.Make the hinge
Stick a 6 cm strip of duct tape (the length of the ridge) across the spoon, right above the ridge, with its ends stuck to the ridge on each side. The spoon must be able to rock but not slide forwards or backwards.
1 Cut 6 cm of duct tape, the length of the ridge 2 Stick it across the spoon, with the ends on the ridge 3 Move the bowl: the spoon pivots on the ridge without shifting Check: When you move the bowl up and down, the spoon pivots on the ridge without shifting.Fit the rubber band
Loop the thin rubber band round the base through the two V-notches, so that it crosses OVER the handle, about 5 mm from its tip. The band pulls the handle against the base and leaves the bowl raised at about 45°.
1 Pass the band through both notches and over the handle 2 The handle touches the base and the bowl is raised at about 45° Check: At rest the handle tip touches the base and the bowl sits 8–12 cm high depending on the spoon length (≈ 12 cm with a 16–17 cm spoon; ≈ 8–10 cm with a 12–15 cm one).Dry run adult
With no ball, push the bowl down with a finger until it touches the base and let go. It should snap back into place with a «clack». Repeat 3 times, checking that the spoon does not twist.
1 Push the bowl down with a finger until it touches the base 2 Let go: it snaps back with a «clack»; repeat 3 times 3 Check that the spoon does not twist or creak Check: If the spoon bends a lot or creaks, the rubber band is too strong: use a thinner one or reinforce the handle with a lolly stick glued underneath.Set up the launch range
Place the catapult on the floor with the HANDLE pointing towards target C, 1.5 m away. Mark the base line with tape and every 50 cm towards the target. Stand to the side, never behind the handle.
1 Put target C at 1.5 m and mark every 50 cm with tape 2 Stand to the side, never between the catapult and the target Load and fire
Put a foil ball in the bowl. Hold the base with one hand, push the bowl down to the base with a finger of the other and let go by sliding your finger to one side. The ball flies out over the handle.
1 Put a foil ball in the bowl 2 Hold the base and push the bowl down with a finger until it touches 3 Slide your finger away: the ball flies out over the handle Check: The ball flies at least 1 m. If it lands close or goes backwards, check that the handle touches the base at rest.Measure and record
Use the tape measure to measure from the base to where the ball first touches the floor. Make 3 identical launches and write down the distance of each one and the average.
1 Measure from the base to the ball's first bounce 2 Write down the 3 shots and work out the average Tip: Put a pinch of flour or a sheet of paper on the floor to see the landing spot more clearly.
Does it work? The test
Three launches with the same ball, always cocking until the bowl touches the base. Measure the distance to the first bounce.
What should happen: A 2 cm foil ball flies 1 to 3 m, on an arc that rises about 50–80 cm. The three launches should land within 30 cm of each other; if they vary a lot, the spoon is moving in the hinge.
If something goes wrong
- The ball comes out very weakly — Rubber band too slack, or the handle does not reach the base. Solution: Use a smaller rubber band or wrap it once more round the base. Check that the band crosses the handle near the tip, not near the ridge.
- The spoon breaks at the neck — Rubber band too strong for a polystyrene spoon. Solution: Tape a lolly stick under the handle with duct tape or use a polypropylene (flexible) spoon.
- The ball goes straight up and lands almost on the spot — The bowl stops too late (stop too high, or none and a band that does not brake). Solution: Remove caps from the stop or move the ridge closer to the handle so the bowl stops at about 45°.
- The whole catapult jumps when fired — Base too light. Solution: Hold the base with your free hand or glue two large coins under the bowl end.
- The spoon twists to one side — Loose hinge or crooked trestle. Solution: Redo the hinge with a new, well-centred strip of tape and check that the ridge is perpendicular to the spoon.
- The ball falls out of the bowl before release — Bowl too flat or ball too big. Solution: Use 15 mm balls or stick a ring of tape round the rim of the bowl to make it deeper.
Safety
- Launch only soft, light objects (foil, paper, pompoms). Never marbles, stones or hard objects.
- The ball flies BACKWARDS, over the handle: nobody should stand in front of the handle or crouch at catapult height. Stand to the side.
- Never aim at people or animals, especially at faces.
- If the spoon breaks, pick up the pieces: broken plastic has sharp edges.
- Only an adult uses the craft knife, with a metal ruler and cutting mat.
The science behind it
For children
The spoon is like a seesaw in the park: it has a point in the middle where it turns. The rubber band is like a spring that pulls the handle down. When you push the bowl down with your finger, you stretch the band and give it energy, like when you pull back a slingshot. When you let go, the band yanks the handle down, the bowl shoots up very fast and, when it hits the stop, the ball keeps flying through the air on its own.
For the adult
The spoon is a first-class lever: the fulcrum (the edge at 40 mm) lies between the effort (the rubber band, pulling the handle ≈ 50 mm from the fulcrum) and the load (the ball in the bowl, at ≈ 90–100 mm). When you cock it, the work done by your finger is stored as elastic potential energy in the band (≈ ½·k·x², of the order of 0.05 J). On release, the band accelerates the short arm and, since the bowl is about twice as far from the pivot, its linear speed is ≈ 2 times greater: this lever does not multiply force, it multiplies speed, which is what matters in a launcher. When the handle hits the base, the arm stops and the ball carries on in a straight line (inertia) in the direction perpendicular to the spoon at that instant. With the 57 mm handle over a 40 mm edge, the stop is at ≈ 45° and the ball leaves at ≈ 45° elevation, the angle of maximum range without air resistance (range = v²·sin 2θ / g). With v ≈ 4 m/s, the theoretical range is ≈ 1.6 m; light balls lose a little to the air. The bottle caps under the handle make the arm stop sooner, so the ball leaves more steeply (≈ 61° with one cap) and goes less far even though it rises higher.
- lever: a bar that turns on a pivot point and helps move something with more force or more speed.
- pivot point or fulcrum: the point the lever turns on.
- elastic energy: energy stored in a rubber band or spring when you stretch it.
- trajectory: the path an object follows as it flies.
- launch angle: how steeply the projectile leaves compared with the ground.
By age
- 5–7 years: The adult cuts the bases and folds the trestle. The child glues, positions the spoon, fits the rubber band and launches. Focus on «push the bowl down, let go, it flies» and on measuring in footsteps.
- 8–10 years: They build it on their own except for the craft knife. They fill in the table of 3 launches and the average and try the caps.
- 11–12 years: Have them measure the range for several fulcrum positions and draw a graph. Challenge: work out the launch speed with the range formula and compare it with a slow-motion video.
In a group or in class
Pairs (one catapult per pair: one launches, the other measures). Materials per pair: 25 × 30 cm sheet of cardboard, 1 spoon + 1 spare, 2 rubber bands, 2 bottle caps, aluminium foil. Before the session: cut the bases and trestles with a craft knife and test a sample catapult. 50-minute session: 25 building, 25 competing in the playground with 3 lanes marked with tape, target at 1.5 m and all launchers on the same line facing the same way.
Challenges
- Launch into a bin 2 m away and score 3 hits out of 5.
- Build a version with an adjustable trestle (3 positions) without unsticking anything.
- Design a trigger: a clothes peg that holds the bowl down and releases when you pull a string.
- Manage to launch 3 m without breaking the spoon (reinforcements, rubber band, angle).