Syringe digger arm
A cardboard crane arm about 21 cm tall that moves by pushing coloured water through two pairs of syringes: one pair lifts the arm (shoulder) and the other bends the forearm (elbow) to hook and lift a little load bucket.
What they will learn
- That water can hardly be compressed: what goes into one syringe comes out of the other (5 ml pushed = 5 ml received).
- That air can be compressed, which is why a bubble makes the arm feel "spongy" and lag behind.
- What a lever and a pivot are: a short push close to the axle produces a big turn at the tip of the arm.
- How real diggers, cranes and brakes work: a small control and a cylinder that pushes.
- That gravity does work too: the arm comes down by itself when you draw water out of the cylinder.
Prepare beforehand
- Print the templates at 100 % (without "fit to page") and check with the ruler that the red line in the header measures 50 mm.
- Check that the tubing fits tightly on the syringe tip: if it's loose, it drips and lets air in.
- Prepare 200 ml of coloured water in a bowl (two colours if you can: one per circuit).
- If the children are young, cut the long pieces (base, tower and arms) yourself beforehand with a craft knife.
- Cover the table with newspaper: some water always spills when filling the syringes.
Materials and tools
- Corrugated cardboard — 2 sheets of 30 × 25 cm
single-wall, 3–4 mm (shipping box), flat and uncreased - Syringes without needles — 4 (2 pairs) buy
10 ml, plain Luer slip tip (not screw), all identical; barrel Ø ≈ 16 mm, stroke ≈ 55 mm - Aquarium airline tubing — 1.2 m (2 lengths of 60 cm) buy
silicone or flexible PVC, 4 mm inside diameter, 6 mm outside - Water with food colouring — 1 glass (200 ml) + 3 drops of colouring
one colour per circuit (e.g. blue for the shoulder, red for the elbow) - Split pins (paper fasteners) — 2
two-legged, 25 mm long (they need to go through 15 mm of cardboard) - Wooden skewer — 1
Ø 3 mm, straight (shoulder axle, 60 mm) - Straw — 1
5–6 mm inside diameter (shoulder spacers) - Large metal paperclip — 2
≈ 50 mm; one for the hook, another for the bucket handle - Yoghurt pot or similar container — 1
load bucket (weighs ≈ 5 g empty) - Duct tape or cloth tape — ≈ 40 cm
to hold the syringes (paper tape comes unstuck with water) - Glue sticks — 3
for a hot glue gun - Rubber bands — 2
office type, to secure the syringes as well as the tape
Tools
- Metal ruler, pencil and set square — marking pieces and checking right angles
- Craft knife and cutting mat — cutting the long pieces with a straight edge adult
- Scissors — cutting out templates, straw and tubing
- Awl or sharp pencil — making the Ø 4 mm axle holes adult
- Hot glue gun — gluing the tower, cardboard layers and syringes adult
- Washing-up bowl or large bowl — filling the water circuits without bubbles
- Cloth or kitchen roll — mopping up drips
Pieces and templates
- A · Base ×2 — corrugated cardboard 3–4 mm
- B · Tower (U-shaped piece) ×1 — corrugated cardboard 3–4 mm
- C · Tower rear crosspiece ×1 — corrugated cardboard 3–4 mm
- D · Arm (shoulder → elbow) ×2 — corrugated cardboard 3–4 mm
- E · Forearm with lever horn ×2 — corrugated cardboard 3–4 mm
- F · Shoulder spacers (straw) ×2 — straw Ø 6 mm
- G · Shoulder axle ×1 — wooden skewer Ø 3 mm
- H · Hook and bucket handle ×2 — large metal paperclip
Step by step
Test a pair of syringes
Fill a syringe with 5 ml of water, connect it with 10 cm of tubing to another empty syringe and push the plunger. The other plunger should come out straight away. This checks that the tubing fits tightly and doesn't drip.
1 Fill a syringe with 5 ml of water by pulling the plunger 2 Connect it with 10 cm of tubing to an empty one and push the plunger 3 The tubing must fit tightly on the tip and not drip Check: If it drips at the joint, the tubing is too wide: find tubing with a 4 mm inside diameter or wrap one turn of tape round the tip.Tip: Empty these syringes and keep them: you'll use them later.Cut and glue the base adult
Cut the 2 pieces A of 150 × 220 mm. Glue them one on top of the other with glue or hot glue, with the corrugations crossed. Stick the marks template on top or copy the marks with a ruler: tower 20 mm from the back edge.
1 Cut two pieces A of 150 × 220 mm 2 Glue one A on top of the other with the corrugations crossed 3 Mark the tower 20 mm from the back edge Check: The base resting on the table doesn't wobble or warp.Cut the tower adult
Cut piece B (150 × 145 mm with the front lowered to 100 mm). Score the two folds with an empty ballpoint pen and the ruler, and fold them to 90° to form a U with a 40 mm front and 55 mm sides.
1 Cut piece B with the lowered front 2 Score the two folds with ruler and empty ballpoint pen 3 Fold it to 90° into a U: 40 mm front and 55 mm sides Pierce the shoulder axle hole adult
With the U folded, pierce the two Ø 4 mm holes 15 mm from the top edge and 10 mm from the back edge of each side. Push the skewer in: it must go straight through both holes at once.
1 Mark the hole 15 mm from the top and 10 mm from the back 2 Pierce both sides with the awl (Ø 4 mm) 3 Push the skewer in: it must be straight and horizontal Check: Seen from the front, the skewer is horizontal. If it's crooked, enlarge the lower hole a little.Glue the tower to the base adult
Glue crosspiece C between the two sides, at the bottom and at the back. Glue the tower onto the marks on the base with a bead of hot glue inside and outside the three sides, with the front facing FORWARDS.
1 Glue crosspiece C between the sides, at the bottom and at the back 2 Glue the tower onto the marks with a bead inside and outside 3 Check with the set square that it's vertical Check: With the set square, the tower is vertical in both directions.Make the arm and forearm adult
Cut 2 pieces D (174 × 30 mm) and glue them face to face; do the same with the 2 pieces E (30 × 155 mm). When they're dry, pierce the Ø 4 mm holes through both layers: shoulder and elbow in D, elbow in E, and the 2.5 mm hook hole in E.
1 Cut two pieces D and two pieces E 2 Glue them face to face and put a book on top for 15 minutes 3 Pierce through both layers: Ø 4 mm and Ø 2.5 mm Tip: Glue with PVA glue and put a book on top for 15 minutes: they come out flatter than with hot glue.Assemble the shoulder adult
Put the back end of arm D between the sides of the tower. Pass skewer G through one side of the tower, a straw spacer F, the hole in the arm, the other spacer F and the other side. Put a dab of hot glue on each end of the skewer, outside the tower.
1 Pass skewer G through: side, spacer F, arm D, spacer F, side 2 Put a dab of hot glue on each end, outside the tower 3 Lift the arm and let go: it must drop by itself, without rubbing Check: Lift the arm with your finger and let go: it should drop by itself, without rubbing or wobbling sideways.Assemble the elbow
Join forearm E to the RIGHT side of arm D with a split pin through the elbow holes: the 55 mm horn pointing up and the long part hanging down. Open the split pin's legs without tightening.
1 Place E on the right side of D, with the horn pointing up 2 Push the split pin through the elbow and open the legs without tightening 3 E hangs vertically and swings back by itself if you push it Check: The forearm hangs vertically under its own weight and swings back to vertical by itself if you push it.Fill the shoulder circuit adult
Put a 60 cm tube and a syringe into the bowl of blue water. Under the water, fill the syringe, connect it to the tube and push to get all the air out. Take out the "control" syringe and fill it with 9 ml. The "cylinder" syringe has its plunger pushed all the way in (0 ml): connect it to the other end of the tube without taking it out of the water.
1 Under the water, connect the syringe to the tube and push until the air is out 2 Control with 9 ml and cylinder pushed in: connect them under the water 3 Push 2 ml: the cylinder moves at the same time, with no lag Check: Push the control 2 ml: the cylinder must move at the same time, with no lag. If it lags, there's still air: empty it and repeat.Tip: Bubbles rise: hold the tube with the syringe pointing up and tap it so they come out before connecting.Fit the shoulder cylinder adult
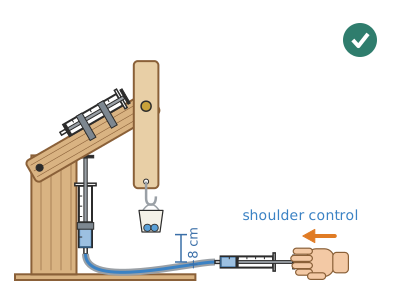
Glue the cylinder syringe upright against the outer face of the tower front, with the tip pointing down 25 mm from the base and the plunger pointing up, just below the bottom edge of the arm (mark 56 mm from the axle). Hot glue on the syringe barrel and a strip of duct tape round it.
1 Stand the syringe against the front: tip 25 mm from the base 2 Glue it with hot glue and wrap duct tape round it 3 The plunger disc touches the edge and the arm is almost flat Check: The plunger disc touches the edge of the arm and the arm is almost horizontal (about 5°).Test the shoulder
Slowly push the control's plunger: the cylinder rises and lifts the arm. Pull the control and the arm comes down under its own weight. Range: from about 5° to about 45° above horizontal.
1 Slowly push the control: the cylinder rises and lifts the arm 2 Pull the control: the arm comes down under its own weight 3 The plunger must be centred under the edge of the arm Check: If the plunger slips out from under the arm, reposition the syringe: it must be centred under the edge of the arm.Fill the elbow circuit adult
Repeat the filling with the other 60 cm tube and red water: control with 9 ml, cylinder with the plunger pushed all the way in. Check that the cylinder responds with no lag.
1 Control with 9 ml and cylinder pushed in: connect them under the water 2 Push 2 ml: the cylinder moves at the same time, with no lag Fit the elbow cylinder adult
Lay the cylinder syringe on the top edge of the arm, with the tip towards the shoulder and the plunger towards the elbow. Shift it 5 mm towards the forearm side so its disc touches the back edge of the horn. Glue it with hot glue and reinforce with 2 turns of duct tape.
1 Lay the cylinder on the arm: tip to the shoulder, plunger to the elbow 2 Glue it with hot glue and reinforce it with two turns of tape 3 The disc rests on the horn without pushing it yet Check: With the forearm hanging, the plunger disc rests on the horn without pushing it yet.Route the tubes
Fix the elbow tube along the arm with 2 small pieces of tape and leave a loose 10 cm loop at the shoulder so the arm can rise without pulling the tube. Leave both controls to the right of the base.
1 Fix the elbow tube to the arm with 2 pieces of tape 2 Leave a loose loop at the shoulder and the controls on the right Fit the hook and prepare the load
Put the S-shaped paperclip in the 2.5 mm hole at the end of the forearm. Push the other U-shaped paperclip into the rim of the yoghurt pot as a handle. Put 1 or 2 marbles inside (5 g each).
1 Open a large paperclip into an S shape 2 Push one end through the hole in E and close it; the other, as a fish-hook 3 Push the other paperclip in as a U handle and add 1 or 2 marbles Hook and lift
With the arm lowered, push the elbow control to bring the hook up to the handle, hook it and release the elbow. Then push the shoulder control: the pot rises. Move it slowly, 1 ml at a time.
1 Push the elbow control until you hook the handle 2 Release the elbow and push the shoulder one, 1 ml at a time: the pot rises Check: The pot with 2 marbles (≈ 15 g) rises at least 8 cm.
Does it work? The test
Put the pot with marbles in the loading area. Hook it with the elbow and lift it with the shoulder as high as it goes. Measure with the ruler how much height the hook gains.
What should happen: The arm rises from about 5° to about 45° and the hook gains about 9–10 cm in height. With 9 ml in the control the movement is smooth and slow; it lifts 20–30 g without trouble. When you pull the control, the arm comes down by itself.
If something goes wrong
- I push the control and the arm moves late or feels "spongy" — There's air in the circuit: the air compresses before it pushes. Solution: Empty the circuit and fill it again inside the bowl of water, with the syringe pointing up so the bubbles come out through the tip.
- It drips at the joints — Tubing too wide for the tip, or a screw-tip syringe. Solution: Use tubing with a 4 mm inside diameter, or wrap one turn of PTFE tape round the tip before pushing the tube on.
- The cylinder plunger slips out from under the arm — The syringe isn't centred or vertical. Solution: Unstick it and reposition it centred under the edge of the arm; glue a 6 mm strip of cardboard on each side of the edge as a guide rail.
- The arm doesn't come down when you pull the control — The arm rubs on the tower or the spacers are too tight. Solution: Trim 1–2 mm off the straw spacers and check that the arm drops by itself without water.
- The forearm doesn't bend — The plunger disc doesn't touch the horn (shifted sideways). Solution: Move the elbow syringe towards the forearm side or glue a 5 mm piece of cardboard onto the horn where it pushes.
- The whole crane tips forwards — Load too heavy or single-layer base. Solution: Use both layers for the base and glue a stone or 4 large coins at the back.
Safety
- Syringes always WITHOUT a needle: buy loose syringes from a pharmacy or ask for an "oral syringe"; if any come with a needle, an adult removes it and puts it away.
- The craft knife and the awl are used by an adult, with a cutting mat and the other hand behind the blade.
- Hot glue burns and so does the gun's nozzle: the adult glues, the child holds with a clothes peg.
- Don't drink the coloured water and don't point it at anyone's eyes when emptying the syringes (it squirts out hard).
- Wipe up spilt water: slippery floor.
The science behind it
For children
Water is very stubborn: it won't let itself be squashed. If you push water into one end of the tube, it has to come out of the other, like when you push a row of marbles inside a tube and the last one shoots out. That's why, when you press the syringe in your hand, the other syringe stretches out and lifts the arm. If there's an air bubble inside, the air does squash like a cushion and the arm goes all soft. The diggers on building sites use the same idea, but with oil.
For the adult
Water is practically incompressible (its volume changes by 0.005 % per atmosphere), so the volume displaced in the control syringe reappears in full in the cylinder syringe: with two identical 10 ml syringes (inner Ø ≈ 14.5 mm, area ≈ 1.65 cm²), 1 ml equals ≈ 6 mm of travel in both. By Pascal's principle the pressure is the same throughout the circuit, so the force on each plunger is F = p · A: with equal areas the force is also equal (1:1 ratio); with a 5 ml control and a 20 ml cylinder the force is multiplied ≈ ×2.7 but the travel is divided in the same proportion (work F · d is conserved). Air, on the other hand, is compressible (Boyle's law): a bubble acts as a spring and causes lag and bounce. Mechanically, the shoulder cylinder pushes 56 mm from the axle: the torque needed to lift the arm (≈ 40 g with syringe) and 20 g on the hook at ≈ 20 cm is of the order of 0.05 N·m, which calls for ≈ 1 N on the plunger, that is, only ≈ 6 kPa of pressure: almost all the force the child feels is friction from the rubber seals. The cylinder only pushes; gravity does the return, just as in many single-acting cranes. At the elbow, the plunger pushes a lever horn ≈ 23 mm from the axle, which turns ≈ 20 mm of travel into ≈ 45° of forearm rotation.
- hydraulics: technique that uses an enclosed liquid to transmit force and movement.
- incompressible: that can't be squeezed to take up less space (like water).
- plunger or piston: part that slides inside the syringe and pushes the liquid.
- pivot: axle around which a part turns.
- pressure: force spread over a surface; in an enclosed liquid it is the same everywhere.
By age
- 5–7 years: The adult builds the crane and fills the circuits. The child decorates, fits the hook and works the controls: the challenge is to hook the pot. Focus on "I push here, it moves there".
- 8–10 years: They build everything except the craft knife, awl, hot glue and filling (the adult does those while they watch). Let them discover what happens with a bubble and how to bleed it out.
- 11–12 years: They build it almost on their own. Challenge: work out how many mm the plunger moves for each ml and add the third pair of syringes for a gripper or a turntable base.
In a group or in class
Teams of 3 (one per control and a "foreman" who gives instructions). Materials per team: 4 syringes, 1.2 m of tubing, 2 sheets of cardboard. Before the session: cut bases, towers and arms with a craft knife and prepare two washing-up bowls of coloured water for every 4 teams. 2 × 60 min sessions: first the structure, second day filling and testing. Finish with a timed "move 3 pots into a box" race. Have towels and spare syringes ready.
Challenges
- Make a turntable base with a jar lid and a third pair of syringes (or a wound-up string).
- Move 5 bottle caps from one box to another in under 2 minutes.
- Swap the hook for a small magnet and pick up paperclips.
- Design a control panel with the 2 controls glued side by side and labelled (LIFT, BEND).
- Manage to lift 50 g by strengthening the structure without changing the syringes.