Spiral water lifter
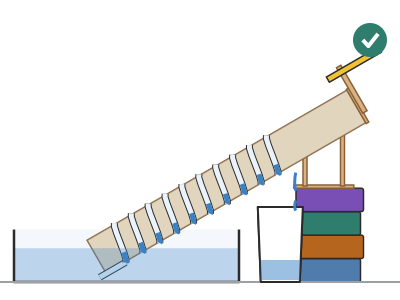
A 40 cm tube with clear hose wound round it in a helix: tilt it at about 30° with the lower end in a washing-up bowl, turn the crank, and the water climbs the hose pocket by pocket and drops into a glass about 12 cm higher up.
What they will learn
- That a turning helix converts rotation into forward movement: each turn of the crank lifts a «pocket» of water by one turn of the helix.
- That water never climbs on its own: it always falls to the lowest point of each turn, but that point moves upwards as the tube turns.
- That the angle of tilt decides whether the machine works: too steep and the pockets drain backwards.
- How to measure a flow rate (ml per minute) and relate it to the turning speed.
Prepare beforehand
- Print the templates at 100 % and check that the helix template (A) is 157 mm wide: that is the circumference of a 50 mm tube.
- Measure your tube: if it isn't 50 mm, trim template A to a width of 3.14 × diameter (Ø 40 → 126 mm; Ø 60 → 188 mm) and redraw the diagonals.
- Cut the tube to 400 mm and, if it is cardboard, cover it completely with packing tape wound in a spiral, overlapping by 1 cm.
- Leave the coiled hose in the sun or in hot tap water for 5 minutes: it softens and winds more easily.
- Work somewhere the floor can get wet (patio, kitchen) and keep a cloth handy.
Materials and tools
- Rigid tube — 1 of 400 mm
Outside Ø 50 mm (poster or drawing tube, or 50 mm PVC waste pipe) - Clear hose — 2 m buy
clear PVC 6 × 8 mm (6 inside, 8 outside); sold by the metre at hardware shops - Clear packing tape — ≈ 1.5 m
wide (48 mm), to waterproof the cardboard tube - Electrical tape or duct tape — ≈ 1 m in 20 pieces of 5 cm
holds better when wet than paper tape - Corrugated cardboard — 1 piece of 25 × 20 cm
3 mm, for the end caps, crank, cradle and 30° set square - Pencil or stick — 1
Ø 7–8 mm, 8–10 cm (crank handle) - Washing-up bowl or basin — 1
≥ 30 cm across, with 4–5 cm of water (≈ 2–3 l) - Glass or measuring jug — 1
clear, 250 ml and no more than 10 cm tall - Food colouring — 2–3 drops
blue or green, to see the pockets of water - Books or a box — stack of ≈ 12–13 cm
to raise the V cradle
Tools
- Scissors — cutting out templates and cutting the hose
- Craft knife and metal ruler — cutting the cardboard pieces and the V of the cradle adult
- Awl or sharp pencil — 8 mm hole in the crank adult
- Glue stick — sticking the helix template to the tube
- PVA glue or hot glue gun — gluing the end cap, crank and cradle adult
- Ruler and permanent marker — marking the pitch and measurements on the tube
Pieces and templates
- A · Helix template (26 mm pitch) ×1 — 80 gsm paper
- B · Tube end caps ×2 — 3 mm corrugated cardboard
- C · Crank arm ×2 — 3 mm corrugated cardboard
- D · V cradle sides ×2 — 3 mm corrugated cardboard
- E · Cradle base ×1 — 3 mm corrugated cardboard
- F · 30° set square ×1 — 3 mm corrugated cardboard
- G · Hose ×1 — 6 × 8 mm PVC hose
Step by step
Prepare the tube adult
Cut the tube to 400 mm. If it is cardboard, cover it completely with packing tape wound in a spiral, overlapping by 1 cm on each turn. With a marker, draw a line 20 mm from the lower end and another at 290 mm.
1 An adult cuts the tube to 400 mm with the craft knife 2 Cover it with packing tape in a spiral, overlapping by 1 cm 3 Draw a line 20 mm from the lower end and another at 290 mm Check: The tube must not soak up a drop of water placed on it.Stick on the helix template
Cut out template A. Wrap it round the tube with its bottom edge on the 20 mm line and the two side edges butted together. Hold it with 3 pieces of clear tape over the top, which also protect it from the water.
1 Cut out template A: it should be 157 mm wide 2 Wrap it round the tube with the two side edges butted together 3 Put its bottom edge on the 20 mm line and hold it with 3 pieces of tape Check: Follow the line with your finger: it should make 10 turns in a row with no jumps, from 30 mm (1 cm above the 20 mm line) up to the 290 mm line.Prepare the inlet
Cut the end of the hose at a slant (about 45°). Place it at the start of the helix (at the bottom, 30 mm from the end of the tube) and run it straight, along the tube, to the bottom end, with 10 mm of hose sticking out below. Fix that straight section with two turns of electrical tape.
1 Cut the end of the hose at a slant of about 45° 2 Run it straight to the end, sticking out 10 mm, and fix it Tip: The slanted end works like a spoon: it scoops water when it passes the bottom and air when it passes the top.Wind the hose along the line
Wind the hose following the line on the template, always in the same direction and without stretching it. Every half turn, put a 5 cm piece of electrical tape across the hose so it doesn't shift.
1 Wind the hose along the line without stretching it 2 Every half turn, hold the hose with 5 cm of electrical tape 3 Check with the ruler: 26 mm between turns and 10 turns Check: Measure with the ruler between two neighbouring turns: 26 mm (anything from 24 to 28 mm is fine). There should be 10 turns.Tip: An adult holds the tube and the child winds: it's easier with four hands.Cut the outlet flush adult
When you reach the end of the helix (290 mm line), cut the hose so that only 15 mm sticks out, following the curve. Fix that last stretch with two turns of tape. Keep the leftover piece for other experiments.
1 An adult cuts the hose, leaving only 15 mm sticking out 2 Fix the last stretch with two turns of electrical tape 3 Blow into the lower end: the air should come out at the top Check: Blow into the lower end: the air must come out at the top. If it doesn't, the hose is kinked somewhere: loosen that turn.Cap both ends adult
Cut the two caps B (Ø 50 mm). Glue one onto each end of the tube with PVA or hot glue and seal them with two crossed strips of packing tape that run 2 cm down the side.
1 An adult cuts the two 50 mm caps B 2 Glue a cap onto each end of the tube with PVA or hot glue 3 Seal them with two crossed strips of tape running 2 cm down Fit the crank adult
Glue the two layers of arm C together. Glue the arm onto the top cap with the 1 mm dot right in the centre. Push the pencil into the 8 mm hole until 6 cm sticks out and fix it with hot glue or wound tape.
1 Glue the two layers of arm C with the corrugations crossed 2 Glue the arm onto the cap with the 1 mm dot in the centre 3 Push in the pencil until 6 cm sticks out and fix it with hot glue Check: When you turn the pencil, the tube turns with it without the arm bending.Build the V cradle adult
Cut the two sides D and the base E. Fold the 15 mm tab on each side and glue them upright on the lines of E, with the two Vs lined up. Put a book on the base while it dries.
1 An adult cuts the two sides D and the base E 2 Fold the tabs and glue the Ds upright on the lines of E 3 Put a book on top while the glue dries Check: Rest the tube in the Vs: it should turn freely and the hose must not rub the bottom of the V.Set up the scene
Put the bowl on the table with 4–5 cm of water and 3 drops of colouring. Place the cradle on a stack of books about 12–13 cm high, outside the bowl and about 7 cm from its rim. Rest the lower end of the tube on the bottom, about 11 cm from the side of the bowl opposite the cradle (not right against it: with a 30 cm bowl the tube wouldn't reach the cradle), and rest the tube in the cradle somewhere between 330 and 370 mm.
1 Fill the bowl with 4–5 cm of water and 3 drops of colouring 2 Rest the end on the bottom and the tube in the cradle, on books Set 30°
Put set square F on the table next to the tube. Take away or add books until the hypotenuse is parallel to the tube. The inlet should be half under water: if it is out of the water, add water; if the first 3 turns are under water, take some out.
1 Put set square F next to the tube and add or take away books 2 The inlet should be half under water Check: The outlet (290 mm line) is about 15–17 cm above the bottom of the bowl, outside its rim.Place the collecting glass
Put the glass (10 cm tall at most) on the table, outside the bowl, right against one side of the stack of books (it won't fit between the bowl and the stack), with its mouth as close as possible to directly below the end of the helix. Turn the crank slowly by hand: the outlet should pass over the glass at the low part of its circle. If it doesn't, use a wider, lower container, such as a food tub, next to the stack.
1 Put the glass, 10 cm tall at most, under the end of the helix 2 Turn slowly: the outlet should pass over the glass Turn and watch
Turn the crank at a pace of one turn per second, always in the direction in which the slanted end «goes into» the water head-on. After 10 turns (those of the helix) a little trickle will start falling into the glass on every turn.
1 Turn once per second, with the inlet going in head-on 2 Watch the pockets of water: they rise one turn on every turn 3 After 10 turns, a trickle falls into the glass on every turn Check: You can see pockets of blue water separated by air bubbles, one in each turn, moving upwards.Tip: If nothing rises after 15 turns, turn the other way: in the opposite direction the screw carries the water down.
Does it work? The test
With the tube at 30°, the inlet half under water and the empty glass under the outlet, turn the crank 60 times in 1 minute (once per second) and measure the water in the glass.
What should happen: After the first 10 filling turns, water falls on every turn: about 60–120 ml per minute with 6 mm hose. The water rises about 12 cm above the surface in the bowl.
If something goes wrong
- The water rises a little and falls back — Tube too steep (more than 45°): the pockets have no low point in each turn and drain backwards. Solution: Lower the cradle to 30° using set square F.
- No water gets in at the bottom — The inlet doesn't reach the water, or it stays under water all the time and fills with water and no air. Solution: Adjust the level: the slanted end must go into and come out of the water on every turn (water up to the middle of the tube's end).
- It turns but the water doesn't move along — You are turning in the direction that carries the water down. Solution: Turn the other way. The right direction is the one that makes the inlet «bite» into the water head-on.
- The water stays stuck in plugs inside the hose — Hose too narrow (less than 5 mm inside): surface tension blocks the flow. Solution: Use 6 × 8 mm hose or larger.
- The hose flattens on the bends — Thick hose on a narrow tube: bend radius too small. Solution: Soften it with hot water, use a 60 mm tube or 6 × 8 mm hose.
- The helix slips when turning — Wet paper tape or too few fixing points. Solution: Electrical tape or cable ties every half turn (20 fixings in total).
- The water falls outside the glass — The outlet sticks out too far and sweeps a big circle. Solution: Trim it to 15 mm and move the glass, against the side of the stack, closer to the lowest point of its circle; if it still doesn't reach, use a wide, low food tub.
Safety
- Water and electricity: set up the experiment away from sockets, extension leads and appliances.
- Dry the floor straight away: a wet floor is slippery.
- Only an adult uses the craft knife and hot glue, with a metal ruler and cutting mat.
- Don't drink the coloured water or suck on the hose to prime it.
- If you use sand, it must be dry and clean; don't blow the sand towards anyone's eyes.
The science behind it
For children
Water is lazy: it always goes to the lowest place it can find. In each turn of the hose there is a «dip» where a little pocket of water stays. When you turn the tube, that dip moves upwards, like when you ride an escalator without walking, and the little pocket travels with it. In the end it reaches the top and falls into the glass. You provide the force with the crank; the water just goes along for the ride.
For the adult
The hose forms a helix with pitch p = 26 mm on a mean diameter of 58 mm (each turn ≈ 182 mm in circumference, helix angle ≈ 8°). With the axis tilted at an angle θ, each turn has a local low point as long as θ < 90° − 8°, but the useful pocket is only large if θ is small: at θ ≈ 30° each turn holds a stretch of water in its lowest part, separated from the next by air. As the tube turns, the position of those low points moves one pitch per turn along the axis, and the water, which is always at rest in its low point, is carried along without anything “pushing” it upwards: the work is done by the torque on the crank, which lifts the centre of gravity of the trapped water. Lifting height ≈ helix length × sin θ = 260 mm (from 30 to 290 mm) × 0.5 ≈ 13 cm; since the bottom end is half submerged, the water comes out about 12 cm above the surface of the tub. The flow rate is roughly (volume of each pocket) × (turns per second): with a 6 mm internal diameter, ≈ 5 ml fits in each turn, of which the pocket takes up between 1/4 and 1/2 (1–2.5 ml). If θ increases, the pocket gets smaller and at ~60–70° it practically disappears; if θ decreases, more water fits but it is lifted less high. It is the same machine used today in sewage works and grain pumps, traditionally attributed to Archimedes (3rd century BC), although it is possibly older.
- helix: a line that winds round a cylinder as it moves along, like the thread of a screw.
- pitch: how far the helix advances in one complete turn (here 26 mm).
- tilt: the angle between the tube and the table.
- flow rate: the amount of water that passes in a given time, for example millilitres per minute.
- crank: an arm with a handle used to turn a shaft by hand.
By age
- 5–7 years: The adult prepares the tube with the helix already stuck on, and the cradle. The child adds the colouring, turns the crank, counts the turns and measures with the glass. Focus on «the water hides at the bottom of each turn and we take it for a ride».
- 8–10 years: They follow all the steps; the adult cuts and does the hot gluing. Let them discover the right turning direction and the angle at which it stops working.
- 11–12 years: Have them work out the pitch and the number of turns from the length of hose (circumference π × D and Pythagoras' theorem) and draw a flow rate–angle graph. Challenge: lift the water 25 cm with two screws in series.
In a group or in class
Teams of 3–4 (each team builds one screw with a tube and 2 m of hose, ≈ €2 per team). Before the session: cut and cover the tubes, print templates and cut the hose. 75-minute session: 10 min demonstrating the principle with a hose by hand, 40 min building, 25 min measuring in the playground with 2–3 shared tubs (each team measures a different angle and the data are combined in a table on the board).
Challenges
- Lift water into a second bowl and from there into a third with two screws in a chain.
- Drive the screw with a paddle wheel or a small windmill instead of your hand.
- Make a screw with 3 hoses in parallel (3 interleaved helices) and compare the flow rate.
- Work out the ideal tilt to lift 1 litre in the shortest time and prove it with data.