Hydraulic goods lift
A 25 cm cardboard tower with a platform that rises 6 cm when you push a control syringe: coloured water travels along a small hose to a second syringe hidden inside the column, which pushes the platform up, guided by two rods.
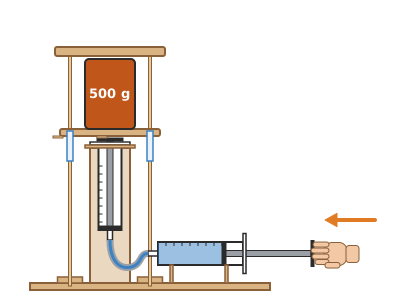
What they will learn
- That liquids hardly compress at all, so they pass force and movement from one plunger to another (Pascal's principle).
- That with two identical syringes the lifting plunger moves the same distance as the control one (1:1), and that with different syringes you trade force for travel.
- That air does compress: with bubbles the lift jerks and loses travel.
- Why a lift needs guides: the platform must only be able to move in one direction.
- How hydraulic jacks, car brakes and digger arms work.
Prepare beforehand
- Measure your lifting syringe: the distance L from the underside of the flanges to the tip of the nozzle. Column height = L + 40 mm. For a typical 20 ml syringe, L ≈ 95 mm and the column is 135 mm tall.
- Check that the tube fits tightly on the nozzle of both syringes: if it is loose, wrap the nozzle with one turn of PTFE tape or use narrower tubing.
- Move the plungers in and out several times while dry: if one is stiff, try another syringe (friction adds to the load).
- Fill a bowl with 1 litre of water and 3–5 drops of food colouring, and protect the table with newspaper.
- Print the templates at 100 % and check that platform D measures 100 mm.
Materials and tools
- Needle-free syringes — 2 identical (+ one 5 ml for the experiment) buy
20 ml, standard Luer slip tip (not screw), rubber-tipped plunger that slides smoothly - Silicone or aquarium tubing — 40 cm buy
4 mm inner Ø, 6 mm outer, clear and flexible - Thick corrugated cardboard — 2 sheets of 30 × 40 cm
3–4 mm, flat, from a shipping box - Wooden skewers — 2
Ø 3 mm × 250 mm, straight - Straw — 1
straight, Ø 5–6 mm (for 2 pieces of 30 mm) - Lolly sticks — 2
114 × 10 mm, trimmed to 100 mm - Food colouring — 3–5 drops
blue or green, in 1 litre of water - PVA glue and hot glue sticks — 1 bottle + 3 sticks
PVA glue for the cardboard; hot glue to fix the skewers and the platform - Duct tape or electrical tape — 30 cm
to hold the syringe flanges and the tube joints - PTFE tape (optional) — 20 cm
plumber's tape, only if the tube is loose on the syringe nozzle - Rubber bands — 2
office ones, to hold the control syringe in its supports - Washing-up bowl or sink with water — 1 litre of water
to fill the circuit without air - Large glass or jug — 1, with coloured water
at least 10 cm deep, to connect the lifting syringe under water without wetting the column
Tools
- Metal ruler and pencil — mark the pieces and measure the syringe
- Craft knife and cutting mat — cut the thick cardboard pieces and the holes adult
- Scissors — cut straws, tubing and thin card
- Hot glue gun — fix skewers, column and platform adult
- Awl or sharp pencil — make the holes for the skewers adult
- Cloth or kitchen roll — dry the syringes and mop up water
Pieces and templates
- A · Base ×2 — corrugated cardboard 3–4 mm
- B · Column (40 × 40 square tube) ×1 — corrugated cardboard 3 mm
- C · Column lid ×1 — corrugated cardboard 3 mm
- D · Platform ×2 — corrugated cardboard 3 mm
- E · Guide straws (sleeves) ×2 — straw Ø 5–6 mm
- F · Top crossbar ×3 — corrugated cardboard 3 mm
- G · Control syringe supports ×2 — corrugated cardboard 3 mm
- H · Guide blocks ×4 — corrugated cardboard 3 mm
- I · Vertical guides ×2 — wooden skewer Ø 3 mm
- J · Hose ×1 — silicone tubing 4 × 6 mm
Step by step
Make the base
Cut two 240 × 160 mm rectangles (A) and glue them together with PVA, with the corrugations crossed. Put a weight on top for 10 minutes. Using the template, mark the column square, the two guide holes and the supports.
1 Cut two pieces A of 240 × 160 mm 2 Glue the two A pieces with the corrugations crossed and weigh them down for 10 minutes 3 Using the template, mark the column, the holes and the supports Check: The base is flat and does not bend when you hold it by one corner.Build the column adult
Cut piece B to a height of L + 40 mm (135 mm for 20 ml) and cut the 10 × 30 mm slot, open at the bottom. Score the 4 folds, fold it into a 40 × 40 mm square tube and glue the tab on the inside. Do not glue it to the base yet.
1 Cut B, 172 × 135 mm, with the 10 × 30 mm slot at the bottom 2 Fold along the 4 folds and glue the tab on the inside 3 You get a straight tube with the slot at the bottom of the right-hand face Check: The column stands up straight and the slot is on the right-hand face, at the bottom.Fit the lid adult
Cut lid C, 50 × 50 mm, with a Ø 24 mm hole (outer diameter of your syringe + 1 mm). Glue it centred over the top opening of the column.
1 Cut lid C, 50 × 50 mm, with a Ø 24 mm hole 2 Glue it centred over the top opening of the column 3 The barrel passes through the hole and the flanges rest on the lid Check: The syringe barrel goes through the hole and the flanges rest on the lid.Fill the tube and the control syringe under water adult
Put the 40 cm tube into the bowl of coloured water and squeeze it until no more bubbles come out. Submerge the control syringe, fill it to 20 ml without bubbles and push it onto one end of the tube without taking it out of the water. Lift them out of the bowl with the free end of the tube pointing up and covered with your finger: do not connect the lifting syringe yet.
1 Put the 40 cm tube in the water and squeeze it to get the air out 2 Pull the plunger and fill the control syringe to 20 ml 3 Push one end of the tube onto the nozzle without taking it out of the water Tip: If you see a bubble inside the syringe, hold it nozzle up, tap it and push until the bubble comes out.Thread the tube through the column and connect the lifting syringe adult
With the column still not glued to the base, feed the free end of the tube in through its bottom opening, slip the lower part of the tube into the slot (it is open at the bottom) and pull about 10 cm of tube out through the hole in the lid. Put that end and the lifting syringe into a large glass of water, keeping the column outside and dry; push the lifting plunger all the way in and fit the syringe onto the tube without taking it out of the water. Dry everything.
1 Thread the free end through the column: in at the bottom and 10 cm out through the lid 2 Put the end and the empty lifting syringe in a glass of water and fit them together there 3 Push the control syringe 2 cm: the lifting one comes out 2 cm at the same time Check: Push the control syringe 2 cm: the lifting one comes out 2 cm. Pull the control one: the lifting one goes back in. If there is more than 2–3 mm of play, there is air: repeat under water.Tip: You must thread the tube before connecting the lifting syringe: with a syringe on each end it can no longer go through the column, because the flanges do not fit through the 24 mm hole.Secure the joints
Wrap each joint between tube and nozzle with 2 tight turns of duct tape or electrical tape, so it does not come off when you push hard.
1 Wrap the joint with 2 tight turns of tape 2 Do the same on the joint of the other syringe Put the syringe into the column
With the lifting syringe empty (plunger pushed fully in), lower its barrel through the hole in the lid, nozzle down, while gently pulling the tube from the slot, until the flanges rest on the lid. Fix the flanges to the lid with two strips of tape.
1 Lower the lifting syringe through the lid while pulling the tube from the slot 2 Bring the tube out through the slot and fix the flanges with 2 strips of tape 3 The tube must come out in a gentle curve, without a sharp bend Check: The tube comes out of the slot in a gentle curve, without a sharp bend, and is not taut.Glue the column to the base adult
Place the column on its square on the base, with the slot facing right, and glue it with a bead of hot glue along the outside of all 4 faces.
1 Place the column on its square with the slot facing right 2 Glue it with a bead of hot glue along the outside of all 4 faces Fit the guides adult
Glue the H blocks over the guide holes (2 per hole). Cut the points off the skewers, push them into the holes until they touch the bottom layer and fix them with a drop of hot glue.
1 Glue two H blocks on top of each guide hole 2 Cut off the point, push it down to the bottom layer and add hot glue 3 Check that they are upright and 80 mm apart Check: Look at the skewers from the front and from the side: they are upright and 80 mm apart.Prepare the platform adult
Glue the two D layers with the corrugations crossed. Trim 2 lolly sticks to 100 mm and glue them underneath, parallel and centred on the 28 and 72 mm lines: this leaves the centre free for the plunger and does not cover the holes. Push the two pieces of straw E into the 6.5 mm holes, sticking out 25 mm underneath, and fix them with hot glue.
1 Glue the two D layers with the corrugations crossed 2 Trim 2 sticks to 100 mm and glue them parallel, leaving the centre free 3 Insert straws E and glue them sticking out 25 mm underneath Check: The sticks do not stick out beyond the platform and the plunger head fits between them (34 mm free).Fit the platform adult
Thread the platform's straws onto the skewers and lower it until it rests on the plunger head. Glue the centre of the platform to the plunger head with a good blob of hot glue.
1 Thread the straws onto the skewers and lower the platform 2 Glue the centre of the platform to the plunger head with hot glue 3 Check that it is level and slides without sticking Check: The platform is level and slides up and down the skewers without sticking.Fit the crossbar adult
Glue the 3 layers of crossbar F together and push it onto the tips of the skewers. Fix it with a drop of hot glue in each hole.
1 Glue the 3 layers of crossbar F on top of each other 2 Push it onto the skewer tips and fix it with hot glue Fix the control syringe adult
Glue the two G supports upright on their marks. Lay the control syringe in the notches, nozzle towards the column, and hold it with a rubber band on each support. Gather the spare tube into a gentle curve.
1 Glue the two G supports upright on their marks on the base 2 Lay the syringe in the notches and hold it with a band on each G 3 Gather the spare tube into a gentle curve, without kinks Tip: You can also leave it loose and work it by hand: that makes the experiments easier.Test without a load
Slowly push the control plunger from 20 ml to 0 ml. The platform should rise about 6 cm smoothly. Pull it back and the platform will go down.
1 Slowly push the control plunger from 20 ml to 0 ml 2 The platform rises about 6 cm; if you pull the plunger, it goes down Check: For every 1 cm of control plunger, the platform rises 1 cm (identical syringes).Lift a load
Put a toy figure or a 200–500 g jar on the platform and push again. If it rises in jerks or sinks a little on its own, there is air or a leak: check the joints.
1 Put a 200–500 g jar on the platform and push again 2 If it jerks or sinks on its own, there is air or a leak: check it
Does it work? The test
Stand a ruler upright next to the platform. Push the control plunger 2 ml at a time and write down how far the platform rises. Repeat with a 500 g jar on top.
What should happen: With two 20 ml syringes the platform rises ≈ 3 mm for every ml (about 6 cm in total), smoothly and without jerks. With 500 g on top it rises the same; it is just a little harder to push (≈ 5 N more force).
If something goes wrong
- The platform rises in jerks or with a delay — Air bubbles in the circuit: the air compresses before it pushes. Solution: Put the control syringe and the end of the tube in a glass of water, disconnect it, push and pull several times with the nozzle pointing up to get the bubbles out, and reconnect it full without taking it out of the water. If the bubble is in the lifting syringe, cut through the hot glue on crossbar F and remove it, unstick the platform from the plunger head and lift it off over the top of the skewers; then unstick the flanges and lift the lifting syringe out through the lid. Disconnect it and reconnect it inside a glass of water as in step 5 (the tube is already fed through the column), then refit the lifting syringe, the platform and the crossbar (steps 7, 11 and 12).
- Water leaks from the joint — Tube too wide for the nozzle. Solution: Wrap the nozzle with PTFE tape before pushing the tube on, or use tubing with a 3 mm inner diameter. Secure it with duct tape or a cable tie.
- It is very hard to push even without a load — Crooked platform rubbing on the guides, or stiff plungers. Solution: Check that the skewers are parallel (the crossbar holds them 80 mm apart). If the straws rub, widen them with a pencil. Try a smoother syringe.
- It does not rise the full 6 cm — The control syringe was not at 20 ml, or there is air. Solution: Disconnect the control syringe with the end of the tube inside a glass of water, fill it to 20 ml with the lifting syringe empty (platform down) and reconnect it without taking it out of the water.
- The tube kinks inside the column and the water does not get through — Column too short: there is no room for the tube to curve. Solution: Make the column 1–2 cm taller (L + 50 mm) or use silicone tubing, which bends without kinking.
- The platform comes unstuck from the plunger when it goes down — Too little gluing surface. Solution: Glue a 30 mm cardboard disc onto the plunger head and then glue the platform onto that disc, with more hot glue.
Safety
- Use only needle-free syringes. If you buy them from a pharmacy, ask for syringes without needles, or have an adult remove the needle and dispose of it in a suitable sharps container.
- Do not drink the coloured water and do not point the syringes at anyone's face: if the tube comes off, the jet can shoot out hard.
- The hot glue gun and the craft knife are for the adult.
- Skewer points are sharp: cut them off before pushing the skewers in.
- Wipe up spilt water so nobody slips, and empty the circuit when you finish if it will not be used for days.
The science behind it
For children
Try squashing a water balloon: the water will not let itself be made smaller, it squeezes out somewhere else. That is why, when you push the plunger, the water does not shrink: it travels along the tube and pushes the other plunger, which lifts the platform. It is like pushing a row of marbles inside a tube: you push one in and another comes out of the other end. If there is air inside, the air does squash like a cushion, and that is why the lift moves in jumps.
For the adult
Pascal's principle states that a change in pressure in a confined fluid is transmitted undiminished throughout it. The force F₁ on the control plunger of area A₁ creates a pressure p = F₁/A₁ that acts on the lifting plunger: F₂ = p·A₂ = F₁·(A₂/A₁). Because water is practically incompressible (bulk modulus ≈ 2.2 GPa), the displaced volume is the same: A₁·x₁ = A₂·x₂. With two identical 20 ml syringes (A ≈ 3.1 cm²) the ratio is 1:1. A 500 g load (≈ 4.9 N) means only ≈ 16 kPa, far below what the joints can withstand; most of the force you feel is the friction of the two rubber plunger seals (2–5 N each). If the lifting plunger had three times the area (for example, a 5 ml control and a 20 ml lift ≈ 1:3), with the same hand force you would lift three times the weight, but it would travel a third of the distance: the work F·x is conserved, minus losses. Air, on the other hand, compresses according to Boyle's law (p·V = constant), so a bubble acts like a spring: it stores energy, delays the movement and causes jerks. The guides remove degrees of freedom: without them the platform could twist or tilt and load the plunger sideways, increasing friction.
- hydraulics: technology that uses liquids to transmit force and movement.
- pressure: force spread over a surface.
- plunger: part that moves inside a cylinder, pushing the liquid.
- incompressible: cannot be squeezed to take up less space, like water.
- guide: part that forces another to move in one direction only.
By age
- 5–7 years: The adult builds the column and the guides and fills the circuit. The child decorates, glues the platform with PVA, colours the water and works the lift, raising toy figures. Message: “the water pushes”.
- 8–10 years: They build the structure and fill the circuit under water with help. Let them discover for themselves what happens when there is a bubble and how to get it out.
- 11–12 years: Full assembly and measurement: a table of ml against mm of rise and the 5 ml syringe experiment, working out the area ratio from the inner diameter of each syringe (A = π·r²).
In a group or in class
Teams of 3, one lift per team (≈ €2–3 in syringes and tubing per team). Beforehand: cut bases, columns and platforms with a craft knife, and set up a shared station with 2–3 bowls of coloured water and kitchen roll. 90-minute session: 10 min demonstrating the principle with two loose syringes, 60 min assembly (filling is done in turns at the water station with an adult), 20 min contest to lift the heaviest weight. Have spare syringes and tubing.
Challenges
- Make the platform rise 10 cm with 20 ml syringes (hint: two control syringes connected with a T-piece).
- Add a brake: a clothes peg that pinches the tube and holds the platform up with a load.
- Build a door that opens with another syringe when the lift reaches the top.
- Lift 1 kg with the least force possible and measure that force with kitchen scales.