Crane with gear wheel and pinion
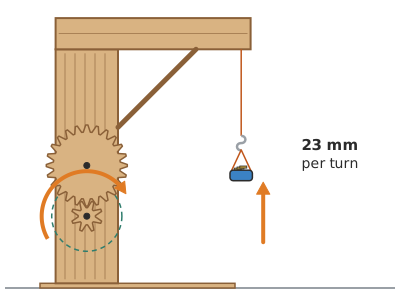
A 35 cm cardboard crane with a crank that turns an 8-tooth pinion, which in turn drives a 24-tooth wheel: the drum winds the string three times more slowly than the crank and lifts a 100 g load with a single finger.
What they will learn
- That two gears with the same tooth size mesh, and that the ratio of turns is the ratio of teeth (24 : 8 = 3).
- That a small gear driving a large one makes it turn more slowly but with more force (reduction), and the other way round faster but with less force.
- That two meshing gears turn in opposite directions.
- How a drum and a crank form a winch, and how to work out the total mechanical advantage (≈ 12).
Prepare beforehand
- Print all the templates at 100 % and check the scale with the red 50 mm line in the header of each sheet. The tower (A), the base (B) and the jib may need to be drawn with a ruler if they don't fit on A4.
- Cut the gears before the session if the children are under 10: cutting the teeth with a craft knife takes about 20 min.
- Cut the cork to 40 mm and pierce it through the centre from end to end with a skewer (or a thin nail).
- Check that the skewer turns freely in a 4 mm test hole in the cardboard.
- Have the coins for the load test and a stopwatch ready.
Materials and tools
- Corrugated cardboard — 3 sheets of 40 × 35 cm
single-wall, 3 mm, flat and uncreased (delivery boxes) - Wooden skewers — 4
Ø 3 mm, 25 cm long, straight - Straws — 1
Ø 6 mm, straight (rollers and crank handle) - Cork — 1
from a wine bottle, Ø ≈ 22 mm (drum), cut to 40 mm long - Strong string (twine) — 1 m
kitchen or kite string, thin (≤ 1.5 mm) - Metal paperclip — 1
large, to bend into a hook - Plastic bottle cap — 1
used as the load bucket (with 2 holes for the handle) - Coins or nuts — 10
to load the bucket and measure weights (€1 coin ≈ 7.5 g) - Hot glue sticks — 3–4
for a hot glue gun - PVA glue — a squeeze
to glue the two layers of each gear - Masking tape — 1 m
to hold the tower and the jib closed while they dry - Clothes peg — 1
wooden or plastic (brake)
Tools
- Craft knife, metal ruler and cutting mat — cutting the pieces and the teeth adult
- Scissors — simple pieces, straws and skewers (cut with the part near the pivot)
- Awl or skewer + pencil — 3 and 4 mm holes adult
- Hot glue gun — fixing the gears to the axles and assembling the structure adult
- Empty ballpoint pen — scoring the folds
- Glue stick — sticking the templates onto the cardboard
Pieces and templates
- A · Tower (80 × 80 × 300 mm tube) ×1 — 3 mm corrugated cardboard
- B · Base ×2 — 3 mm corrugated cardboard
- C · Tower lid ×1 — 3 mm corrugated cardboard
- D · Jib (40 × 40 × 250 mm tube) ×1 — 3 mm corrugated cardboard
- E · Strut ×1 — 3 mm corrugated cardboard
- F · Large gear wheel (24 teeth) ×2 — 3 mm corrugated cardboard
- G · Pinion (8 teeth) ×2 — 3 mm corrugated cardboard
- H · Drum flanges ×2 — 3 mm corrugated cardboard
- I · Crank arm ×2 — 3 mm corrugated cardboard
- J · Spacer washers ×4 — 3 mm corrugated cardboard
- K · Skewer axles ×5 — wooden skewer Ø 3 mm
- L · Rollers and handle (straw) ×3 — straw Ø 6 mm
Step by step
Cut out and glue the gears adult
Stick templates F and G onto the cardboard and cut out 2 large wheels and 2 pinions with a craft knife (the gaps between teeth with two straight cuts). Glue each pair with PVA glue, turning one layer 90° to cross the flutes, and leave to dry for 20 min under a book.
1 Stick on the templates: 2 wheels F and 2 pinions G 2 Cut each gap with two straight cuts that meet at the bottom 3 Glue each pair with the flutes crossed and leave 20 min under a book Check: Looking edge-on, the teeth of the two layers line up. The centre holes are aligned.Test the meshing flat
Push two skewers into a test piece of cardboard exactly 65 mm apart. Put the large wheel on one and the pinion on the other and turn: they should move without jumping or jamming. If they jam, move them to 66 mm; if they slip, bring them to 64 mm.
1 Push two skewers exactly 65 mm apart into a test piece of cardboard 2 Turn the pinion: the wheel should move without jumps or jams 3 One turn of the pinion moves 8 teeth: a third of the wheel Check: For every turn of the pinion, the large wheel makes exactly a third of a turn (count 8 teeth).Tip: Sand down any teeth that rub at the same point on every turn.Prepare the base
Cut two 200 × 250 mm rectangles B and glue them with PVA with the flutes crossed. Mark the tower's 80 × 80 mm square 20 mm from the back edge and centred (from 60 to 140 mm).
1 Cut two 200 × 250 mm rectangles B 2 Glue them one on top of the other with PVA and the flutes crossed 3 Mark the 80 mm square 20 mm from the back edge Cut out and pierce the tower adult
Draw tower A with a ruler (335 × 320 mm), cut it out and cut the 50 × 70 mm window. With the piece still flat, make the 4 holes of 4 mm with the awl. Score the folds with an empty ballpoint pen.
1 Draw tower A with a ruler, cut it out and cut the window 2 Make the 4 holes of 4 mm while the piece is still flat 3 Score the folds with a ruler and an empty ballpoint pen Check: On each side, the distance between the centres of the two holes is 65 mm.Close the tower adult
Fold the 4 faces and glue the 15 mm tab inside the FRONT face with hot glue. Hold it with tape while it cools. Fold the bottom tabs outwards.
1 Fold into a tube and glue the 15 mm tab inside FRONT 2 Hold with tape and fold the bottom tabs outwards 3 A skewer goes straight through the two top holes Check: Push a skewer through the two top holes: it goes in straight on both sides and turns freely.Glue the tower to the base adult
Place the tower on the square marked on the base, with the window facing FRONT, and glue the 4 bottom tabs with hot glue. Check that it is upright with a set square or the edge of a book.
1 Place the tower on the square with the window facing FRONT 2 Glue the 4 tabs with hot glue and press them down as it cools 3 Check with a set square that it is upright Fit the drum
Glue the two flanges H to the ends of the 40 mm cork. Thread a washer J onto the 110 mm skewer and push it through the top right hole (the washer stays outside, against the wall). Keep pushing, thread the drum on through the window, come out through the left hole and put another washer J on the outside.
1 Glue a flange H to each end of the 40 mm cork 2 Push in the 110 mm skewer with a washer J and thread on the drum 3 The drum is inside and there is a washer J outside each side Check: There is a washer J outside each wall and none inside the tower; the drum is inside, facing the window.Fix the large wheel adult
On the right side, leave the washer against the wall and thread on the large wheel F. Hot-glue the wheel to the axle and the drum to the axle (centred in the tower). On the left, glue the washer to the axle as a stop, leaving 1 mm of play.
1 Thread wheel F on from the right, next to the washer 2 Glue wheel and drum to the axle; the left J as a stop with 1 mm of play 3 Turn the wheel: the drum turns with it and the axle doesn't slide Check: When you turn the large wheel by hand, the drum turns with it and the axle doesn't slide sideways.Fit the pinion and the crank adult
Push the 125 mm skewer through the bottom holes with a washer on each side. On the right, thread on pinion G, mesh it with the large wheel and glue it to the axle. On the left, glue arm I to the axle and the 40 mm handle with its straw into the other hole of the arm.
1 125 mm axle at the bottom: pinion G on the right, arm I on the left 2 Glue arm I to the axle and the handle with its straw in the other hole 3 Turn the crank: the wheel goes the other way and makes 1 turn for every 3 Check: When you turn the crank, the large wheel turns the opposite way and makes 1 turn for every 3 of the crank.Build the jib adult
Cut out jib D, the slot at the tip and the 5 holes. Fold into a tube and glue the tab under the TOP face. Push the two 55 mm axles with their 34 mm straws (rollers) through the tip and turning holes.
1 Cut out jib D with its slot and the 5 holes 2 Fold into a tube and glue the tab on the inside, under TOP 3 Fit each 55 mm axle with its 34 mm straw: the roller turns Check: The rollers turn when you push them with a finger through the slot.Fit the lid and the jib adult
Glue lid C inside the tower, flush with the top edge. Glue the jib on top, with its string entry hole right over the one in the lid and its back end flush with the BACK face of the tower.
1 Fold the 4 flaps of lid C downwards 2 Glue C flush with the edge and the jib on top, hole over hole 3 The jib lies flat, flush with the BACK face of the tower Fit the strut adult
Fold the two tabs of strut E and glue it between the FRONT face of the tower (line 100 mm below the lid) and the bottom face of the jib (line 100 mm from the tower).
1 Fold the two 10 mm tabs of strut E 2 Glue it between the tower and the jib, 100 mm from the corner 3 Press the tip with a finger: the jib shouldn't bend Check: When you press the tip of the jib down with a finger, it doesn't bend.Thread the string
Tie the 1 m string to the drum through the window and wind it round twice. Pass it up inside the tower, through the lid and the jib, over the turning roller, along the jib, over the tip roller and down through the slot.
1 Tie the string to the drum through the window and wind it round twice 2 Take it up inside the tower and pass it over the two rollers 3 It comes out of the slot at the tip and hangs down to the table Tip: Tie a skewer to the end of the string to push it through the holes.Make the hook and the bucket adult
Bend the paperclip into an S shape and tie it to the end of the string. Make 2 opposite holes in the bottle cap, thread a 15 cm piece of string through as a handle and hang it from the hook.
1 Bend the paperclip into an S shape 2 Make 2 opposite holes near the rim of the cap 3 Thread a 15 cm string through as a handle and hang it from the hook Lift away!
Put 5 coins in the bucket and turn the crank: the string winds onto the drum and the load rises about 23 mm per turn. To leave it hanging, clip the clothes peg onto the end of the crank arm, pointing downwards, and let the arm drop until the peg rests on the base: the peg acts as a stop and the load can't come down.
1 Put 5 coins in the bucket 2 Turn the crank: the load rises about 23 mm per turn 3 Clip the peg to the arm and rest it on the base: the load stays still Check: The load rises smoothly from the table to almost the tip of the jib: about 20 cm, ≈ 9 turns of the crank.
Does it work? The test
Load the bucket with €1 coins (7.5 g each) and lift it 20 cm from the table (to almost the tip of the jib). Count the crank turns and time it.
What should happen: About 9 crank turns for 20 cm (≈ 23 mm per turn). With 10 coins (≈ 80 g) you can turn it with one finger; the crane lifts up to 300 g without tipping over or skipping teeth if the gears are well glued.
If something goes wrong
- The teeth skip when lifting a load — Gears too far apart or an axle that bends. Solution: Check the 65 mm between holes; if they are further apart, glue on a cardboard patch and pierce again at 64–65 mm. Use double-layer gears.
- The crank sticks at one point on every turn — A deformed tooth or an off-centre gear (hole made in the wrong place). Solution: Mark the tooth that rubs and sand it or trim 1 mm off; if the gear wobbles, remake it, piercing exactly at the centre.
- The crank turns but the drum doesn't — Gear or drum loose on the axle. Solution: Hot-glue on both faces; if the hole ended up too big, wrap a little piece of tape round the skewer before gluing.
- The string jams or comes off the roller — A roller that doesn't turn or string rubbing on an edge. Solution: Check that the straw turns freely on the skewer and that the entry hole is right behind the turning roller.
- The crane tips forwards — Tower in the wrong place on the base or load too heavy. Solution: The tower must go at the back of the base; add a counterweight (a pencil case or a jar) on the back part of the base.
- The load drops by itself when you let go — Cardboard gears have little friction. Solution: Use the clothes peg as a brake, or a rubber band from the handle to the base.
Safety
- The craft knife is used by an adult with a metal ruler and cutting mat; cutting the teeth is the riskiest task.
- Hot glue burns: the adult applies it, the child points to where it goes and holds the piece with a stick or a ruler, not with their fingers.
- Cut the points off the skewers and don't leave any sticking out at face height.
- Don't hang more than 300 g or anything fragile from the crane: if it tips over, it falls forwards.
- The coins and the paperclip are small parts: keep them out of reach of children under 3.
The science behind it
For children
Gears are wheels with teeth that push each other round. When you turn the crank, you move the small wheel, which has 8 teeth. This pushes the big wheel, which has 24: for the big one to make one turn, the small one has to make three. That's why the load goes up slowly, but you hardly have to push at all, just like when you put your bike in the easiest gear to ride up a hill.
For the adult
Two gear wheels mesh if they have the same pitch (here module m = 4 mm, circular pitch p = π·m ≈ 12.6 mm); their pitch diameter is d = m·z (32 and 96 mm) and the centre distance is (d1 + d2)/2 = 64 mm, to which we add 1 mm of clearance because of the irregularity of the cardboard. The gear ratio is i = z2/z1 = 24/8 = 3: the driven wheel turns 3 times more slowly and, ignoring losses, with 3 times more torque, and in the opposite direction. The crank-and-drum assembly is a winch: mechanical advantage = (R crank / r drum)·i = (45/11)·3 ≈ 12. A 100 g load (0.98 N) needs only ≈ 0.08 N at the handle, plus friction. In exchange, the distance moved is reduced in the same proportion: each turn of the crank lifts the load 2π·11/3 ≈ 23 mm (conservation of energy: force × distance stays the same). The flanks inclined at 20° imitate the involute profile of industrial gears, which keeps a rolling contact; in cardboard, sturdy trapezoidal teeth with some clearance are enough. The base extends under the jib so that the centre of gravity of the whole (with the load) falls within the support polygon.
- gear: a wheel with teeth that passes its rotation on to another toothed wheel.
- pinion: the smaller gear of a pair.
- gear ratio: how many turns one wheel makes for each turn of the other (here, 3 to 1).
- winch: a cylinder that winds up a rope when turned with a crank.
- mechanical advantage: how many times a machine multiplies the force.
By age
- 5–7 years: Too complex to make on their own: the adult builds the crane and the child assembles the jib, threads the string, makes the bucket and uses it, counting turns.
- 8–10 years: The adult cuts the gears and tower and makes the holes. They glue, fit the axles, thread the string and check the 3 to 1 ratio by counting teeth and turns.
- 11–12 years: They build it almost on their own (adult on craft knife and hot glue). Challenge: work out the mechanical advantage, check it with a rubber-band force meter and design a second pair of gears for a 9 to 1 reduction.
In a group or in class
Teams of 3–4, one crane per team, in two 60-min sessions. Before the first: the teacher cuts all the gears (or the older children cut them under supervision) and draws the towers. Session 1: base, tower and mechanism (with a hot glue station staffed by an adult). Session 2: jib, string and load test with coins; each team records its maximum load and turns per 20 cm in a shared table. Keep spare gears and skewers.
Challenges
- Add a second gear stage (8 → 24 twice) and get a 9 to 1 reduction: how much weight does it lift now?
- Make the jib swivel on the tower with a bottle cap as a bearing.
- Design a cardboard ratchet that lets the load go up but not down.
- Replace the crank with a battery motor and compare the speed.
- Build a sliding counterweight to lift heavier loads without tipping over.