Pulley crane with winch
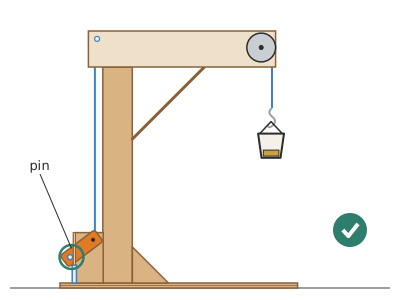
A 35 cm tall crane with a square-tube mast, a 26 cm jib and a hand-cranked winch: when you turn the crank, the string runs over a roller and a pulley made from a bottle cap and lifts a load of up to 300 g.
What they will learn
- That a fixed pulley does not reduce the effort but changes the direction of the force: you pull one way and the load goes up.
- That a winch (crank + axle) multiplies force: with a crank of 40 mm radius and a drum of ≈ 2.5 mm, your hand uses about 16 times less force than the weight.
- That gaining force costs distance: you have to turn about 16 times to lift the load 25 cm.
- Why a crane does not topple over: the weight of the load must fall inside the base.
- That a folded cardboard tube is much stiffer than a flat strip of the same material.
Prepare beforehand
- Print the small templates at 100 % and check the 50 mm red line in the header. Draw the large pieces (base, mast, jib) directly with a ruler and set square, following the dimensions.
- Cut and fold the mast and the jib before the session if the children are under 8: they are the longest cuts.
- Pierce the bottle cap (4 mm hole, so it turns freely on the 3 mm skewer).
- Cut the skewers to length: 110 mm (winch axle), 3 × 40 mm (pulley axle, roller and handle) and 70 mm (locking pin). Remove the tips.
- Prepare the load bucket: a yoghurt pot with two opposite holes below the rim and a string handle.
Materials and tools
- Corrugated cardboard — 2 sheets, 35 × 45 cm
single-wall, 3–4 mm (medium shipping box), with no creases or crushed areas - Wooden skewers — 2
Ø 3 mm, 25–30 cm long, straight - Straws — 2
Ø 6 mm, straight (the kind a skewer slides through loosely) - Plastic bottle cap — 1
Ø 30 mm, about 12 mm high (water or fizzy drink bottle) - Thick thread or kitchen string — 1.5 m
1–1.5 mm cotton twine, smooth (not fluffy) - Metal paperclip — 1
32 mm, to bend into an S shape (hook) - Small yoghurt pot — 1
clean, with two holes and a 20 cm string handle (load bucket) - Coins — 20–30
to load the bucket (a €1 coin weighs 7.5 g; a 10 cent coin, 4.1 g) - Glue sticks for hot glue — 3–4
for a hot glue gun - Sticky tape — 1 roll
parcel tape or masking tape, to hold things while they dry
Tools
- 30 cm metal ruler, pencil and set square — draw the large pieces and check that the mast stands at 90°
- Craft knife and cutting mat — cut the pieces, the jib slot and the mast opening adult
- Scissors — cut out templates, straws and discs
- Dry ballpoint pen — score the folds so they bend cleanly
- Awl or 3 mm nail — pierce the axle holes and the centre of the bottle cap adult
- Hot glue gun — glue the mast, jib, supports and pulley adult
- Small pliers — bend the paperclip into an S and cut skewers
Pieces and templates
- A · Lower base ×1 — corrugated cardboard 3–4 mm
- B · Upper base (with mast opening) ×1 — corrugated cardboard 3–4 mm
- C · Mast (40 × 40 square tube) ×1 — corrugated cardboard 3–4 mm
- D · Mast plug ×2 — corrugated cardboard 3–4 mm
- E · Jib (U channel) ×1 — corrugated cardboard 3–4 mm
- F · Brace (diagonal strut) ×1 — corrugated cardboard 3–4 mm
- G · Mast foot gussets ×3 — corrugated cardboard 3–4 mm
- H · Winch supports ×2 — corrugated cardboard 3–4 mm
- I · Pulley discs ×2 — corrugated cardboard 3 mm
- J · Crank arm ×2 — corrugated cardboard 3–4 mm
- K · Axles and sticks ×5 — wooden skewer Ø 3 mm
- L · Straw lengths ×3 — straw Ø 6 mm
Step by step
Draw and cut the bases adult
Draw two 160 × 330 mm rectangles: one with the flutes running lengthways (A) and the other with the flutes running across (B). In B, cut the 41 × 41 mm square opening 59.5 mm from the back edge and from the sides.
1 Draw A and B at 160 × 330 mm with the flutes crossed 2 On B, mark the opening 59.5 mm from the back and the side and cut it out 3 Check: 41 mm on each side and centred across the width Check: Put a ruler in the opening: it should measure 41 mm on each side and be centred (59.5 mm from each side).Glue the double base
Spread glue or hot glue in a zigzag over A and stick B on top, edges flush. Put 2–3 books on top for 10 minutes so it stays flat. Copy the marks from template B in pencil (supports, gussets, locking pin, load area).
1 Put glue in a zigzag over A and stick B on top, edges flush 2 Put 2 or 3 books on top for 10 minutes 3 Copy the marks from template B in pencil Check: The base does not rock on any corner when it rests on the table.Fold the mast
Draw piece C (170 × 300 mm, vertical flutes). Score the 4 folds every 40 mm with a dry ballpoint pen and the ruler, fold them to 90° and glue the 10 mm tab inside the first face. The faces end up, in order, SIDE, BACK, SIDE and FRONT. Hold with tape while it cools.
1 Draw C at 170 × 300 mm and mark 4 folds every 40 mm 2 Go over each fold with the ruler and a dry ballpoint pen, pressing hard 3 Fold to 90°, glue the tab on the inside and hold with tape Check: The tube measures 40 × 40 mm on the outside and its four faces are flat.Tip: Fold each crease by resting the ruler on top and lifting the cardboard against it: it comes out straight.Close the top of the mast adult
Cut out the two 34 × 34 mm squares D, glue them together and push them into the top end of the tube, flush with the edge. Fix with a bead of hot glue round the edge.
1 Cut two 34 mm squares D and glue one on top of the other 2 Push them into the top opening of the mast 3 Flush: the ruler rests on the plug and on all four edges Check: When you rest the ruler across the top, it touches the plug and all four edges at once.Stand the mast up adult
Put hot glue in the bottom of the opening in the base and insert the mast (the face marked FRONT towards the load area). Check with the set square that it is at 90° from the front and from one side, and hold it like that for 1 minute while it cools.
1 Put hot glue in the opening and insert the mast, FRONT towards the load 2 Hold it at 90° with the set square for 1 minute while it cools 3 No light between set square and mast, from the front and from one side Check: Place the set square against two adjacent faces: there should be no light between the set square and the mast.Glue on the gussets adult
Glue the 3 gussets G (50 mm triangles) with the vertical side against the mast and the horizontal side on the base: one on the front face and one on each side. Do not put one at the back: that is where the string goes up.
1 Cut three triangles G with 50 mm sides 2 Hot glue on the short sides: one against the mast and one on the base 3 One at the front and one on each side; none at the back: the string goes up there Fold the jib adult
Draw piece E (260 × 130 mm), cut the two 12 × 14 mm slots in the floor (the back one, for the string to go up, and the one at the tip, open to the edge, for it to come down) and pierce the 4 holes of 3 mm: the roller ones 39 mm from the fold and the pulley ones at 27 mm. Fold the two 50 mm walls upwards: you get a U channel with a 30 mm floor.
1 Draw E: two 50 mm walls and a 30 mm floor 2 Cut the 12 × 14 mm slots and pierce the 3 mm holes 3 Fold the walls upwards: the skewer goes through straight Check: Push a skewer through the two holes at the tip: it should go in straight, parallel to the floor of the jib.Assemble the pulley adult
Glue a disc I to each side of the bottle cap, well centred, and widen the hole through all three to 4 mm with the awl. Put the pulley in the tip of the jib (the axle 27 mm from the floor leaves the discs 4 mm above it) and push the 40 mm skewer through the wall, the pulley and the other wall. Fix the skewer to the walls with a drop of hot glue on the outside.
1 Glue a Ø 40 mm disc I to each side of the bottle cap, centred 2 Push the 40 mm skewer through wall, pulley and wall; glue on the outside 3 Spin it with a finger: it turns once on its own without touching the walls Check: Spin the pulley with a finger: it should make at least one full turn on its own without touching the walls or the floor, and its front edge sits right above the slot at the tip.Fit the roller adult
Push the second 40 mm skewer through one back hole, thread on the 24 mm length of straw and carry on through the other hole. Glue the skewer to the walls with hot glue on the outside; the straw must stay loose.
1 Push the skewer through one hole, thread on the straw and carry on 2 Glue the skewer to the walls on the outside; the straw stays loose 3 The straw turns freely, right above the slot Check: The straw turns freely on the skewer, right above the slot.Glue the jib onto the mast adult
Put hot glue on the mast plug and rest the jib on top with the MAST area of the template over it: the slot sits 4 mm behind the mast and the tip 200 mm in front. Check that the jib points towards the load area and is level.
1 Hot glue on the plug, then rest the jib's MAST area on top 2 The tip sticks out 200 mm in front and is level 3 From above, the string will fall right over the orange cross Check: Look from above: the string hanging from the front of the pulley falls right over the orange cross in the load area.Fit the brace adult
Fold the tabs of brace F to 45°. Glue the lower one to the front face of the mast, on the line 100 mm from the top, and the upper one under the jib, on the line 100 mm in front of the mast.
1 Fold the two tabs of F to 45° 2 Glue one tab 100 mm below the top and the other 100 mm in front 3 Gently push the tip downwards: it should not give Check: Gently push the tip of the jib downwards: it should not give.Build the winch adult
Glue the supports H upright on their lines (60 mm apart on the inside, one on each side of the mast) with the edge marked BACK facing backwards. Push the 110 mm skewer through the two holes, leaving 12 mm sticking out on the left and about 31 mm on the right; there are about 67 mm between the outer faces of the supports. Left and right are seen from the front, from the loading area, as on template B: the right is the pin side.
1 Cut two supports H, pierce Ø 4 mm and fold the feet outwards 2 Glue the supports upright on their lines, 60 mm apart 3 Push in the 110 mm axle: 12 out on the left and 31 on the right Check: The axle turns with a finger without catching and stays level.Fit the crank adult
Glue the two J pieces together. Thread it onto the right-hand end of the axle (the 31 mm one, on the pin side), leaving 15 mm between crank and support, and glue it with hot glue. Put the 40 mm skewer in the other hole, pointing outwards, with its loose 25 mm straw sleeve, and glue the skewer.
1 Glue the two J pieces with the flutes crossed 2 Thread J onto the right-hand end, 15 mm from the support, and glue it 3 Fit the 40 mm handle pointing outwards, with its loose straw sleeve Check: With the locking pin removed, turn the crank all the way round: the arm clears the base by 1 cm without touching it.Tip: On the left-hand end of the axle (the 12 mm one), wrap tape round until it forms a stop: that way the axle cannot slide out towards the crank.Fit the locking pin adult
Glue the 25 mm length of straw upright on the «pin» mark (at the back, next to the right-hand edge) with a drop of hot glue round it. The 70 mm stick goes in and out: without it the crank turns freely; with it in, the handle hits it on the way down at the back and the load is locked.
1 Glue the 25 mm straw upright on the pin mark 2 Put the 70 mm stick into the straw 3 On the way down at the back, the handle hits the pin Tip: It is not a ratchet: the pin stops the crank in both directions. That is why you take it out to raise or lower the load and put it in when you want to leave it hanging.Thread the string
Tie one end of the string to the middle of the winch axle with two knots and a drop of hot glue. Take it up behind the mast, through the back slot, over the roller, along the jib, over the pulley and down through the slot at the tip, and let it hang. Bend the paperclip into an S (you will tie it on in the next step).
1 Tie the string to the middle of the axle with two knots and a drop of hot glue 2 Take it up behind the mast, through the slot, over the roller and the pulley 3 Bend the paperclip into an S; you will tie it on when you adjust the length Check: The string does not touch the mast on its way up and runs centred in the pulley channel.Adjust the length and test
Take out the locking pin and wind 2 turns of string onto the axle. Tie the paperclip at the point where the string touches the load area and cut off the spare end after the knot (leave 1 cm). Hang the empty bucket and turn the crank so that the string winds on at the front of the axle. When the bucket is at the top, hold the crank, put the pin in and let go slowly: the handle comes down at the back and rests against it.
1 With 2 turns on the axle, tie the clip where it touches the base and cut the end 2 Take out the pin, hang the bucket and turn: the string winds on at the front 3 Put the pin in and let go: the handle rests on it and the bucket stays up Check: With the pin in, the bucket does not drop even if you give it a little tap. If, when you turn, the string leaves the axle at the back instead of the front, it rubs on the edge of the slot: unwind it and wind it the other way.Decorate
Paint the jib and the mast yellow with poster paint or felt-tip pen and draw black warning stripes on the tip. Do not paint the pulley channel or the winch axle (paint makes them stiff). Leave to dry for 15 minutes.
1 Paint the jib and the mast yellow, with black stripes on the tip 2 Do not paint the pulley or the winch axle; leave to dry for 15 minutes
Does it work? The test
Put the bucket on the orange cross, hook it on and load it with €1 coins, 5 at a time (37.5 g per 5). Take out the pin, raise the load to the top counting the turns of the crank and put the pin back in to lock it.
What should happen: With 20 coins (150 g + bucket) the crane lifts the load effortlessly: about 15–17 turns for 25 cm of travel. It holds well up to 300 g; above that, the jib starts to flex.
If something goes wrong
- The string comes off the pulley — Discs off-centre or string coming in at an angle from the roller. Solution: Re-centre discs I; check that the roller and the pulley are aligned with the centre of the jib.
- The load drops on its own when you let go of the crank — The locking pin is not pushed all the way into the straw, the straw has come unstuck or the stick is too short and the handle goes over it. Solution: Hold the crank, put the pin in and let go slowly: the handle should come down at the back and rest against it. The string should leave the axle at the front (mast side).
- The crank is very hard to turn — The string rubs against the edge of the slot or the mast, or the axle rubs in the supports. Solution: Widen the slot, check that the string goes straight up without touching the mast and enlarge the holes in the supports to 4 mm.
- The crank does not go all the way round — The locking pin is in (it locks in both directions) or the arm touches the base. Solution: Take out the pin while you turn. If the arm rubs on the base, the axle is too low: the holes in the supports go 60 mm above the base.
- The jib bends under the load — Brace come unstuck or loose folds in the jib. Solution: Glue the brace again with more hot glue and reinforce the floor of the jib with a 30 × 150 mm strip of cardboard underneath.
- The mast leans — Not enough hot glue at the foot or mast not square. Solution: Unstick it, stand it up again checking with the set square and add the gussets G.
- The pulley does not turn — Hole in the bottle cap too tight or hot glue on the skewer. Solution: Enlarge the hole in the cap and discs to 4 mm; glue the skewer only on the outside of the walls.
Safety
- The craft knife is used by an adult with a metal ruler and cutting mat; the 300 mm cuts are the most dangerous.
- Hot glue burns: the adult applies it and the child only holds the pieces once it is no longer runny.
- Do not put your face under the load while it is going up: if the string comes loose, it falls.
- Cut the tips off all the skewers before fitting them.
- Coins and paperclips are small parts: keep them out of reach of children under 3.
The science behind it
For children
Imagine you want to get a bucket to the top of a tree: it is easier to pull a rope downwards than to climb up with the bucket. That is what the pulley does: the bottle-cap wheel changes the direction of your force. The crank is like a long arm that turns a very thin stick: your hand goes round in a big circle and the string winds on just a little, so the load goes up slowly but with hardly any effort. And the locking pin is like a bolt on a door: when you put it in, the crank cannot turn any more and the load stays still at the top.
For the adult
The crane combines two simple machines. The fixed pulley at the tip gives no mechanical advantage (the tension in the string equals the weight of the load), but it redirects the force through 90°. The advantage comes from the winch: a wheel and axle whose ideal mechanical advantage is the ratio between the crank radius (40 mm) and the effective radius of the drum (1.5 mm skewer + string ≈ 2.5 mm), i.e. ≈ 16. For a 200 g load, a force of ≈ 12–15 gf on the handle is enough (plus friction). The price is distance: each turn of the crank (251 mm of hand travel) raises the load ≈ 16 mm; work is conserved (F·d constant, minus losses). Statically, the crane does not topple because the vertical line through the load falls inside the support polygon (the pulley is 280 mm from the back of a 330 mm base). The mast is a closed thin-walled tube: its moment of inertia is many times that of a flat strip of the same cardboard, and the vertical flutes work in compression. The brace at 45° forms a triangle with the mast and the jib, the rigid shape of structures. The locking pin is not a ratchet (which would let it turn one way and not the other): it is a stop that locks the crank in both directions, which is why it is removed to turn and put in to hold the load.
- pulley: a wheel with a groove that a rope runs in; it changes the direction of the force.
- winch: an axle turned with a crank to wind up a rope and lift a weight.
- crank: an arm with a handle used to turn an axle with little force.
- counterweight: a weight placed on the other side so that something does not topple over.
- triangulation: using triangles (like the brace) so that a structure does not change shape.
By age
- 5–7 years: The adult draws, cuts and glues the mast, jib and winch. The child folds with help, glues the gussets with PVA glue, threads the string over the roller and the pulley, and plays at lifting loads. Focus on «I pull this way and it goes up that way».
- 8–10 years: They follow all the steps with help with the craft knife, awl and hot glue. Let them check for themselves with the set square that the mast is straight and count the turns for every 5 cm.
- 11–12 years: Let them work out the mechanical advantage of the winch (crank radius / axle radius) and compare it with what they measure. Challenge: add the movable pulley and make a table of force against load.
In a group or in class
Teams of 3 children, one crane per team. Before the session the adult pre-cuts bases, masts and jibs (they are long cuts) and pierces the bottle caps; the teams fold, glue and assemble. 2 × 60 min sessions: on the first day the structure (base, mast, jib, brace); on the second, winch, pulley and a coin-lifting contest. Have 2 hot glue guns for the whole class, with an adult at each one.
Challenges
- Lift 300 g of coins 25 cm in less than 30 seconds.
- Add a movable pulley and show that half the force is needed.
- Make the jib go up and down (luffing jib) with a second string and another winch.
- Build a crane that turns 360° without toppling, using a counterweight.
- Design a hook that releases the load when you pull a second string.