Spinning colour disc
A 10 cm cardboard disc with the seven colours of the rainbow, mounted as a "whirligig" on a string: when you pull and release it spins at more than 20 turns per second and the colours blend into a light, almost white grey.
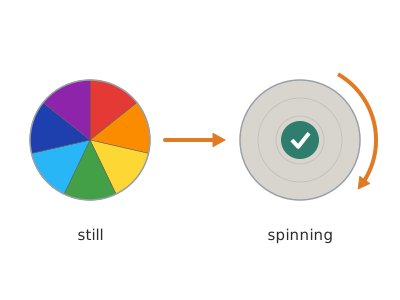
What they will learn
- That white light is a mixture of colours and that the eye can "add up" colours that reach it very quickly one after another.
- That mixing lights (additive) and mixing paints (subtractive) don't give the same result: that's why the disc looks light grey and not white.
- How a twisted string stores energy and gives it back as spin (whirligig).
- To divide a circle into equal parts with a protractor (360 / 7 = 51.4°).
Prepare beforehand
- Print the disc sheet in colour at 100 % (without "fit to page") and check that disc A measures 100 mm.
- Cut the 1 m strings in advance (one per child).
- If the children are young, make the holes yourself before the session.
- Have a phone with slow motion ready for the last experiment.
Materials and tools
- Corrugated cardboard — 1 piece of 12 × 12 cm per disc
single-wall, 3 mm, flat - A4 sheet printed in colour — 1 A4 sheet (all 3 discs fit)
printed at 100 % scale, ordinary 80 gsm paper - Thick string — 1 m per disc
cotton, twine or thick wool, 1–2 mm thick - Glue stick or PVA glue — a little
to stick the paper onto the cardboard - Felt-tip pens or poster paints — 7 colours
red, orange, yellow, green, light blue, blue and violet, as bright as possible (only if you don't print in colour)
Tools
- Scissors — cutting out the discs
- Compass or 10 cm glass — drawing the circle if you don't print
- Protractor — dividing into 51.4° sectors
- Awl, thin nail or wooden skewer — making the Ø 2 mm holes adult
- Lump of modelling clay or cork — backing for making holes
Pieces and templates
- A · 7-colour disc ×1 — paper printed in colour (glued onto D)
- B · Disc of the 3 primary colours of light ×1 — paper printed in colour (glued onto cardboard)
- C · Benham's disc (ghost colours) ×1 — printed paper (glued onto cardboard)
- D · Disc backing ×2 — corrugated cardboard 3 mm
- E · Disc B backing ×1 — corrugated cardboard 3 mm
Step by step
Cut out the colour disc
Cut out disc A printed in colour (Ø 100 mm) along the outer line. If you don't have a colour printer, print in black and white and colour each sector with its colour, pressing hard so no white is left.
1 Print the sheet at 100 %: disc A must measure 100 mm 2 Cut out disc A right on the outer line 3 Make sure no white border is left around the disc Check: There should be no white border around it: cut right on the line.Cut out the cardboard backing
Place the paper disc on the corrugated cardboard, draw round it in pencil and cut out a Ø 100 mm cardboard circle (piece D). Careful: disc B is smaller and its backing (piece E) is Ø 80 mm; you'll make it in step 9.
1 Put disc A on the cardboard and draw round it 2 Cut slowly, turning the cardboard, not the scissors 3 Now you have piece D, a 100 mm cardboard circle Tip: Cut slowly, turning the cardboard, not the scissors: the circle will come out rounder and spin more steadily.Glue on the colour disc
Spread glue stick over the cardboard and stick disc A on top, with the edges lined up. Smooth it with your hand from the centre outwards so no bubbles are left.
1 Spread glue stick over the whole face of the cardboard 2 Lower disc A on top, with the edges lined up 3 Smooth with your hand from the centre outwards Mark the holes
The two holes go on the horizontal line through the centre, 5 mm on each side (10 mm apart). If you coloured it by hand, mark them with the ruler.
1 Lay the ruler on the line through the centre 2 Mark a dot 5 mm on each side of the centre Check: Measure: each mark exactly 5 mm from the centre. If they are off-centre, the disc will wobble.Make the holes adult
Rest the disc on a ball of modelling clay or a cork and push an awl or a wooden skewer through each mark to leave holes of about 2 mm.
1 The adult rests the disc on modelling clay and pierces each mark 2 There are two 2 mm holes, one on each side of the centre Thread the string
Thread the 1 m string through one hole and back through the other. Even up the two ends and tie them with a double knot. You have a loop of about 45 cm with the disc in the middle.
1 Thread the string through one hole and back through the other 2 Even up the two ends and tie them with a double knot 3 Hold the loop by the ends: the disc sits in the middle Check: Hold the loop by both ends: the disc should be in the middle.Wind up the string
Hold one end of the loop in each hand, with your index fingers hooked in the loop. Leave the string a little slack and swing the disc round like a skipping rope about 20–30 times, until both strands are well twisted.
1 With the string slack, swing the disc round like a skipping rope 2 Do 20–30 turns until both strands are well twisted Tip: If it's hard at first, have someone else turn the disc by hand while you hold the string.Pull and release
Pull your hands apart sharply: the disc spins very fast. When the string has fully unwound and starts winding the other way, bring your hands slightly closer; pull again once it has wound up. Repeat in a rhythm.
1 Pull your hands apart sharply: the disc spins very fast 2 When it winds the other way, bring your hands slightly closer 3 Repeat in a rhythm: the colours blend into light grey Check: The disc hums and the colours disappear: you see an almost even light grey (depending on the printer, with a slight pinkish or yellowish tint).Make and test the other discs adult
Make discs B and C the same way as A (steps 1–6): cut out each one, glue it onto its cardboard backing (C onto another Ø 100 mm circle D; B onto piece E, Ø 80 mm, drawn round disc B itself), mark and make the two holes 5 mm from the centre and thread a 1 m string. Then spin them like A: the 3-colour disc B (Ø 80 mm) fast and Benham's disc C (black and white) with slower turns, pulling gently.
1 Spin the 3-colour disc B and compare the colour 2 Spin disc C slowly: faint colours appear
Does it work? The test
Spin disc A on its string in front of a window with good daylight and look at it from 30–50 cm.
What should happen: At full speed (20–40 turns per second, the disc hums) the colours disappear and the disc looks an even light grey, sometimes with a slightly pinkish or yellowish tint depending on the printer. As it slows down, the colours reappear as stripes and then as separate sectors.
If something goes wrong
- The disc doesn't pick up speed — String too thin or slippery, or pulling too late. Solution: Use 1–2 mm cotton string and wind at least 20 turns before the first pull. Pull sharply and ease off just as the string goes straight.
- The disc wobbles and stops — Off-centre holes or a disc that isn't round enough. Solution: Check that the holes are 5 mm from the centre and on the same line. Trim any "points" off the outline.
- You can still see colours — It isn't spinning fast enough or there's a big difference in brightness between sectors. Solution: Wind more turns (25–30) and pull sharply just as the string goes straight. If the disc is very light (thin card), glue another cardboard circle on the back: with more weight it spins for longer. Repaint any pale sectors so they all have a similar intensity.
- It looks dark grey, not light grey — Dark paints or poor light. Solution: Look at it in strong daylight and use light, bright colours (lemon yellow, light blue). It's normal for it not to be pure white.
- The string breaks or cuts through the cardboard — Sewing thread, or holes too close to the edge of soft cardboard. Solution: Use thicker string; reinforce the holes with a small piece of tape on each side before making them.
Safety
- The disc spins very fast and its edge can hit: keep it away from your face (more than 30 cm) and from other people.
- Keep long hair away from the moving string: tie it back.
- The awl or nail is used by an adult, pushing into a soft backing and never towards the hand.
- The twisted string can pinch fingers: don't put your fingers between the two strands.
The science behind it
For children
Your eyes are a bit slow: when they see a colour, they hold on to it for a moment even after it has gone. If the disc spins really fast, the seven colours pass the same spot so quickly that your eyes see them all at once, mixed together. And the mixture of all the colours of light is white. The thing is, paints aren't pure light, so instead of bright white you'll see a light grey.
For the adult
Newton (1666–1672) split sunlight with one prism and recombined it with another; the disc illustrates recombination by temporal mixing. The retina integrates light over about 20–50 ms: above the critical flicker fusion frequency (≈ 50–60 Hz for bright stimuli) an alternating stimulus is perceived as its average. With 7 sectors, 10 turns/s gives 70 colour changes per second, but each colour only repeats 10 times per second, so at that speed some flicker is still visible; full fusion comes at around 20–40 turns/s, which is what a 10 cm cardboard whirligig reaches. The twisted string is a torsion spring: when you pull, the tension becomes torque and the disc accelerates; its inertia twists the string again in the opposite direction, and so on. The perceived colour is the weighted average (averaged additive mixing) of the sectors' reflectances: each pigment absorbs much of the spectrum (subtractive mixing in each sector) and reflects perhaps 30–60 %, so the average is a mid-luminance grey, not white. The RGB disc works the same way: it averages three narrow-band reflectances and gives a darker grey. Benham's disc, in black and white, produces subjective colours (Fechner–Benham colours) through the different temporal responses of the cones and retinal pathways; it is seen best at 5–10 turns/s.
- spectrum: all the colours that make up white light, from red to violet.
- additive mixing: mixing coloured lights; all of them together make white.
- persistence of vision: the eye holds on to each image for a fraction of a second.
- frequency: how many times something happens in one second.
- sector: part of a circle between two radii, like a slice of pizza.
By age
- 5–7 years: The adult makes the holes and threads the string. The child cuts out, glues and colours in (if there's no colour printing) and practises the pull-and-release movement with help. Focus on "where do the colours go?".
- 8–10 years: They do everything except making the holes. Let them compare discs A and B and try colouring their own disc with 2 colours to predict the result.
- 11–12 years: Challenge: divide the circle into 51.4° sectors with the protractor, measure the turns per second with slow motion and calculate how many times per second each colour passes the same point.
In a group or in class
Individually (it's cheap and quick): each child makes their own disc A, and each table of 5 shares a disc B and a disc C for comparison. For 25 children: 25 sheets printed in colour (one per child, with the 3 discs; B and C are cut out of only 5 of them), 35 pieces of corrugated cardboard 12 × 12 cm (from 2–3 medium boxes, or cereal boxes in two layers) and 35 m of string. The teacher makes the holes with an awl while the children glue. 40-min session: 5 min demonstration, 20 min building, 15 min testing and comparing A/B/C by the window. Watch the space: the discs should be spun at least an arm's length apart.
Challenges
- Paint a disc half yellow and half blue and predict: will it come out green, as when you mix those paints, or grey? Try it with 1:1 and 2:1 proportions and explain the result (when it spins, the eye averages light, it doesn't mix paints).
- Mount the disc on a toy motor with a 1.5 V battery and compare the speed with the whirligig.
- Make a disc with more red, orange and yellow area: do you get a warmer grey? And a "whiter" one?
- Build a spinning top with a pencil pushed through the centre of the disc and try Benham's disc on it.