Constellation projector
A shoebox with a 56 mm hole in the lid and a phone torch inside: put a black card disc pierced with a real constellation on top and the ceiling of a dark room fills with those stars in a circle more than 1 m across.
What they will learn
- That light travels in straight lines: each tiny hole lets through one ray that draws a dot on the ceiling, and together they keep the shape of the constellation.
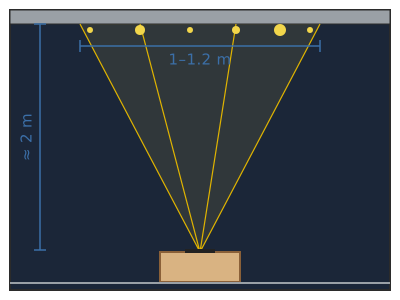
- That the image grows in proportion to distance: with the light 10 cm from the disc and the ceiling 2 m away, the constellation looks about 20 times bigger.
- That sharpness depends on the size of the light source: a small LED gives stars as dots; a torch with a reflector gives blobs.
- To recognise 5 real constellations, and that stars have different brightnesses (magnitude).
- That a projection flips the image if the disc is put the wrong way round, and how to avoid it.
Prepare beforehand
- Print the templates at 100 % (not «fit to page») and check with a ruler that the red line in the header measures 50 mm and that the discs measure 66 mm.
- Choose the room for the show: you need total darkness (blinds down) and a smooth white ceiling.
- Test your phone torch: cover it with a finger and check that the light comes from a small point. If your phone has two LEDs, cover one with tape.
- If the children are young, pierce the 2 and 2.5 mm holes yourself beforehand; they can do the 1 mm ones with the needle.
Materials and tools
- Shoebox with lid — 1
about 32 × 20 × 11 cm; the height (10–12 cm) sets the distance from the light to the disc - Black card — 1 A4 sheet
180–250 gsm, opaque (no light should come through when held up to the light) - Phone with a torch — 1
the LED flash is a small source (3–4 mm) and gives sharp stars - Black sticky tape — 1 roll
black electrical tape or duct tape, to seal corners and hold the disc - Glue stick — 1
to stick the printed template onto the card - Piece of cork or polystyrene sheet — 1, 10 × 10 cm
soft base to push the awl into without damaging the table
Tools
- Craft knife and cutting mat — cut the 56 mm hole in the lid adult
- Compasses or a 56 mm glass — draw the hole (template A works too)
- Thick sewing needle (1 mm) — faint stars
- Fine awl or 1.5 mm nail — medium stars adult
- 2 and 2.5 mm nails (or drill bits of those sizes turned by hand) — bright stars adult
- Scissors — cut out the discs
Pieces and templates
- A · Lid hole template ×1 — paper (template for drawing round)
- B · Disc: Orion ×1 — black card 180–250 gsm
- C · Disc: Ursa Major ×1 — black card 180–250 gsm
- D · Disc: Southern Cross ×1 — black card 180–250 gsm
- E · Disc: Scorpius ×1 — black card 180–250 gsm
- F · Disc: Cassiopeia ×1 — black card 180–250 gsm
Step by step
Mark the hole on the lid
Cut out template A (56 mm circle) and place it in the centre of the box lid: draw two diagonals from corner to corner to find the centre. Draw round the outline in pencil.
1 Draw the two diagonals of the lid: they cross at the centre 2 Centre template A on the crossing and draw round it in pencil 3 The 56 mm circle is drawn in the centre of the lid Check: The circle should be the same distance from both long sides of the lid.Cut the hole adult
An adult cuts out the 56 mm circle with a craft knife on the cutting mat, making lots of short cuts along the line. Sand or trim the fluff on the edge with scissors.
1 An adult cuts the circle with lots of short, gentle cuts 2 Trim any fluff left on the edge with scissors 3 A clean round hole in the centre of the lid Seal the box
Put black tape on the outside of the box's 4 vertical corners and over any gaps. It doesn't matter if the box is white inside, but no light should get out anywhere except through the hole.
1 Stick black tape on the outside of each vertical corner of the box 2 Cover the gaps too: light should only come out through the hole Check: Put the phone in with the torch on, close the lid and cover the hole with your hand in the dark: the box should not glow at the corners.Prepare the discs
Use the glue stick to stick the disc sheet (B to F) onto the black card, with the drawing facing you. Cut out the 5 circles of 66 mm along the outer line.
1 Stick the disc sheet onto the black card, drawing facing you 2 Cut out each disc along the outer line 3 You get 5 discs: Orion, Ursa Major, Southern Cross, Scorpius and Cassiopeia Tip: Also write the constellation's name on a tab of masking tape stuck to the edge: that way you can read it in the dark with the phone.Pierce the faint stars
Lay the disc on the cork with the printed side up. With the thick needle, pierce all the circles marked «1» (1 mm), pushing straight down without twisting.
1 Disc on the cork, printed side up: look for the «1» circles 2 Push straight down, without twisting the needle, until it goes through Check: Hold the disc up to the light: each tiny hole should look like a clean dot of light.Pierce the bright stars adult
An adult pierces the 1.5 mm circles with the awl, the 2 mm ones with a 2 mm nail and the 2.5 mm ones with a 2.5 mm nail (Betelgeuse, Rigel, Acrux). Go right through and twist the nail so that the hole is round.
1 Awl for the «1.5» holes; 2 and 2.5 mm nails for the rest 2 The adult goes right through and twists the nail to round the hole 3 The bright stars end up with the biggest holes Tip: Don't pierce the grey lines joining the stars: they are only a guide to help recognise the shape.Clean the holes
Turn the disc over: the card forms burrs on the back. Trim them with small scissors or fine sandpaper, without pressing them back into the hole, because they block the light.
1 Turn the disc over: there are burrs on the back 2 Trim the burrs flush with small scissors or fine sandpaper 3 Don't press the burr into the hole: it would block the light Position the phone
Put the phone face down (screen against the bottom) inside the box, with the flash right below the centre of the hole in the lid. Turn on the torch and close the lid.
1 Phone face down, with the flash below the centre of the hole 2 Turn on the torch and close the lid Check: When you look through the hole (without putting your eye close), you should see the lit LED right in the centre.Put the disc on upside down
Place the disc over the hole with the PRINTED side facing INTO the box (towards the light) and centre it. Hold it in place with 3 short strips of black tape at the edge, without covering any stars.
1 Turn it over: the printed side faces inwards, towards the light 2 Centre it over the hole and hold it with 3 strips of tape at the edge 3 Side view: the white printed side faces the flash Tip: If you put it with the print facing out, the constellation comes out as in a mirror: Ursa Major with its handle pointing the other way.Project onto the ceiling
Turn off all the lights and wait 1 minute for your eyes to adjust. Put the box on a bedside table under the ceiling, so the ceiling is about 2 m away: you will see a circle of stars 1–1.2 m across. With the box on the floor the ceiling is further away (about 2.3 m) and the circle comes out a little bigger.
1 Turn off all the lights and wait 1 minute in the dark 2 With the ceiling about 2 m away, the stars fill a circle of 1–1.2 m Check: The stars should look like dots of different sizes, not blobs. If you get blobs, check the light source (troubleshooting).Change constellation
To change, peel off the 3 strips of tape, put on another disc and stick it down again. Go on a tour: Ursa Major, Cassiopeia, Orion, Scorpius and the Southern Cross, telling the story of each one.
1 Peel off the 3 strips of tape and remove the disc 2 Put on another disc, printed side in, and stick the strips back on 3 Go on the tour and tell the story of each constellation
Does it work? The test
With the box on the floor and the room dark, project the Orion disc onto the ceiling (with a 2.4 m ceiling, the disc is about 2.3 m from it). Measure the distance between Betelgeuse and Rigel on the ceiling with a tape measure.
What should happen: On the disc they are about 42 mm apart; on the ceiling, about 24 times further apart: around 1 m (magnification ≈ (light-to-disc height + distance to ceiling) / light-to-disc height = (10 + 230) / 10). The 7 main stars look sharp; the three in the belt, in a line.
If something goes wrong
- You see big blobs instead of stars — The light comes from a large surface (torch with a reflector or lens). Solution: Use the phone flash or remove the reflector from the torch. The smaller the source, the more point-like the stars.
- Each star appears double — The phone has two separate flash LEDs (white and amber). Solution: Cover one with a small piece of black tape.
- The stars are very faint — Room with some light, holes too small or ceiling too far away. Solution: Make the room completely dark, move the box closer to the ceiling (on a table) or make the holes slightly bigger.
- The constellation comes out as in a mirror — Disc with the printed side facing out. Solution: Turn it over: the printed side goes inwards, towards the light.
- There are patches of light on the ceiling as well as the stars — Leaks at the corners, at the lid–box joint or round the edge of the disc. Solution: Seal with black tape and check that the disc covers the hole with a 5 mm margin.
- Only the stars in the middle show up — The flash is not centred below the hole or has a narrow beam. Solution: Centre the phone and check it is lying flat, with nothing propping it up underneath; if it is still the same, take off the case, which may clip the beam, or try another phone whose flash spreads wider.
Safety
- Awls and nails are handled by an adult, piercing downwards onto the cork with the hand away from the point.
- The craft knife is used by an adult, with a cutting mat.
- Don't use incandescent torches or candles inside the box: they heat the cardboard. The phone LED doesn't heat up, but take it out if the session lasts more than 20 minutes.
- In the dark, keep the floor clear and have an emergency light to hand so nobody trips.
- Don't stare at the LED through the hole from close up: it dazzles.
The science behind it
For children
The phone's light comes out of a tiny point and travels in straight lines in all directions. The black card blocks almost all of it, but through each tiny hole one ray escapes, reaches the ceiling and draws a star. Because the rays spread apart as they go up, the picture on the ceiling is much bigger than the one on the disc, just as a torch beam gets bigger on the wall the further away it is. Big holes let through more light and make brighter stars, just like in the real sky.
For the adult
It is a central projection from an almost point source: each hole defines a narrow beam joining the source to the ceiling. If the source is at a distance a from the disc and the ceiling at a distance D from the disc, the magnification is M = (a + D) / a; with a = 10 cm and D = 2 m, M ≈ 21, so the useful 56 mm area becomes a circle of ≈ 1.2 m. A source of size s produces on the ceiling a spot per star with a diameter of ≈ s · D / a + hole · M: with the phone LED (s ≈ 3–4 mm) the first term gives 6–8 cm and, adding the hole (1–2.5 mm × 21), each star is about 8–13 cm across, acceptable; with a reflector torch (s ≈ 25 mm) they exceed 50 cm and no stars can be made out. The sharpness/figure-size ratio ≈ s / disc diameter does not depend on a, which is why a small source and a large disc are best. The light flux through each hole is proportional to its area: a 2.5 mm hole lets through 6 times more light than a 1 mm one, which mimics the magnitude scale (each magnitude ≈ 2.5 times in brightness). The hole positions were calculated with a gnomonic projection of the real coordinates (right ascension and declination), drawn as seen in the sky (north at the top, east on the left); the projection keeps that orientation for an observer looking up at the ceiling only if the drawn side faces the source.
- constellation: group of stars that, seen from the Earth, seem to form a shape.
- projection: image formed by light when it reaches a surface.
- point source: light that comes from a very small point; it gives sharp shadows and dots.
- magnitude: number that shows how bright a star is: the lower it is, the brighter the star.
- planetarium: room or device that projects the night sky onto a dome or a ceiling.
By age
- 5–7 years: The adult cuts the lid and pierces the large holes. The child cuts out the discs, pierces the small stars with the needle (with the adult beside them) and changes the discs during the show.
- 8–10 years: They do everything except the craft knife and the 2–2.5 mm nails. They learn the names of 2–3 bright stars (Betelgeuse, Rigel, Antares) and look for Ursa Major in the real sky.
- 11–12 years: They measure the magnification at different distances and check M = (a + D) / a. Challenge: make a disc of a new constellation from the coordinates in an app or a star atlas.
In a group or in class
Pairs, one box per pair (12–13 boxes for 25 children) or a single box per class and one disc per pair. Before the session: cut the lids, print the discs and have cork pieces and needles ready. 60-minute session: 10 min of explanation, 30 min of piercing (needle stations for the children and an adult with the big nails), 20 min of show with the classroom dark, projecting each disc and telling its story.
Challenges
- Make a disc with the whole «Summer Triangle» (Vega, Deneb and Altair) and the stars around it.
- Make a rotating disc with 4 constellations round the edge and a drawing pin in the centre so you can change without peeling off tape.
- Put red cellophane over Betelgeuse and Antares and blue over Rigel: those are the real colours of those stars.
- Build a paper dome (open white umbrella) and project inside it, like in a real planetarium.