Dark box that projects images
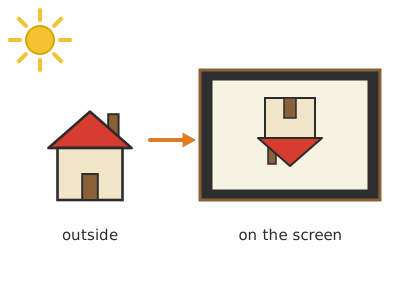
A shoebox painted black inside with a tiny 0.8 mm hole at one end and a tracing-paper screen at the other: looking at the screen under a dark hood, you see the outside scene in colour and in motion, upside down and with left and right swapped.
What they will learn
- That light travels in straight lines: rays from the top and bottom cross at the hole and the image comes out inverted (rotated 180°).
- That the size of the image depends on distance: image = object × (box length ÷ distance to the object).
- The trade-off between sharpness and brightness: small hole = sharper and darker; large hole = brighter and blurrier; there is an optimum size (≈ 0.8 mm for 33 cm).
- That the human eye and photo cameras are camera obscuras with a lens.
Prepare beforehand
- Print the templates at 100 % and check the red 50 mm line in the header of each sheet. Measure your box: if its small faces are not 200 × 120 mm, centre the windows anyway.
- Paint the inside of the box and the lid the day before (or line them with black card).
- Choose a sunny day or a room with a large window looking out onto a well-lit outdoor scene; you must be able to make the room dim.
- Measure the needle: hold it next to a ruler with a magnifying glass, or use one that just fits through a 1 mm hole on the test chart.
Materials and tools
- Shoebox with lid — 1
adult size, ≈ 330 × 200 × 120 mm, card without holes (cover any ventilation holes with black tape) - Tracing paper — 1 sheet, 180 × 115 mm
technical-drawing type, 90 gsm - Aluminium foil — 4 squares, 30 × 30 mm
kitchen foil, smooth, no creases - Sewing needle — 1
Ø 0.8 mm at the thick part (measure the shaft, not the tip) - Matt black paint — ≈ 50 ml
black poster paint; if you have none, line the inside with black card or a black bin bag - Black electrical tape — 2 m
to seal the lid joins and the corners - Card — 1 A4 sheet
200 gsm, for the 4 pinhole holders - Corrugated cardboard — 1 sheet, 655 × 150 mm
3 mm, for the hood - PVA glue or double-sided tape — a little
to stick the screen and the hood
Tools
- Craft knife, metal ruler and cutting mat — cutting the box windows and the hood adult
- Scissors — cutting paper and card
- Eraser or cork — backing for piercing the foil
- Brush or small roller — painting the inside
- Pencil and ruler — marking the windows
Pieces and templates
- A · Front face template ×1 — paper (for marking on the box)
- B · Pinhole holder ×4 — 200 gsm card (black or painted)
- C · Foil square ×4 — aluminium foil
- D · Back face template ×1 — paper (for marking on the box)
- E · Screen ×1 — tracing paper
- F · Hood ×1 — 3 mm corrugated cardboard
Step by step
Darken the inside
Paint the whole inside of the box and the lid matt black with poster paint, or line them with black card. Leave to dry for 30 minutes with the box open.
1 Paint the inside of the box and the lid matt black 2 Leave to dry for 30 minutes with the box open: no brown showing Check: Looking inside in the light, there should be no brown areas or printed lettering left.Tip: Matt black stops light bouncing around inside and washing out the image; gloss reflects.Cut the front window adult
Stick template A centred on one of the small faces of the box and cut out the 50 × 50 mm square window with a craft knife. Remove the template.
1 Stick template A centred on a small face 2 The adult cuts the square with the craft knife, side by side 3 Remove the template: a centred 50 × 50 mm window is left Cut the back window adult
On the opposite small face, stick template D and cut out the 160 × 100 mm window, leaving a 20 mm frame at the sides and 10 mm at the top and bottom.
1 Stick template D on the opposite small face 2 Cut the 160 × 100 mm window with ruler and craft knife 3 Check that the two windows face each other Check: The two windows must face each other, centred.Fit the screen
Cut the tracing paper to 180 × 115 mm. Stick it INSIDE the box over the back window, with tape or glue round the edges, pulling gently so it is as smooth as a drum.
1 Cut the tracing paper to 180 × 115 mm 2 Stick it inside over the window, taut as a drum 3 From outside, the screen is smooth with no creases Prepare the pinhole holders
Cut out the 4 card pinhole holders B with their 20 × 20 mm window and paint them black if they are light-coloured. On the back of each one, stick a 30 × 30 mm square of foil, nice and smooth, with tape on all 4 sides.
1 Cut out 4 pinhole holders B with their 20 × 20 mm window 2 On the back, tape on the 30 × 30 mm foil square C 3 From the front you see the smooth foil in the window Make the holes adult
Rest each pinhole holder on an eraser. Pierce the centre of the foil with the needle, twisting it: on the first, just the tip (≈ 0.5 mm); on the second, up to the thick part (0.8 mm). On the third and fourth, widen the hole with a toothpick (≈ 2 mm) and with a pencil point (≈ 4 mm). Write the diameter on each one.
1 Pierce the centre of the foil on an eraser, twisting the needle 2 Make 4 different holes and write the diameter on each one 3 Look at a lamp through it: round dot, no tears Check: Look at a lamp through the 0.8 mm hole: you should see a round dot of light, with no ragged edges or tears.Fit the 0.8 mm pinhole
Fix the 0.8 mm pinhole holder on the outside over the 50 mm window, centred, with 4 pieces of masking tape. That way you can swap it for the others without breaking anything.
1 Bring the 0.8 mm pinhole holder to the 50 mm window 2 Fix it centred, on the outside, with 4 pieces of masking tape Seal the box
Close the lid and put black electrical tape along all the lid joins and on the 4 corners of the box. Also cover any ventilation holes.
1 Put black electrical tape on the lid joins and the corners 2 Test with a torch inside in the dark: no light gets out Check: Put a lit torch inside, close the box and switch off the room light: no light should escape through any gap.Build the hood adult
Mark the folds of hood F at 15, 215, 335 and 535 mm (adjust them to your box), fold it into a tunnel and glue the tab. Fit it over the back face and fix it with black tape on the outside.
1 Mark the folds of F at 15, 215, 335 and 535 mm 2 Fold it into a tunnel and glue the tab 3 Fit it over the back face and fix it with black tape Tip: If you don't want to make a hood, cover your head and the back of the box with a dark towel.Aim at a bright scene
Go somewhere sunny, or stand in a dim room facing a window that looks out onto a well-lit outdoor scene. Aim the hole at a tree, a car or a house 3–20 m away.
1 Aim the hole at a house, a tree or a car in the sun 2 Or, in a dim room, aim at a window onto the street Look and wait
Rest your face against the hood, keep still for 1–2 minutes so your eyes get used to the dark, and look at the screen. The scene will appear in colour, upside down and with left and right swapped.
1 Rest your face against the hood and wait 1–2 minutes, keeping still 2 The scene appears upside down and with the sides swapped 3 Move your hand: its shadow moves the opposite way on the screen Check: Move your hand in front of the hole: you should see its shadow moving the opposite way on the screen.Compare holes
Swap the 0.8 mm pinhole holder for the 0.5, 2 and 4 mm ones, always looking at the same scene. Note down which gives the sharpest image and which the brightest.
1 Swap the pinhole holder for the 0.5, 2 and 4 mm ones 2 Note down which gives the sharpest image and which the brightest Photograph the image
Put your phone camera in through the hood, with no flash and in night mode, pointing at the screen. Rest the phone on something so it doesn't move during the shot (1–3 s). Rotate the photo 180° to see it the right way up.
1 Put the phone in through the hood, propped up, no flash and in night mode 2 Rotate the photo 180° to see the scene the right way up
Does it work? The test
On a sunny day, from a dim room, aim the box with the 0.8 mm hole at a window looking onto the street or garden, 3–5 m away. Look under the hood after 2 minutes of adapting to the dark.
What should happen: You see the outside scene in colour, rotated 180°, about 8–12 cm wide on the screen, and you can see the cars, people or branches moving. A 1.2 m window at 4 m takes up ≈ 10 cm. With the 4 mm hole the image is brighter but very blurry; with the 0.5 mm one it is darker and slightly less sharp than with 0.8 mm.
If something goes wrong
- Nothing shows on the screen — Scene not bright enough or eyes not adapted. Solution: Aim at a sunny outdoor scene, use the hood or a towel and wait 2 minutes.
- The screen looks grey and washed out — Light is getting in through gaps or round the edges of the hood. Solution: Seal joins and corners with black tape and press your face firmly against the hood.
- You see a patch of light but not the scene — Hole too big or torn. Solution: Use the 0.8 mm pinhole holder and check that the hole is round; if it is torn, make another in fresh foil.
- The image is very dark and a bit blurry — Hole too small (diffraction) or creased foil. Solution: Switch to the 0.8 mm hole and smooth out the foil.
- You see two images — There are two holes (an extra pinprick or a tear in the foil). Solution: Cover the extra hole with black tape.
- The screen creases or comes unstuck — Glue too wet or paper slack. Solution: Stick it with double-sided tape, pulling the paper taut.
Safety
- NEVER look at the sun through the hole or through any lens or tube: it causes permanent damage to the retina. To see the sun or an eclipse, stand with your back to the sun and project its image with a pierced card onto white paper.
- Never put a magnifying glass or a lens in the hole pointing at the sun: it concentrates the heat and can burn the tracing paper or the box.
- The craft knife is used by an adult with a metal ruler and cutting mat.
- The needle: the adult handles it or supervises; store it stuck into a cork when you finish.
- When looking under the hood or towel outdoors, do it somewhere with no traffic or steps: don't walk while you are looking.
The science behind it
For children
Light always travels in a straight line, like an arrow. Light from the top of a tree goes down through the tiny hole and reaches the bottom of the screen; light from the roots goes up and reaches the top. That's why the tree appears upside down. If the hole is small, each tiny dot on the screen only gets light from one tiny dot of the tree, and the image looks clear. If the hole is big, the light gets mixed up and it looks blurry. Your eye has a tiny hole too (the pupil), and your brain turns the image the right way round.
For the adult
The camera obscura relies on the rectilinear propagation of light: each point of the object projects a small circle of light through the aperture onto the screen, and the overlap of those circles forms the image, inverted (180° rotation). The magnification is m = f/D, where f is the hole-to-screen distance (≈ 330 mm) and D the distance to the object. Sharpness depends on the size of the circle of confusion: geometrically equal to the hole diameter d, but through diffraction it grows as ≈ 2.44·λ·f/d; the optimum compromise is d ≈ 1.9·√(f·λ) ≈ 0.8 mm for f = 330 mm and λ = 550 nm (Rayleigh criterion). Brightness is very low: the f-number is 330/0.8 ≈ f/400 (a phone camera works at ≈ f/1.8, about 50,000 times more light per unit area), which is why sunny scenes and dark adaptation of the eye are needed (the rods take minutes to reach their maximum sensitivity). Described by Mozi (5th century BC) and Aristotle, studied by Ibn al-Haytham (11th century) and used by painters since the Renaissance; in 1826 Niépce fixed on a bitumen-coated plate the oldest surviving photograph, using a camera obscura fitted with a lens. The eye is a camera obscura with a lens: the pupil is the aperture and the retina the screen.
- camera obscura: closed box with a tiny hole that projects images of the outside.
- projection: image formed on a surface.
- inverted image: image turned round: top goes to bottom and left goes to right.
- sharpness: how clear and well defined the edges of an image look.
- pupil: the tiny black hole in the eye that lets light in.
By age
- 5–7 years: The adult cuts the windows and makes the holes; the child paints the inside, sticks on the black tape and looks. Game: an adult moves in front of the box and the child says which way they see them going.
- 8–10 years: They do all the steps except the craft knife. They compare the 4 holes and explain with a ray diagram why the image comes out inverted.
- 11–12 years: Have them work out the optimum hole for their box with d = 1.9·√(f·λ), check the image size with m = f/D and build a version with two sliding boxes to change f. Challenge: trace the scene on the screen like a painter.
In a group or in class
Teams of 3–4, one box per team (ask for shoeboxes a week in advance). The adult cuts windows and hoods before the session or at craft-knife stations. Session 1 (30 min): paint the inside and leave to dry. Session 2 (45 min): screen, pinhole holders and sealing; go out to the sunny playground or, if there is no sun, darken the classroom to look out of the window. Rotation: each member looks under the hood for 1 minute while another swaps the hole. Have plenty of black tape.
Challenges
- Build a camera obscura from two sliding boxes to change the distance to the screen and check how the size and brightness change.
- Turn a whole room into a camera obscura by covering the window with cardboard and leaving a 10 mm hole: the street will appear on the opposite wall.
- Trace the outline of a building on the tracing paper, like Renaissance painters.
- Put a magnifying glass with a 30–40 cm focal length in place of the hole (without pointing at the sun): the image will be much brighter and sharper. Why?