Hologram pyramid
A small truncated pyramid of clear plastic (4 faces of 10/60 × 35 mm) placed upside down on a phone reflects a four-view video, and the figure seems to float inside the pyramid.
What they will learn
- That clear plastic also reflects part of the light (≈ 5 % at each face), like a window pane at night.
- That the reflected image is virtual: it seems to be behind the plastic, where there is nothing.
- Why the 45° angle makes an image lying flat on the screen appear upright.
- That contrast (black background, dark room) decides whether we see the reflection or not.
Prepare beforehand
- Print the templates at 100 % and check with a ruler that the base of the trapezium measures 60 mm.
- Find and download the video before the session (on YouTube: "hologram pyramid video"). Check that it has 4 views around a black centre.
- If you use a CD case lid, unclip it from the hinge and remove the tabs: only the flat part is useful (≈ 120 × 120 mm, enough for all 4 faces).
- Clean the plastic and peel off the protective film if it has one: any fingerprint will show in the reflection.
- Get a room ready that can be made completely dark.
Materials and tools
- Clear plastic — 1 piece of 12 × 12 cm (or 4 pieces of 7 × 4 cm)
clear acetate or PET, 0.3–0.5 mm (clear folder cover, rigid flat blister pack, cake packaging); or a CD case lid (1 mm, cut into 4 pieces) - Clear sticky tape — about 30 cm
12–19 mm wide - A4 sheet and masking tape — 1 A4 sheet
to print the template and hold it under the plastic - Fine-tip permanent marker — 1
to trace the outline onto the plastic - Mobile phone — 1
screen at least 65 mm wide; brightness at maximum; a "pyramid hologram" video (4 views on a black background)
Tools
- Craft knife and metal ruler — scoring and cutting the plastic adult
- Scissors — cutting thin acetate
- Empty ballpoint pen — scoring the folds on the one-piece template
- Cutting mat — protecting the table adult
Pieces and templates
- A · Pyramid face (single trapezium) ×4 — clear plastic (CD lid or acetate)
- B · Unfolded pyramid (4 faces in one piece) ×1 — clear acetate or PET 0.3–0.5 mm
Step by step
Choose the plastic and the template
If you have acetate or plastic of 0.3–0.5 mm, use template B (the 4 faces joined). If you use a CD case lid (1 mm, rigid), use template A and cut 4 separate trapeziums.
1 Thin acetate: use template B, with the 4 faces joined 2 CD lid: use template A and cut 4 separate trapeziums Fix the template under the plastic
Put the printed template on the table and the plastic on top. Hold both in place with 2 strips of masking tape so they don't move.
1 Printed template on the table with the plastic on top 2 Hold both in place with 2 strips of masking tape Trace the outline
With the permanent marker and the ruler, go over the cutting lines on the plastic: 60 mm base, 10 mm top side and 35 mm height for each face. If you use template B, also mark the 3 folds with little dots.
1 Go over the lines with permanent marker and ruler 2 On template B, also mark the 3 folds with little dots 3 Measure: 60 mm base and 10 mm top side Check: Measure on the plastic: the base of each face 60 mm and the top side 10 mm.Cut out the faces adult
Cut with a craft knife and metal ruler. On the CD lid, score each line 4–5 times with the craft knife and snap the plastic by bending it over the edge of the table. Thin acetate can simply be cut with scissors.
1 Score each line 4–5 times with craft knife and metal ruler 2 Snap the plastic by bending it over the edge of the table 3 Stack the faces: they must match exactly Check: Stack the faces on top of each other: they must match exactly. If one sticks out, file or trim it.Tip: Cut just inside the marker line so the ink doesn't stay on the edge.Score the folds (template B)
With the ruler and an empty ballpoint pen or the back of the craft knife, gently score the 3 folds between faces, without cutting through the plastic. Fold each one towards the same side.
1 Score the 3 folds with ruler and empty ballpoint pen 2 Fold each crease towards the same side, without breaking it Assemble the pyramid
Join the faces along their sloping sides with 4 cm pieces of clear tape, on the outside. With template B you only need to close the last joint. The 4 small openings form a 10 × 10 mm square and the large ones a 60 × 60 mm square.
1 Template B: close the last edge, face 1 to face 4 2 Stick 4 cm of tape on the outside of each sloping edge 3 Standing on the large opening, straight and about 24–25 mm high Check: Stand the pyramid on its large opening: it should sit straight, without wobbling, about 24–25 mm high.Clean it and remove excess tape
Trim any tape sticking out at the top and bottom so the pyramid sits flat. Wipe the faces with a dry cloth: fingerprints show up as smudges in the hologram.
1 Trim the tape sticking out so it sits flat 2 Wipe the faces with a dry cloth: no fingerprints Get the phone ready adult
Lay the phone flat on a table, with brightness at 100 % and aeroplane mode on. Play the hologram video full screen (in landscape if the video asks for it).
1 Lay the phone flat on the table, brightness 100 % and aeroplane mode 2 Play the hologram video full screen Place the pyramid upside down
Place the pyramid with the small opening (10 × 10 mm) touching the screen, right over the black square in the centre of the video, and with each face looking towards one of the 4 images.
1 Turn it upside down: the small opening touches the screen 2 Small opening over the black square, one face over each figure Check: Each image in the video should be under one face, centred.Turn off the light and look
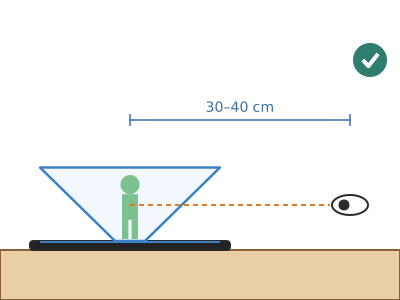
Turn off the light and crouch down until your eyes are level with the pyramid, about 30–40 cm away. Look through one face: the figure appears upright, floating in the centre.
1 Turn off the light in the room 2 With your eyes level with the pyramid, the figure floats inside 3 From above you can't see it: you only see the screen Check: If you walk around the table, you see the figure from a different angle on each side.
Does it work? The test
In a dark room, with the video playing and the pyramid centred, look from one side with your eyes level with the pyramid.
What should happen: You see the figure upright, about 2–3 cm tall, as if suspended in the centre of the pyramid, in colour and slightly see-through. With the light on it almost disappears. Looking from above you see nothing (you see the screen).
If something goes wrong
- I can't see any floating figure — Looking from above, a lit room or a video without a black background. Solution: Put your eyes level with the pyramid, turn off the light and use a proper "pyramid hologram" video with a black background.
- The figure is cut off or off-centre — The pyramid isn't in the centre of the video or the video doesn't fill the whole screen. Solution: Play the video full screen and place the small opening right over the black central square.
- The figure appears lying down or tilted — The faces aren't at about 45° to the screen (unequal or badly joined trapeziums). Solution: Check that the 4 faces measure 10/60 × 35 mm and that the pyramid is ≈ 24–25 mm high. Redo any face that is different.
- I see two figures slightly offset — The plastic is thick (1 mm or more): it reflects from both its surfaces. Solution: This is normal with a CD lid. Use 0.3–0.5 mm acetate for a single, sharp reflection.
- The pyramid won't stand or comes apart — Plastic too soft or not enough tape. Solution: Use a stiffer plastic or reinforce each edge with tape along its whole length.
- The figure is very faint — The plastic only reflects ≈ 5 % of the light. Solution: Maximum brightness and total darkness; a video with saturated colours (blues, neon greens) looks much better.
Safety
- CD case plastic splinters into sharp fragments: an adult cuts it, wearing glasses if they have them, and the edges are sanded or taped.
- The craft knife is used by an adult with a metal ruler and cutting mat.
- Don't press the pyramid against the screen: the plastic edges can scratch it. Rest it there without pushing.
- Watching videos in the dark: keep sessions short and brightness reasonable if it bothers any child's eyes; stop if anyone feels dizzy or gets a headache.
The science behind it
For children
When you look out of the window at night with the lights on at home, you see your reflection in the glass, as if you were outside. The faces of the pyramid do the same: they are see-through, but they bounce a tiny bit of the phone's light towards your eyes. Because they are tilted, the picture lying flat on the screen appears upright, and your brain thinks it is floating inside the pyramid. But there's nothing there! That's why it's called a virtual image.
For the adult
It is a scaled-down version of "Pepper's ghost" (J. H. Pepper, 1862). At each clear face the light splits: most of it is transmitted and a small fraction is reflected (for PET or acrylic, n ≈ 1.5–1.6, the reflectance is ≈ 4–6 % per surface at moderate incidence; in practice, ≈ 5 % at each face). A flat mirror tilted at 45° to the screen forms the virtual image of the horizontal figure in a vertical plane, symmetrical about the face: the figure "stands up" and seems to be behind the plastic, in the centre of the pyramid. With 10/60/35 mm, each face makes arccos(25/35) = 44.4° with the screen (practically 45°), and the pyramid is √(35² − 25²) = 24.5 mm high. Because the reflection is weak, it can only be seen if the screen is very bright and the background of the scene (what is behind the face) is dark: hence the black background and darkened room. It isn't a true hologram (which records the phase of light using laser interference), but the name has caught on. A thick plastic produces a double image because of reflections from its two faces 1 mm apart.
- reflection: light that bounces off a surface.
- virtual image: an image that seems to be somewhere where there is actually nothing.
- transparent: lets almost all light through, but also reflects a little.
- contrast: the difference between light and dark; without contrast you can't see the reflection.
- trapezium: a four-sided shape with two parallel sides of different lengths.
By age
- 5–7 years: The adult cuts the faces. The child joins them with tape (better with template B in acetate, which is already joined) and looks for the figure from the side. Talk about reflections in windows and shop windows.
- 8–10 years: They trace and assemble on their own; the adult cuts. Let them discover where it can and can't be seen from, and try it with the light on and off.
- 11–12 years: Challenge: calculate the height and angle of the pyramid using Pythagoras and cosine, build one for a tablet (everything ×2) and create their own four-view video with a presentation app.
In a group or in class
Individually or in pairs: one A4 acetate folder makes 4–6 pyramids with template B, so 5 folders are enough for 25 children. The teacher pre-cuts the pieces if CD lids are used. 45-min session: 5 min demonstration, 25 min tracing, cutting and assembling, 15 min testing in the darkened classroom with 4–5 school phones or tablets with the video already downloaded; the children rotate with their pyramid.
Challenges
- Build a giant pyramid for a tablet: 20 mm at the top, 120 mm at the bottom and 70 mm high.
- Make a single-face "Pepper's ghost": a piece of acetate at 45° inside a black box with the phone underneath.
- Record your own four-view video with a modelling clay figure turning on a black background.
- Add a black card collar around the pyramid (leaving the faces clear) to improve the contrast in room light.