A rainbow from a glass and a slit
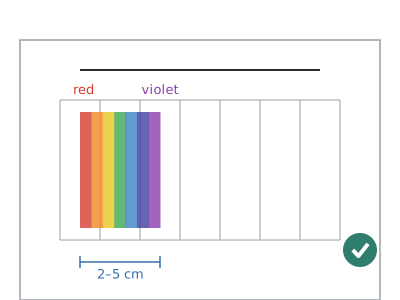
A glass tumbler full of water, placed in the sun on the edge of a windowsill or table and fitted with a card mask with a slit, splits white light and projects a band of colours 2–5 cm wide onto a white sheet 30–80 cm away.
What they will learn
- That white sunlight is a mixture of colours and can be split apart.
- That light bends (refraction) when it passes from air into water and from water into air, and that each colour bends slightly differently (dispersion).
- That the order of the colours is always the same: red, orange, yellow, green, blue, indigo and violet (red is bent the least).
- That a narrow beam of light gives sharper colours, and that moving the screen further away spreads the colours more but makes them fainter.
- To link the experiment with rainbows in the sky, prisms and CDs.
Prepare beforehand
- Find a window that gets direct sun early in the morning (east-facing windows) or mid-afternoon (west-facing). Check the day before what time the sun comes in.
- Print pieces A and B at 100 %. Stick template A onto the black card and cut the slit with a craft knife before the session if the children are young.
- Clear the windowsill or table: the glass will sit on the edge, so put a towel underneath in case it falls.
- Have a low chair or a box ready next to the window to rest the sheet on if the floor is too far away.
Materials and tools
- Plain glass tumbler — 1
clear, straight-sided, no patterns, about Ø 7 cm × 10–12 cm - Tap water — about 300 ml
clean, up to 1 cm from the rim - Sheets of white paper — 2 (A4)
one for the screen (piece B) and a spare - Black or dark card — 1 piece 10 × 12 cm
opaque, for the mask with the slit (piece A) - Sticky tape — 4 pieces of 3 cm
to fix the mask to the glass and the sheet to the wall or floor - Coloured pencils — 7 colours
red, orange, yellow, green, light blue, dark blue and violet - Torch (optional) — 1
narrow beam; a phone torch will do if the room is very dark
Tools
- Craft knife and ruler — cut the 3 × 50 mm slit adult
- Scissors — cut out the mask and the screen
- Ruler or tape measure — measure the distance from the glass to the sheet and the width of the rainbow
Pieces and templates
- A · Mask with slit ×1 — black card (or thin card painted black)
- B · Screen for drawing the spectrum ×1 — white paper or card
Step by step
Make the mask adult
Stick template A onto the black card and cut it out (100 × 90 mm). An adult cuts the 3 × 50 mm slit with a craft knife and ruler, nice and straight.
1 Stick template A onto the black card and cut out 100 × 90 mm 2 An adult cuts the 3 × 50 mm slit with a craft knife and ruler 3 Look at a lamp through it: you see a thin, straight line of light Check: When you look through the slit at a lamp, you see a thin, straight line of light.Fill the glass
Fill the glass with water up to 1 cm from the rim (about 300 ml). Dry the outside well with a cloth: drops on the outside bend the light.
1 Fill the glass with water up to 1 cm from the rim 2 Dry the outside of the glass well with a cloth: no drops Tape the mask to the glass
Curve the mask round half the glass, with the slit upright, and stick it on with two pieces of tape at the edges. The bottom of the slit should be about 2 cm above the bottom of the glass. You will adjust exactly where the slit faces in steps 5 and 7.
1 Curve mask A round the glass, on the sunny side 2 Tape the edges; the slit starts 2 cm above the bottom 3 Firmly against the glass: no gaps for light to get in Check: The mask sits flat against the glass with no gaps for light to leak through.Find the sun
Find a window with direct sun, ideally early in the morning or mid-afternoon, when the sun is low and the light comes in at a slant. When the sun is very high the light falls almost vertically and does not pass through the glass well.
1 Look for low, direct sun: early morning or mid-afternoon 2 Check that the shadow of your hand is sharp Check: The shadow of your hand on the windowsill is sharp (direct sun, not cloudy light).Place the glass on the edge
Put the glass on the edge of the windowsill or of a table in the sun, with the mask on the sunny side but turned so that the slit is about 2 cm to one side of the point that faces the sun head-on. A beam that enters right through the centre crosses the water without bending and does not split the colours; it has to enter from the side. The opposite side of the glass should be right over the edge, so the light coming out can go down to the floor without hitting the frame.
1 Place the glass with the slit towards the sun, on a towel 2 The other side of the glass sits right over the edge Tip: Put a towel under the glass in case it falls.Place the screen
Put sheet B on the floor, on a chair or taped to the wall on the shady side of the glass, about 30–50 cm away. Find the band of light coming out of the glass and move the sheet until it falls on it.
1 Put sheet B on the floor, about 30–50 cm from the glass 2 Find the band of light and move the sheet until it falls on it Fine-tune the rainbow
Slowly turn the glass on the spot a few millimetres at a time: this moves the slit away from the centre of the sunny side and the beam enters the water at a steeper slant; the more from the side it enters, the more it bends and the more the colours spread out (if you go too far, the band becomes faint or disappears). Move the sheet closer or further away, between 30 and 80 cm, until the band turns into well-separated colours. If needed, tilt the glass slightly by wedging a coin under it.
1 Turn the glass slowly, a few millimetres at a time 2 Move the sheet closer or further, between 30 and 80 cm 3 Red at one end and violet at the other, within 2–5 cm Check: You see red at one end and violet-blue at the other, side by side horizontally, in a band 2–5 cm wide.Darken the surroundings
If the colours look weak, lower the blind a little so the sun only comes in around the glass, or shade the sheet with a piece of cardboard. The colours stand out much more.
1 Lower the blind: let the sun in only around the glass 2 Shade the sheet with cardboard: the colours stand out more Draw and measure
With the pencils, colour in each colour on the sheet exactly where you see it. Write down the time and the glass-to-sheet distance, and use the grid to measure how wide the rainbow is.
1 Colour in each colour exactly where you see it 2 Write down time and distance, and measure the width on the grid Check: You have recorded the colours in order; red is always on the side that has bent the least.Try it without the mask
Take the mask off and compare: with the whole glass lit up the band is wider and brighter, but the colours blend and the centre looks almost white. Put the mask back on to see the difference.
1 Take the mask off: the band is wide and the centre almost white 2 Put it back on: the colours separate clearly
Does it work? The test
With the sun halfway up the sky, the glass with a 3 mm slit mask on the edge of the window and the sheet at 50 cm.
What should happen: A band of colours 2–4 cm wide appears, with red at one end and violet at the other, going through orange, yellow, green and blue. Moving the sheet to 80 cm makes it wider and fainter; bringing it to 20 cm makes it narrower and almost white.
If something goes wrong
- There is only a patch of white light — The beam is too wide or the sheet is too close. Solution: Fit the mask with the slit and move the sheet to 50–80 cm.
- With the mask on, there is a white stripe with no colours — The slit faces the sun head-on: the beam enters through the centre of the glass and crosses it without bending. Solution: Turn the glass so the slit is 2–3 cm to one side and the beam enters at a slant; keep turning little by little until the colours appear.
- No patch of light at all — There is no direct sun or the light does not pass through the glass towards the sheet. Solution: Check that the shadow of your hand is sharp. Turn the glass and look for the light coming out; move the sheet all over the floor and the wall.
- The colours look very pale — Too much background light in the room. Solution: Lower the blind so the sun only comes in around the glass, or shade the sheet.
- The rainbow comes out distorted or streaky — Glass with raised patterns, scratches or drops on the outside. Solution: Use a plain glass and dry the outside. A plain cylindrical jar works very well.
- It does not work at midday — The sun is too high and the light does not enter the slit from the side. Solution: Do it early in the morning or mid-afternoon, or tilt the glass towards the sun by wedging it.
- Cloudy day — Diffuse light comes from every direction and does not form a beam. Solution: Use a powerful torch in a dark room, pointing it through the slit from 20 cm.
Safety
- Never look directly at the sun, or at it through the glass: it can damage your eyes.
- The glass on the edge can fall and break: put a towel underneath and have an adult hold it if the windowsill is narrow.
- The craft knife for the slit is used by an adult, with a metal ruler and a cutting mat.
- A glass of water in the sun can focus light like a magnifying glass: do not leave it unattended next to paper, curtains or wood for hours.
- Wipe up any water that spills on the floor to avoid slipping.
The science behind it
For children
Sunlight looks white, but it is really a mixture of lots of colours travelling together, like a plait of seven strands. When the light enters the water in the glass from the side, it bends a little (if it goes in right through the centre, it carries on straight), and each colour bends differently: violet bends a lot and red only a little. So the plait comes undone and each colour lands in a different place on the sheet. That is a rainbow!
For the adult
Light changes speed when it passes from one medium to another, and so it bends at the boundary (refraction, Snell's law: n₁·sin θ₁ = n₂·sin θ₂). The refractive index of water depends slightly on wavelength (dispersion): ≈ 1.331 for red (700 nm) and ≈ 1.343 for violet (400 nm). As it passes through the cylinder of water and glass, which acts as both a prism and a cylindrical lens, violet light is bent more than red and the white beam opens into an angular fan of 1–2°. At a distance of 50 cm, that means 1–2 cm of separation between red and violet, plus the width of the beam itself. A ray entering through the centre of the cylinder meets the surface at right angles and is not bent; that is why the beam must enter off-centre, and the deviation and colour separation increase the closer to the edge it enters. Because the axis of the glass is vertical, the light is only bent in the horizontal plane: the colours end up side by side horizontally, as vertical stripes. The slit is also essential: if the incoming beam is wide (the whole glass), the spectra from each part of the beam overlap and the centre looks white; colours only appear at the edges. A rainbow in the sky is the same phenomenon in spherical drops, with one internal reflection: the rays come out concentrated at about 42° from the point opposite the sun. The seven named colours are a convention (Newton); the spectrum is continuous.
- refraction: the change in direction of light when it passes from one material to another (air, water, glass).
- dispersion: the separation of colours because each one bends slightly differently.
- spectrum: the ordered band of colours that make up white light.
- prism: a transparent object that splits light into colours.
- beam of light: a narrow stream of light going in one direction.
By age
- 5–7 years: The adult makes the mask and places the glass. The child hunts for the rainbow by moving the sheet around the floor, names the colours out loud and colours them in. Focus on «white light has hidden colours».
- 8–10 years: They set everything up (except cutting the slit), draw the spectrum on the grid and compare with and without the mask and at several distances.
- 11–12 years: They measure the width of the spectrum at 30, 50 and 80 cm and check that it grows in proportion to the distance (constant angle). They calculate the dispersion angle from width/distance. Challenge: the water prism with a mirror.
In a group or in class
Pairs or groups of three, one glass per team, using the sunny windows in the classroom and corridor (or the playground with tables). Per team: 1 plain glass, 1 mask with a pre-cut slit, 2 B sheets, pencils and a towel. 40-minute session early in the morning or mid-afternoon: 10 min of explanation, 20 min of finding and drawing the spectrum, 10 min of sharing and comparing drawings. If it is cloudy, have 3–4 powerful torches ready and darken the classroom.
Challenges
- Get a rainbow more than 8 cm wide in which all seven colours can be seen.
- Project the rainbow onto the ceiling using a mirror.
- Build a spectroscope with a cardboard tube, a slit and a piece of CD, and look at different light bulbs.
- Join the colours back into white light with a second glass or a magnifying glass.
- Make a Newton disc (a circle with the seven colours) and spin it fast to see what colour appears.