Mirror periscope
A 40 cm periscope made from a cardboard box with a slanted profile and two CDs as mirrors at 45°: looking through the bottom window you see, the right way up and not reversed, what is above a table, a wall or round a corner.
What they will learn
- That light travels in a straight line and bounces off a mirror at the same angle it arrives at (angle of incidence = angle of reflection).
- That two parallel mirrors at 45° turn the light through 90° twice and the image comes out the right way up, not reversed.
- That a CD reflects on its data side, but only on the metallised area: the centre is transparent.
- That the field of view depends on the size of the windows and the length of the tube.
Prepare beforehand
- Find the good side of each CD: it is the one without the label. Clean it with a soft cloth and soapy water, without rubbing in circles.
- Draw piece A directly on the cardboard with a ruler (it doesn't fit on A4): it is a 459 × 400 mm rectangle with a central trapezium removed at the top (from 130 to 444 mm, 92 mm deep) and the two corners removed at the bottom (from 0 to 222 mm and from 352 to 459 mm).
- If the children are young, cut the net and the windows before the session.
- Set up a bit of wall or a table with a toy behind it for the test.
Materials and tools
- Corrugated cardboard — 1 sheet of 47 × 41 cm + 2 pieces of 14 × 14 cm
single-wall, 3 mm, uncreased (large delivery box) - Old CDs or DVDs — 2
Ø 120 mm, no scratches on the shiny side (DVDs reflect slightly better) - Double-sided tape — 8 pieces of 2 cm
thick (foam) tape to stick the CDs on by the label side - Masking tape or duct tape — ≈ 2 m
25–50 mm wide, to close edges and lids - PVA glue or hot glue sticks — a squeeze / 1 stick
for the closing tab - Poster paints or felt-tip pens — as you like
camouflage or submarine colours - A4 paper — 2 sheets
to print lids B (piece A is drawn with a ruler)
Tools
- Craft knife, metal ruler and cutting mat — cutting the net and the windows adult
- Set square or 45° triangle — checking the slanted cuts
- Long ruler (50 cm) and pencil — drawing the 459 × 400 mm net
- Empty ballpoint pen — scoring the folds
- Scissors — tape and small pieces
Pieces and templates
- A · Periscope body (net) ×1 — 3 mm corrugated cardboard
- B · Mirror lid (CD holder) ×2 — 3 mm corrugated cardboard
Step by step
Draw the net
Draw a 459 × 400 mm rectangle on the cardboard with the flutes running vertically. Mark vertical lines at 130, 222, 352 and 444 mm. At the top, join (130, 0) to (222, 92) and (352, 92) to (444, 0); at the bottom, join (130, 308) to (222, 400) and (352, 400) to (444, 308). Go over the outline of template A.
1 Draw a 459 × 400 mm rectangle with the flutes running vertically 2 Mark vertical lines at 130, 222, 352 and 444 mm 3 Join the points with slanted lines: 45° with the set square Check: Each slanted line drops 92 mm over 92 mm of width: it makes 45° with the set square.Cut out the net adult
An adult cuts along the solid line with a craft knife and ruler. At the top, a central trapezium is waste: the gap between 130 and 444 mm, 92 mm deep. At the bottom, the two corners are waste: the left one from 0 to 222 mm and the right one from 352 to 459 mm. Also bevel the corners of the 15 mm tab.
1 Cut along the red line: the grey areas are waste 2 Rest the metal ruler on the piece and cut with the craft knife 3 Piece A cut out: four faces and the 15 mm tab Check: At the top, the FRONT face (0–130 mm) and the tab reach the edge, and the BACK face starts 92 mm lower down; at the bottom it is the other way round: only the BACK face (222–352 mm) reaches the edge.Cut the two windows adult
Cut the 30 × 30 mm windows: the entry window in the FRONT face, 31 mm from the top edge and offset towards the first SIDE face (from 90 to 120 mm); the eyepiece in the BACK face, 31 mm from the bottom edge, also next to that same SIDE face (from 232 to 262 mm).
1 Both windows sit next to the same SIDE face (in orange) 2 Cut the 30 × 30 mm window 31 mm from the edge, next to the fold 3 Dry-fold it: both windows are on the same side Check: Both windows end up on the same side of the periscope when you fold it (check by dry-folding it).Score and fold
Go over the 4 fold lines with an empty ballpoint pen and the ruler. Fold each one 90° inwards (with the undrawn side facing out).
1 Score the 4 folds with a ruler and an empty ballpoint pen 2 Fold each crease 90° with the drawing on the inside Close the tube
Glue the 15 mm tab inside the free edge of the FRONT face with PVA or hot glue and hold it with tape on the outside. Also tape the 4 long edges so they stay straight.
1 Glue the tab inside the free edge of FRONT 2 Hold with tape and tape the 4 long edges 3 From the side you see a parallelogram: 92 mm offset at top and bottom Check: Looking at the tube from the side, you see a parallelogram: the FRONT face sticks out 92 mm at the top and the BACK face 92 mm at the bottom.Prepare the mirror lids
Cut out 2 squares B of 130 × 130 mm. On each one, stick a CD centred over the drawn circle, with the label against the cardboard, using 4 pieces of double-sided tape. Don't touch or tape the shiny side.
1 Cut out 2 squares B of 130 × 130 mm 2 Put on 4 pieces of double-sided tape and lay the CD label side down 3 CD centred and firmly stuck; don't touch the shiny side Check: The CD doesn't stick out past the square and is firmly stuck (it doesn't wobble when you shake the lid).Fit the top mirror
Rest one lid B on the top slanted cut, with the CD facing in. Tape it on all 4 sides, letting the cardboard of the lid rest on the edges of the side walls.
1 Rest lid B on the top cut, with the CD facing in 2 Tape it on all 4 sides 3 Look through the window: you need to see silver, not the CD's centre Tip: Before taping it all the way, look through the entry window: you should see the silver CD, not the transparent centre.Fit the bottom mirror
Do the same with the second lid on the bottom slanted cut, with the CD facing in. Tape all 4 sides so that no light gets in through any gap.
1 Rest the second lid on the bottom cut, with the CD facing in 2 Tape all 4 sides: no light should get in through any gap First look
Put one eye to the eyepiece (bottom, back) and cover the other with your hand. Point the top window at something well lit 2–3 m away: you should see the scene the right way up, with some coloured reflections from the CD.
1 Look through the eyepiece with one eye and point the window at something 2 You'll see the scene the right way up, with some coloured reflections 3 Can you see the CD's centre? Enlarge the window 5 mm towards the edge Check: If you see a brown blur or the CD's transparent ring, the window is too central: enlarge it 5 mm towards the edge.Adjust if needed
If the image comes out crooked or you only see cardboard, unstick a lid, check with the set square that the cut is at 45° and tape it back on, resting firmly on the edges.
1 If the image comes out crooked, unstick the lid 2 Check with the set square that the cut is at 45° 3 Tape it back on, resting firmly on the edges Decorate
Paint the outside with poster paints (camouflage, submarine, castle...) without covering the windows. Leave to dry for 20 minutes.
1 Paint the outside without covering the windows 2 Leave to dry for 20 minutes before using it Time to spy
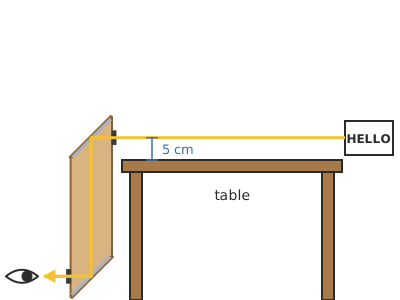
Crouch behind a table or the sofa holding the periscope upright: the top window should poke out about 5 cm above the edge. Turn it slowly to look for a particular object.
1 Crouch behind the table: the window pokes out about 5 cm above it 2 Turn it slowly until you find what you're looking for
Does it work? The test
Hide behind a 75 cm high table and ask someone else to hold up between 1 and 5 fingers on the other side, about 3 m away. Count the fingers using only the periscope.
What should happen: You see the hand the right way round (not reversed) and can count the fingers. The field is narrow (about 5°: at 3 m you see an area of about 25 cm) and the image has some rainbow reflections, typical of a CD.
If something goes wrong
- I only see cardboard or black — One of the mirrors isn't at 45° or a CD is the wrong way round (label facing in). Solution: Check the cuts with the set square and that the shiny side faces the inside.
- There is a brown blur in the middle of the image — The window looks onto the transparent centre of the CD. Solution: Move or enlarge the window towards the edge of the box (silver area), as on the template.
- I see the sky or the floor instead of what's in front of me — A mirror is tilted at more or less than 45°. Solution: Unstick the lid and rest it firmly on the two slanted edges; if the cut is wrong, trim it with a set square.
- The image is double or blurry — Reflection from the CD's clear plastic and scratches on the data side. Solution: Use an unscratched CD or a DVD; for a sharper image, stick a handbag mirror on top.
- Very dark image — Too little light gets in or there are gaps letting in glare. Solution: Use it in daylight, looking towards well-lit areas, and tape over any gap near the eyepiece.
- The box twists — Cardboard with the flutes running horizontally or edges not taped. Solution: Tape the 4 long edges; if it is still twisted, glue a strip of cardboard inside as reinforcement.
Safety
- Never look at the sun through the periscope: the mirrors send the light straight into your eye and can damage it.
- The craft knife is used by an adult with a metal ruler; CDs are not cut or broken (they splinter into sharp shards).
- Don't walk around looking through the periscope: you could trip.
- Don't use the periscope to spy on people without their permission: it's a game between the people playing.
The science behind it
For children
Light travels in a straight line, like a ball you throw. When it hits a mirror, it bounces off. If the mirror is tilted like a slide (45°), light coming straight at it bounces and goes down the tube. At the bottom there is another mirror just the same that bounces it again, this time towards your eye. That way you can see what's up above even though you're hiding down below. It's what submarines use to look out of the water!
For the adult
The law of reflection says that the angle of incidence equals the angle of reflection, measured from the mirror's normal. With the mirror at 45° to the axis of the tube, a horizontal ray is turned 90° downwards; the second mirror, parallel to the first, turns it another 90° and sends it back horizontal and in the same direction. Since each reflection reverses the image and there are two, the final image is upright and not mirror-reversed, only shifted down by the distance between the mirrors (308 mm). A CD reflects thanks to an aluminium layer of ~50–100 nm under 1.2 mm of polycarbonate; the tracks (1.6 µm pitch) form a diffraction grating that produces the colours, and the plastic surface adds a weak reflection (≈ 4 %) that can show up as a double image. The central area (r < 23 mm) is transparent, which is why the windows are offset 40 mm. The field of view is limited by the angle the entry window subtends at the eye: 30 mm at ≈ 400 mm of optical path gives ≈ 4–5°; bigger windows or a shorter tube widen it. Real periscopes use total internal reflection prisms and lenses to widen the field.
- reflection: light bouncing off when it hits a surface.
- mirror: a surface so smooth that it reflects light in an orderly way and forms images.
- 45° angle: half a right angle, like the diagonal of a square.
- field of view: how wide the area you can see at once is.
- periscope: a tube with two mirrors for seeing over obstacles.
By age
- 5–7 years: The adult draws and cuts the net and the windows. The child folds, tapes, sticks on the CDs (finding the shiny side) and decorates. Game: “How many fingers can you see?”.
- 8–10 years: They draw the net with a ruler (with help for the slanted lines), fold and assemble it; the adult only cuts. Have them draw the light path with arrows.
- 11–12 years: Have them work out the net for another length and another mirror size, and measure the field of view (width seen at 3 m ÷ 3 m, in degrees). Challenge: an L-shaped corner periscope or one with three mirrors.
In a group or in class
Pairs, one periscope per pair. Beforehand: cut the nets and windows (or have long boxes ready) and collect 2 CDs per pair. 60-min session: 10 min demonstration with a torch and two mirrors, 35 min assembly, 15 min “spy mission” with a wall of tables on their sides and signs with secret words on the other side. Leave the poster paints for another session.
Challenges
- Read a secret word written in 3 cm letters at 5 m using your periscope.
- Build a periscope that looks backwards (mirrors in a V): what do you see and why?
- Make a telescopic periscope: two boxes that slide one inside the other to change the height.
- Design a three-mirror periscope that looks over a wall and then to the left.
- Decorate it like a submarine periscope and add a compass scale (N, S, E, W) round the eyepiece.