Mirror and colour tube
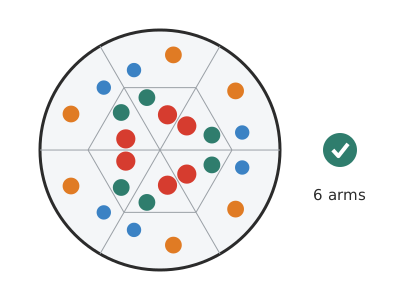
A 16 cm kitchen-roll tube with a triangular prism of three 34 mm mirrors inside and a 10 mm chamber of coloured beads at the tip: look towards the light and turn it, and the reflections multiply the beads into a symmetrical six-armed mosaic that never stops changing.
What they will learn
- That a mirror reflects light at the same angle at which it arrives (angle of incidence = angle of reflection).
- That two mirrors at 60° make 6 images of an object (360° ÷ 60° = 6), which is why six-armed shapes appear.
- What reflection symmetry and rotational symmetry are, and how they combine in a mosaic.
- That the quality of the mirror (smooth, shiny) decides how many times an image can repeat before it fades.
Prepare beforehand
- Print the pieces at 100 % and check with a ruler that prism A is 110 mm wide.
- Measure the inside Ø of the tube: if it is 41 mm or more, use the 34 mm prism; if it is smaller, reduce the faces to 0.82 × inside Ø (e.g. 32 mm for Ø 39).
- Cut the tube to 160 mm (adult, with a craft knife while turning the tube, or with a serrated knife).
- Put the beads in a saucer and have the plastic discs already cut out if the children are young.
- If you use foil, glue it onto the card the day before so it dries flat under a book.
Materials and tools
- Kitchen-roll tube — 1
inside Ø 41–45 mm (measure it); cut to 160 mm - Card for the prism — 1 piece of 120 × 160 mm
stiff, from a cereal box or 300 gsm card - Mirror material — 3 strips of 33 × 150 mm
in order of quality: self-adhesive mirror vinyl or mirrored plastic sheet; metallic mirror-effect card; clear acetate with black card behind; aluminium foil glued on very smoothly - Stiff clear plastic — 1 disc of Ø 43 mm (≈ the inside Ø of the tube)
from a blister-pack lid, a cake container or a smooth bottle (straight part) - Tracing paper or baking paper (greaseproof paper) — 1 disc of Ø 75 mm
translucent: lets diffuse light through and hides the background - Coloured beads or bits of paper — 8–12 pieces
3–6 mm, translucent rather than opaque: seed beads, bits of cellophane, sequins, small pieces of coloured straw - Rubber band — 1
an office one that grips the Ø 46 mm tube without slack - Sticky tape — ≈ 50 cm
clear or masking tape - Card for the eyepiece — 1 piece of 50 × 50 mm
dark on the inside if possible (fewer reflections) - Glue — 1 glue stick or PVA glue
to stick the mirrors onto the prism - Coloured paper or washi tape — as you like
to decorate the tube at the end
Tools
- Ruler, pencil and an empty ballpoint pen — marking and scoring the prism folds
- Scissors — cutting out pieces, mirrors and plastic
- Craft knife or serrated knife — cutting the tube to 160 mm adult
- Awl or sharp pencil — making the Ø 8 mm hole in the eyepiece adult
- Soft cloth — smoothing the mirror without scratching it or leaving fingerprints
Pieces and templates
- A · Mirror prism (net) ×1 — stiff card (cereal box) or mirror card
- B · Mirrors ×3 — mirror vinyl / mirrored plastic / metallic card
- C · Chamber window ×1 — stiff clear plastic
- D · Translucent cap ×1 — tracing paper or baking paper
- E · Eyepiece ×1 — card
- F · Card tube (if you don’t have a tube) ×1 — 300 gsm card
- G · Centring wedges ×3 — paper or card
Step by step
Cut the tube adult
Mark a line 160 mm from one end of the tube, wrapping a straight strip of paper around it as a guide. The adult cuts with a craft knife while turning the tube, or with a serrated knife.
1 Wrap a strip of paper round the tube and mark at 160 mm 2 The adult cuts along the mark, turning the tube little by little 3 Standing up it doesn’t wobble: both cuts are straight Check: Both ends are straight: if you stand the tube up, it doesn’t wobble.Cut out and score the prism
Glue template A onto the card and cut it out (110 × 150 mm with tab). Run the empty ballpoint pen along the 3 fold lines against the ruler, pressing firmly.
1 Glue template A onto the cereal-box card 2 Cut round the outline, including the tab 3 Go over the 3 fold lines with a ruler and an empty ballpoint pen Stick on the mirrors
Stick a 33 × 150 mm mirror B on each of the 3 faces with text, centred on the face, shiny side towards you. Smooth it with a cloth from the centre to the edges so no bubbles are left.
1 Stick a mirror B on each face with text, shiny side towards you 2 Smooth with a cloth from the centre to the edges 3 Look at yourself in each strip: your face should show without ripples Check: When you look at yourself in each strip, your face shows without ripples. If it is wavy, peel it off and smooth it again.Fold into a triangle
Fold the 3 lines so the mirrors end up on the INSIDE. Put glue on the 8 mm tab and stick it to the outside of face 1. Hold it with 3 pieces of tape along the prism.
1 Fold the 3 lines with the mirrors facing inwards 2 Glue the tab to the outside of face 1 3 Hold with 3 tapes and look inside: repeated triangles Check: Look through the prism towards a window in the house (or a lamp): you see a triangle with lots of repeated triangles around it. If you see no reflections, the mirrors are on the outside.Put the prism in the tube
Slide the 150 mm prism into one end of the tube until it is flush with that end (the eye end). 10 mm are left free at the other end: this will be the object chamber.
1 Slide the prism in at the eye end 2 Make it flush with the eye end: 10 mm are left at the other side Check: Measure with the ruler: there are 10 mm from the edge of the prism to the edge of the tube.Centre it with wedges
Fold 3 strips of paper of 20 × 140 mm (G) concertina-style and push them between each face of the prism and the wall of the tube with a pencil, until the prism is centred and doesn’t turn.
1 Fold 3 strips G of 20 × 140 mm concertina-style 2 Push a wedge along each face with a pencil 3 The triangle stays centred and doesn’t turn when you shake the tube Check: Looking at the eye end, the triangle is centred in the circle and doesn’t move when you shake the tube.Fit the eyepiece adult
Make the Ø 8 mm hole in the centre of disc E (adult, with an awl and then widening it with the pencil). Place it on the eye end and fix it with 3–4 strips of tape folded over the tube.
1 The adult pierces the centre of E and widens it to Ø 8 mm 2 Put it on the eye end and fix it with 3–4 strips of tape 3 Looking through the hole you see the whole triangle, centred Check: Looking through the hole, you see the whole triangle, centred.Close the prism with the window
Cut the clear plastic disc C to the inside size of the tube (≈ 43 mm). Put it in through the free end and push it until it touches the prism. Fix the edge with a thin strip of tape or a drop of glue.
1 Trace disc C onto the plastic and cut it out (Ø 43 mm) 2 Put it in through the free end until it touches the prism 3 Fix the edge with a drop of glue or a thin strip of tape Tip: If the disc is loose, stick a thin strip of tape around the edge so it fits snugly.Fill the chamber
Put 8–12 beads or bits of paper of 3–6 mm on the window, in the 10 mm chamber. They should cover roughly half of the bottom, no more.
1 With the tube standing up, drop 8–12 beads onto the window 2 They should cover roughly half of the bottom, no more Check: When you tilt the tube, the beads roll freely.Cap with tracing paper
Place disc D of Ø 75 mm over the tip, stretch it down the sides and hold it with the rubber band about 10 mm from the edge. Reinforce with a turn of tape over the band.
1 Put tracing-paper disc D over the tip 2 Stretch it down and hold it with the band 10 mm from the edge 3 Reinforce with tape: the paper is tight like a drum Check: The paper is tight like a drum and doesn’t touch the beads or squash them.Try it out
Look through the eyepiece pointing the tip at a window or a lamp (never at the sun) and turn the tube slowly. You should see a 6-armed pattern that changes as you turn.
1 Point at a lamp or window, never at the sun, and turn the tube 2 You’ll see a 6-armed pattern that changes as you turn Decorate
Cover the tube with coloured paper or washi tape, without covering the eyepiece or the tracing paper. You can write your name and the date.
1 Cover the tube with coloured paper or washi tape 2 Leave the eyepiece and the paper clear; write your name
Does it work? The test
Look through the eyepiece towards a bright window or a lamp 1 m away, turn the tube one full turn and count how many times the shape repeats around the centre.
What should happen: You see a mosaic of triangles that fills the whole view, with the beads repeated to make a 6-armed shape (hexagonal symmetry). With good mirrors you can make out 3–4 “rings” of reflections before they fade; with foil, 1–2. As you turn the tube, the shape keeps changing.
If something goes wrong
- No reflections, just a grey triangle — The mirrors ended up facing outwards or the material isn’t reflective. Solution: Take it apart and fold the prism again with the shiny side inside. Try another mirror material (look at yourself in it first).
- The images are blurry or wavy — Crumpled foil or a mirror that has come unstuck somewhere. Solution: Glue the mirror onto stiff card, smoothing it with a cloth. Better still, use mirror vinyl or mirror card.
- The prism won’t go into the tube — The tube is narrower than expected. Solution: Reduce the faces to 0.82 × inside Ø (e.g. 32 mm for Ø 39) and the mirrors to 1 mm less.
- A line or gap shows at the corners of the mosaic — The prism faces don’t close properly or the mirrors don’t reach the fold. Solution: Adjust the tab so the triangle is closed, and use mirrors 1 mm narrower than the face, centred.
- The beads don’t move — Too many beads or the chamber is too shallow (paper squashed). Solution: Take out half and check that the chamber is about 10 mm deep.
- Everything looks very dark — Not enough light or the cap paper isn’t translucent enough. Solution: Point it at a bright window and use thin tracing paper or baking paper.
- The beads slip inside the prism — Window C is missing or is loose. Solution: Fit the plastic window snugly in the tube and seal its edge with tape.
Safety
- Never look at the sun through the kaleidoscope: even though the paper diffuses the light, it can damage your eyes.
- The craft knife for cutting the tube is used by an adult; cut blister plastic has sharp edges: round them off with the scissors.
- Beads and seed beads are small parts: not for children under 3; use bits of cellophane with the youngest.
- If you use real glass mirrors (not recommended), they should be cut by a glazier and the edges must be protected with tape.
The science behind it
For children
A mirror sends light back the way a wall sends a ball back. When you put two mirrors together to make a point, the light bounces from one to the other many times, and with each bounce another copy of the beads appears. Our three mirrors make a triangle, so the copies repeat in every direction, like tiles, and make a six-petalled flower. When you turn the tube, the beads move and all the copies move at once, which is why the pattern is always changing.
For the adult
A flat mirror forms a virtual image of the object, symmetrical about its plane (law of reflection: angle of incidence = angle of reflection). Two mirrors at an angle θ produce 360°/θ − 1 images; with θ = 60° you get 5 images plus the object, that is, 6 sectors with order-6 symmetry around each corner. With three mirrors forming an equilateral triangle (all angles 60°), the successive reflections tile the plane with triangles: this is the symmetry group p3m1 (the field of view fills with copies of the chamber triangle). Each reflection loses some light: a polished aluminium mirror reflects ≈ 85–90 %, crumpled aluminium foil much less and diffusely, and acetate over black only ≈ 4–5 % (by specular reflection at the plastic surface): that is why the quality of the mirror decides how many rings of reflections you see. The tracing paper diffuses the light so the beads look backlit and the outside world isn’t visible. The small, centred eyepiece (Ø 8 mm) makes you look along the axis, which is where the mosaic comes out regular.
- reflection: light bouncing off a smooth, shiny surface.
- symmetry: when a shape repeats exactly when you reflect or turn it.
- prism: a solid with two identical bases (here triangles) joined by rectangular faces.
- eyepiece: the part of an optical device you look through.
- tessellation: a pattern that covers a surface with repeated shapes and no gaps, like tiles.
By age
- 5–7 years: The adult cuts the tube, folds the prism and centres it. The child sticks on the mirrors, smoothing them with the cloth, chooses and adds the beads, stretches the paper with the rubber band and decorates. Use bits of cellophane instead of seed beads.
- 8–10 years: They build everything except cutting the tube and making the eyepiece hole. They do the two-mirrors-at-an-angle experiment and count images.
- 11–12 years: They work out the prism size for their tube (face = 0.82 × inside Ø), check the 360/θ formula with mirrors and try a 4-sided (square) prism or a 30-60-90 triangle to compare the mosaics.
In a group or in class
One kaleidoscope per child, in pairs who help each other fold and centre. Before the session: cut the tubes to 160 mm, cut out the plastic discs and prepare the mirror strips (for 25 children: 75 strips of 33 × 150 mm, about 4 A4 sheets of mirror vinyl or mirror card). A central table with bowls of beads and cellophane. 60-minute session: 10 min demonstration with two mirrors at an angle, 35 min building, 15 min looking, swapping and drawing the shapes.
Challenges
- Make a kaleidoscope without a chamber (a teleidoscope) with a clear marble at the tip: it turns whatever is in front of you into a mosaic.
- Build a 4-mirror (square) prism and compare its mosaic with the 3-mirror one.
- Make a rotating chamber separate from the tube, so you turn only the beads.
- Draw a mandala in a circle that copies exactly the 6-armed shape you see.