Paper snowflakes and stars
Paper snowflakes with 6 identical arms, made by folding a square into 12 layers of 30° and cutting with 4 templates of increasing difficulty, plus two Christmas stars in card: a 3D one made of two slotted pieces and a folded one in relief. Use them all to make a garland or decorate a window, and find out why real snow always has 6 arms.
What they will learn
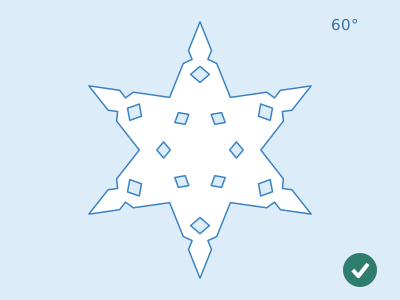
- That a paper snowflake has 6-fold symmetry: 360° ÷ 6 = 60° between arms, and each arm is the same on both sides of its axis, so you only need to draw a 30° wedge (half an arm).
- That folding a square diagonally, in half and in thirds turns it into 12 equal layers: whatever you cut once is repeated 12 times, 6 normal and 6 mirrored.
- What a line of symmetry is and how to find it: the snowflake has 6 (one through each arm and another between each pair of arms) and the 5-pointed star has 5.
- Why real snowflakes have 6 arms: water molecules arrange themselves in ice into rings of 6, like a honeycomb.
- That two flat pieces with a slot halfway along slide together in a cross and form a 3D object, and that mountain and valley folds give relief to a flat sheet.
Prepare beforehand
- Print the templates at 100 % (“actual size”) and check with the ruler that the 50 mm square measures 50 mm. Guide G and the 4 snowflake wedges fit on 1–2 A4 sheets; stars E, F and R on 2 sheets that you can print straight onto card if your printer takes it.
- Cut wedges A–D round their outer outline beforehand for the youngest children: that way they only have to cut out the grey areas.
- Have thinner paper to hand (60–70 gsm or tissue paper) for the level 3 and 4 snowflakes: with 12 layers of normal A4 paper the fine notches are very hard.
- If you are going to hang the garland, measure the space first (window, shelf or door) and cut the string 30 cm longer for the knots.
- Clear a large table and keep a heavy book ready to flatten the freshly unfolded snowflakes.
Materials and tools
- White A4 sheets — 4–6 (one per snowflake and a few for practice)
A4, 80 gsm at most (normal printer paper); for the level 3 and 4 snowflakes, 60–70 gsm paper or tissue paper works better - A4 sheet to print the templates — 2–3
normal A4; guide G and wedges A–D are cut out and used as patterns - Yellow or gold card — 2 A4 sheets (or 4 half sheets)
160–200 gsm, for the slotted star (E and F) and the relief star (R × 2) - Thread — ≈ 2 m
thick sewing thread, fine wool, twine or kitchen string; 1.5 m for the garland and 20 cm pieces to hang each item - Glue stick — 1
to stick the templates onto the card, the two R stars together and the snowflakes on the window (comes off with warm water) - PVA glue — ≈ 5 ml
a drop where the slotted star crosses so it does not turn - Sticky tape — ≈ 30 cm
19 mm clear tape or masking tape, to hang things without making holes and to fix the garland string to the wall - Paperclips — 2
medium-sized, so the 12 layers do not move while cutting
Tools
- Round-ended school scissors — cutting the square, the templates and the 12 layers of snowflakes A and B
- Small sharp-pointed scissors (craft or straight nail scissors) — the fine notches of snowflakes C and D and the slots of the star adult
- Soft pencil (HB or 2B) and rubber — tracing the template onto the folded wedge and marking the thirds
- 20–30 cm ruler — marking the thirds with guide G and measuring the slots
- Empty ballpoint pen — scoring the folds of the relief star so they bend straight
- Blunt darning needle or awl — making the 2 mm hole in the star and threading the string through the snowflake tips adult
Pieces and templates
- P · Paper square for each snowflake ×4 — 60–80 gsm paper
- G · Guide for folding in thirds (30°) ×1 — paper (A4 sheet)
- A · Snowflake level 1 · Ice star ×1 — paper (A4 sheet)
- B · Snowflake level 2 · Branch snowflake ×1 — paper (A4 sheet)
- C · Snowflake level 3 · Lace snowflake ×1 — paper (A4 sheet)
- D · Snowflake level 4 · Dendrite (fern) ×1 — paper (A4 sheet)
- E · Slotted star: piece with slot at the top ×1 — 160–200 gsm card
- F · Slotted star: piece with slot at the bottom ×1 — 160–200 gsm card
- R · Relief star (folded) ×2 — 160 gsm card or 120 gsm paper
Step by step
Make a 21 cm square from an A4 sheet
Fold one corner of the sheet over until the short edge (210 mm) lies exactly on top of the long edge. Run your fingernail along the fold and cut off the 87 mm strip left over at the bottom with scissors. Do not open the triangle: the diagonal fold is already the first of the three you need.
1 Fold the corner until the short edge touches the long one 2 Cut off the 87 mm strip left over at the bottom 3 When you open it you have a square with a diagonal fold Check: When you open it you have a 210 × 210 mm square with a diagonal fold from corner to corner.Tip: If the sheet is 60–70 gsm or tissue paper, the snowflake will be easier to cut: make the level 3 and 4 ones from thin paper.Fold the triangle in half
With the triangle folded and the long fold at the bottom, bring the left point over onto the right one and flatten the new fold with your fingernail. You get a smaller triangle with a 90° corner: that corner is the centre of the square and will be the centre of the snowflake.
1 Bring the left point over onto the right one 2 The right-angled corner is the centre of the square and of the snowflake Check: The triangle has two 148 mm sides forming a right angle and 4 layers of paper. No loose edge shows at the right-angled corner.Mark the thirds with guide G
Cut out guide G. Place the folded triangle on top with the centre corner on O and the two folded sides along the straight sides of the guide. Mark the 2 red dots in pencil on the loose edge: that way you divide the 90° angle into 3 parts of 30°.
1 Put the centre corner on O, with the sides on the guide 2 Mark the 2 dots in pencil on the loose edge Check: The two marks are on the long edge, ≈ 77 mm from each sharp corner and ≈ 56 mm apart.Tip: Hold the triangle with two fingers at corner O so it does not move while you mark.Fold in thirds: 12 layers of 30°
Fold the left part forwards, along the line from the centre corner to the first mark. Then fold the right part backwards, along the line to the other dot. Adjust until the two folded edges lie exactly on top of those of the middle part and flatten with your fingernail.
1 Fold the left part forwards along the first line 2 Fold the right part backwards along the other line 3 You get a 30° wedge with 12 layers Check: You have a narrow wedge with a 30° tip (like a small slice of pizza), 12 layers thick, and two points of paper stick out at the top: that is normal, they get cut off.Tip: First fold without creasing and adjust by looking at the edges; when they match, flatten. If it comes out crooked, open just the thirds again and repeat.Prepare the template for snowflake A
Cut out wedge A round its outer outline and then cut out the 3 grey areas: the large piece at the top and the 2 V notches. You are left with a white template shaped like half an arm of the snowflake. Keep it: you can use it to make lots of identical snowflakes.
1 Cut out wedge A and remove the 3 grey areas 2 You are left with the white template: half a snowflake arm Check: The template has tip O at the bottom, a long straight side on the left (the arm's axis) and another straight side at 30°.Tip: Cut the V notches with two snips that meet at the bottom of the V.Trace the template onto the folded wedge
Place the template on the paper wedge with tip O exactly on the centre corner and its two straight sides along the two folded edges. Hold it with one finger and draw round the whole edge of the template in pencil. Remove the template and hold the 12 layers together with 2 paperclips on the parts you are going to throw away.
1 Put tip O on the centre and trace the whole edge 2 Hold the 12 layers with 2 paperclips where you will cut Check: You can see the template's outline on the paper: the line runs from the axis edge to the 30° edge and leaves no gap unclosed.Cut all 12 layers at once
Cut along the pencil line starting with the large cut at the top (it removes the points sticking out) and carry on with the notches: each V with 2 snips that meet at the bottom. Push the paper right into the scissors, where they cut most strongly, and turn the paper, not the scissors.
1 Start with the large cut at the top 2 Each V: two cuts that meet at the bottom 3 The cut wedge, with all 12 layers cut right through Check: The notches are cut right through at the bottom: when you gently pull the little piece, it comes away on its own without tearing.Tip: With 5–7 year olds, cut the 12 layers yourself and let them do the folding and tracing. If the paper resists, cut slowly in 1 cm stretches.Unfold and flatten the snowflake
Open the paper slowly, undoing the folds in reverse order: first the thirds, then the half and finally the diagonal. Put the snowflake between two sheets and leave a heavy book on top for 10 minutes so it stays flat.
1 Open slowly: thirds, half and diagonal 2 Flatten it for 10 minutes under a heavy book 3 Snowflake with 6 identical arms, about 19 cm across Check: You have a 6-pointed star of ≈ 19 cm, with a diamond in each arm, 6 diamonds round the centre and a notch on each side of the tips. All 6 arms are the same.Tip: If an arm has torn, stick it from behind with a small piece of sticky tape: nobody will notice.Level up: snowflakes B, C and D
Repeat steps 1–8 with templates B (branches), C (lace) and D (dendrite), in that order, each one finer than the last. On C, also cut 6 mm off the tip of the wedge: when you unfold it there is a hexagonal hole in the centre. For D use tissue paper or 60 gsm paper and sharp-pointed scissors.
1 Templates B, C and D: each one finer 2 Unfold each one: branches, lace and dendrite Check: Each snowflake has 6 identical arms with their branches at 60° to the arm. If an arm is missing a branch, the scissors did not reach the bottom on that layer: go over it again with the snowflake folded.Tip: On the fine branches, cut the lower side of each gap first and then the upper one: the piece comes out whole.Cut out the two stars E and F
Stick templates E and F onto the yellow card with a glue stick and cut them out round the outline. Cut the 2 mm slots: on E from the top tip downwards 49 mm; on F from the bottom corner upwards 49 mm. Make two parallel cuts and remove the strip with a cut at the bottom.
1 Mark the slots: E from the top, F from the bottom 2 Cut two lines 2 mm apart and remove the strip Check: Both slots end just past the centre of each star and are the same length (49 mm).Tip: Cut the slots with the sharp-pointed scissors; if it is hard, an adult can do them with a craft knife and ruler.Slot together the 3D star adult
Take F with the slot facing down and E with the slot facing up, crossed at a right angle. Lower F onto E, sliding one slot into the other until the two top tips are at the same height. Put a drop of PVA glue where they cross. Thread a 20 cm piece of string through the hole in F with the needle and tie it.
1 Lower F, turned 90°, sliding one slot into the other 2 The top tips end up together: a 3D star 3 From above they form a cross: add a drop of glue Check: Seen from above, the star forms a cross (+). When you hang it, it turns by itself in the air and looks 3D from any side.Tip: The adult makes the 2 mm hole with the awl or darning needle, on top of a piece of cardboard.Fold the relief star
Cut out the two R stars from card. Score the 10 lines coming out of the centre with the ruler and the empty ballpoint pen. Fold backwards (mountain) the 5 red lines that go to the tips and forwards (valley) the 5 green ones that go to the inner corners. Push the centre up from behind.
1 Score the 10 lines and fold them into mountains and valleys 2 The centre rises and the star gains relief Check: Resting on the table, the star stands on its 5 tips and the centre sits ≈ 1 cm higher.Tip: First fold each point in half lengthways, like a roof, and then pinch the valleys by bringing the points towards the centre.Join the two relief stars
Place one R star face down, lay a 25 cm piece of string across it from the top tip to the centre and put glue stick on the 5 tips and the centre. Stick the other R star on top, face up, with the tips lined up, and press each tip for 10 seconds.
1 Lay the string and put glue on the 5 tips and the centre 2 Stick the other star on top, with the tips lined up Check: The star has relief on both faces, the 5 tips match and the string comes out of the top tip.Make the garland or decorate the window
For the garland, tie a 1.5 m string between two points and hang the snowflakes and stars every 20 cm, with a knot or a piece of sticky tape on the tip of an arm. For the window, put a dab of glue stick on the centre and on 3 tips of each snowflake and stick it to the glass.
1 Hang snowflakes and stars every 20 cm on the string 2 On the window: glue stick on the centre and 3 tips Check: The snowflakes hang straight and do not touch each other when they move in the air.Tip: Alternate snowflakes and stars and put the big snowflakes in the middle of the garland, where it hangs lowest. Glue stick comes off the glass with a damp cloth and warm water.
Does it work? The test
Place the 4 unfolded snowflakes on top of the symmetry guide in the diagram (or on a plate) and turn them 60° at a time. Then stand a small mirror on each fold line. Hang the slotted star by its string and blow gently.
What should happen: Each snowflake has 6 identical arms: when you turn it 60° (a sixth of a turn) it looks exactly the same, 6 times per turn. With the mirror resting on any of the 12 folds coming out of the centre, half the snowflake plus its reflection make the whole snowflake: it has 6 lines of symmetry. The slotted star turns by itself and from any side you can see at least 3 tips in relief.
If something goes wrong
- When you open it, 3 arms are bigger than the other 3 or the centre is not in the middle — The thirds were not equal (one was more than 30°) or the centre corner was not on O when marking. Solution: Mark the thirds again with guide G, holding corner O with your finger, and before flattening check that the two folded edges lie one on top of the other.
- The snowflake falls apart into pieces when you unfold it — A cut went from one side of the wedge to the other, or two notches met and cut off an arm. Solution: Always leave at least 3 mm of paper between two cuts and never cut the axis line from side to side. If it has already happened, stick the pieces together from behind with sticky tape.
- When you open it, some holes are only in some layers and there is paper in others — The scissors did not reach the bottom of the notch in the lower layers, or the paper is too thick for 12 layers. Solution: Fold the snowflake up again and go over the bottom of each notch. For levels 3 and 4 use 60–70 gsm paper or tissue paper and small sharp-pointed scissors.
- You get a snowflake with 4 or 8 points instead of 6 — The small triangle was folded in half again (into 45° quarters) instead of in thirds. Solution: After step 2 do not fold in half any more: use guide G to divide the 90° angle into 3 parts of 30°.
- The paper tears or crumples when cutting — Paper heavier than 80 gsm or scissors that do not cut 12 layers well. Solution: Use thinner paper, hold the layers with 2 paperclips and cut with the part of the scissors nearest the screw, opening and closing them fully.
- The slotted star will not go together or bends when you slot it — Slots narrower than the card or shorter than 49 mm. Solution: Widen the slots to 2–3 mm and lengthen them to 1 mm past the centre of the star. Together they should add up to a little more than the height of the axis (97 mm).
- The relief star does not rise or ends up crooked — Folds not scored or some mountain and valley folds swapped. Solution: Score the 10 lines again with the empty ballpoint pen and check that the 5 that go to the tips fold backwards and the 5 that go to the inner corners, forwards.
- The snowflakes fall off the glass — Too little glue stick or cold, damp glass. Solution: Dry the glass, put glue on the centre and on 3 tips, and press for 10 seconds. You can also use a loop of sticky tape on the back.
Safety
- The sharp-pointed scissors and the darning needle or awl are used by an adult, or by the child with an adult beside them: for the notches of levels 3 and 4 and for the hole in the star, always on top of a piece of cardboard.
- Always cut with the hand holding the paper away from the cutting line, and turn the paper, not the scissors.
- Never hang the garland near candles, fireplaces, heaters or light bulbs that get hot: paper burns very quickly. If you want lights, use an LED string, which barely gets warm, and do not let the paper touch it.
- With children under 3 nearby, pick up the small paper scraps and the paperclips: they can put them in their mouths.
- Do not stick snowflakes on heated glass or next to a radiator that is on, or on windows that open onto the street if the child has to lean out to stick them: an adult does that.
The science behind it
For children
When you fold the paper into 12 layers and make a single cut, that cut appears 12 times: 6 times the way you made it and 6 times flipped over, as in a mirror. That is why your snowflake has 6 identical arms. Real snow also has 6 arms, and it is because of water: water is made of tiny little bits called molecules, shaped like a boomerang. When it is very cold, those little bits hold on to each other in rings of 6, like the cells of a honeycomb. That is why a snowflake starts as a tiny hexagon, and its 6 corners grow and become the 6 arms.
For the adult
Symmetry: the paper snowflake has the symmetry of the dihedral group D6, with 12 operations: 6 rotations (0°, 60°, 120°, 180°, 240° and 300°, because 360° ÷ 6 = 60°) and 6 reflections in 6 axes (3 through the arms and 3 between them). A fundamental region of D6 is a 30° wedge (60° ÷ 2): when you fold the square diagonally (2 layers), in half (4 layers, 90° angle at the centre) and in thirds (3 × 4 = 12 layers of 30°), each layer is a copy of the wedge, and adjacent layers are joined by a fold, which acts as a mirror. A cut in the wedge therefore appears 12 times: 6 direct and 6 mirrored. That is why you only need to design half an arm, and why notches that touch a fold give symmetrical holes (diamonds) when unfolded. If you fold into 45° quarters (8 layers) you get D4: 4 or 8 points, which snow never has. The usable radius of the snowflake is 100 mm because in a 210 mm square the point on the edge nearest the centre is 105 mm away. Why snow has 6 arms: the water molecule is bent (H–O–H angle of 104.5°) and in ordinary ice (ice Ih) each oxygen is joined by hydrogen bonds to 4 neighbours in an almost tetrahedral arrangement (≈ 109.5°). That lattice, seen along the crystal's c-axis, forms rings of 6 molecules: the cell is hexagonal, and the basic crystal is a hexagonal prism with 2 basal faces and 6 prism faces. A snowflake is born when water vapour is deposited directly as ice onto a particle in a supercooled cloud. The 6 corners of the prism stick out into air with more vapour and grow faster than the middle of the faces (branching instability): that is where 6 arms come from, and from the arms, branches at 60°, always parallel to the directions of the lattice. The 6 arms look alike because they grow at the same time, in the same air and at the same temperature, but they are not identical. The shape depends on temperature and humidity (Nakaya diagram): plates around −2 °C and between −10 and −20 °C, needles and columns around −5 °C and below −22 °C, and branched stars (dendrites, like snowflake D) around −15 °C with high humidity. A real snowflake measures 1 to 5 mm (large dendrites, up to ≈ 10 mm); ours are about 40 times bigger. Stars: the regular 5-pointed star has D5 symmetry (5 axes and rotations of 72°), 36° points and a ratio r/R = 0.382 between the radius of the inner corners and that of the tips (1/φ², with φ the golden ratio). The slotted star is assembled with 2 slots that each reach 1 mm past the middle of the common axis (97 mm): when they cross, each piece holds the other, the same principle as the cardboard dividers in bottle boxes. The relief star takes advantage of the fact that the paper adds up to 360° around the centre: by alternating 5 mountain folds and 5 valley folds, the paper cannot stay flat and becomes a pleated pyramid, stiffer than the flat sheet.
- symmetry: when a shape looks the same after you turn it or look at it in a mirror
- line of symmetry: a line that splits a shape into two halves that are reflections of each other; the snowflake has 6 and the 5-pointed star, 5
- molecule: the smallest bit of a substance, such as water, that is still that substance
- hexagon: a 6-sided shape; the angles of a regular hexagon are 120° and its corners are every 60° around the centre
- crystal: a solid in which the molecules are arranged in a repeating lattice, like ice, salt or sugar
- mountain fold and valley fold: in a mountain fold the paper bends backwards and forms a ridge; in a valley fold, forwards, and it forms a groove
By age
- 5–7 years: The adult makes the square, marks the thirds and cuts the 12 layers. The child folds the diagonal and the half, traces template A, unfolds the snowflake (the star moment) and counts the arms and holes. Do only snowflakes A and B and the slotted star with the slots already cut. Focus on “one cut, 12 times” and on counting in sixes.
- 8–10 years: They do everything except the hole in the star. Get them to predict by drawing what the snowflake will look like before opening it and to check the 6 axes with the mirror. Challenge: snowflakes A, B and C and designing their own on a blank 30° wedge.
- 11–12 years: Get them to work out the angles (360 ÷ 6, ÷ 12, the 36° point of the star), explain with the diagram why ice is hexagonal and make snowflake D with tissue paper. Challenge: design a snowflake template on graph paper with branches at 60° and check it does not fall apart when unfolded; work out the length of the slots for a star of a different size.
In a group or in class
For 20–25 children, in pairs or individually (it is cheap: 1 A4 sheet per snowflake and half a sheet of card per star). Beforehand: print 1 guide G per pair and templates A–D (one sheet with the 4 wedges per pair), cut out stars E, F and R in card for the youngest and prepare 210 mm squares. 60–75 min session: 10 min demonstration (fold live and unfold a finished snowflake), 25 min of snowflakes A and B, 20 min of stars in stations (one table for the slotted star, another for the relief star) and 10 min to put together a class garland with a snowflake from each child. Have several pairs of sharp-pointed scissors for the adult's table and leave level 4 for those who finish first.
Challenges
- Design your own snowflake: on a blank 30° wedge (trace the outline of template A) draw a shape with notches that touch both edges, without cutting from side to side. Before cutting it out, draw what you think it will look like unfolded.
- Make small snowflakes for the garland: with a 105 mm square (a quarter of an A4 sheet) and the templates printed at 50 %, you get a snowflake of ≈ 10 cm.
- Copy a real snowflake: find a photo of a snowflake under a microscope, draw half an arm on the 30° wedge and cut it out. How much bigger is yours than the real one?
- Make a bigger slotted star, 100 mm from the centre to the tips: work out the radius of the inner corners (× 0.382), the length of the axis (top tip to bottom corner) and each slot (half the axis + 1 mm). Check that it fits together.
- Translucent window snowflakes: make them with baking paper or tracing paper and stick them on the glass: by day they look white and at night, with the light on inside, you can see them from the street.