Jumping paper frog
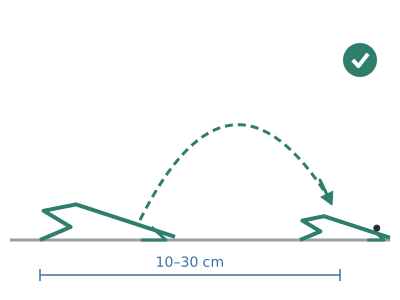
A 7.5 × 4 cm paper frog folded from an 8 × 15 cm rectangle. The zigzag fold at the back acts as a spring: press its tail and let go, and it jumps 5–15 cm high and 10–30 cm forwards.
What they will learn
- That a folded material stores elastic energy and gives it back when released: the zigzag fold is a spring.
- That the thickness of the paper and how sharply the folds are creased change the stiffness of the spring and the height of the jump.
- To follow a folding diagram with valley and mountain folds.
- To measure jumps with a ruler and compare models fairly (several repeats and an average).
Prepare beforehand
- Print template A on coloured paper or thin card at 100 % (not «fit to page»). The fold lines end up on the outside (the side with the legs) and help you fold accurately.
- If you use card heavier than 160 gsm, score the folds first with an empty ballpoint pen and the ruler.
- Fold a frog yourself first: step 4 (pushing the sides in) is much easier to understand when you see it done.
- Set up a smooth, clear table as a jumping track with the jump ruler (D) taped down.
Materials and tools
- Coloured paper or thin card — 3 rectangles of 80 × 150 mm
120–160 gsm (thin card, index card); you get 3 from an A4 sheet if you cut them by hand (the printed template has 2 per sheet) - Black felt-tip pen — 1
fine tip, for the eyes - 80 gsm paper — 1 A4 sheet
for the thin versus thick paper experiment
Tools
- Scissors and ruler — cut the 80 × 150 mm rectangles
- Empty ballpoint pen — score the folds on thick card before folding
- Tape measure or the jump ruler (piece D) — measure the distance of each jump
Pieces and templates
- A · Standard frog (80 × 150 mm) ×3 — thin card 120–160 gsm (or coloured paper)
- B · Large frog (120 × 225 mm) ×1 — thin card 120–160 gsm (or coloured paper)
- C · Small frog (60 × 112.5 mm) ×1 — thin card 120–160 gsm (or coloured paper)
- D · Jump ruler (0–25 cm) ×1 — 80 gsm paper
Step by step
Cut out the rectangle
Cut out piece A (80 × 150 mm) along the solid line. Place it upright, with the printed lines facing you and the 80 mm side at the top.
1 Cut out piece A along the solid line 2 Place it upright, lines facing you and the 80 mm side at the top Check: It measures 80 mm wide and 150 mm high.Fold the two diagonals
Bring the top edge onto the right-hand edge, so that the top left corner touches the right-hand side 80 mm from the top; crease with your fingernail and open. Repeat towards the left. You have two diagonals forming an X on the 80 × 80 mm square at the top.
1 Bring the top corner to the right-hand side, at 80 mm 2 Crease the fold with your fingernail and open 3 Repeat towards the left: you get an X crossing at 40 mm Check: The two diagonals cross in the centre of the square, 40 mm from the top edge.Fold the horizontal through the crossing
Turn the sheet over. Fold the top strip towards you along a horizontal line that passes exactly through the crossing of the X (40 mm from the top edge). Crease with your fingernail, open and turn the sheet back with the diagonals facing you.
1 Turn the sheet over 2 Fold the top strip down exactly through the crossing of the X 3 Open and turn the X back to face you Tip: This makes the horizontal a mountain fold and the diagonals valley folds: that's what makes the triangle form by itself.Form the triangle
With two fingers, push both ends of the horizontal line towards the centre. The sides tuck inwards and the top part comes down, flattening into a triangle with an 80 mm base and 40 mm high. Flatten it with your fingernail.
1 Push the ends of the horizontal line towards the centre 2 The sides go in and the top part comes down 3 Flatten the triangle: 80 mm base and 40 high Check: At the top there is a triangle pointing upwards with its base across the width; below it is the rectangle of the body (70 mm high).Make the front legs
Take the bottom right corner of the top layer of the triangle and bring it up to the tip of the triangle; crease. Repeat with the left corner. Open the points out a little so they stick out like legs.
1 Bring the right corner of the top layer up to the tip 2 Repeat with the left corner 3 Open the points out a little: these are the legs Check: The two front legs are the same and stick out about 10 mm at the sides.Narrow the body
Fold the right side of the body (the rectangle below the triangle) towards the centre, along the line 20 mm from the edge, until the edge touches the centre line. Repeat with the left side. The body is now 40 mm wide.
1 Fold each side along the 20 mm line to the centre 2 Tuck the edges under the triangle: 40 mm body Tip: Tuck the edges slightly under the triangle so they don't spring open.First accordion fold
Fold the bottom edge of the body up until it touches the base of the triangle (the fold is 35 mm from the bottom edge, on the 115 mm line of the template). Crease firmly with your fingernail.
1 Fold the bottom edge up to the base of the triangle 2 Crease the fold firmly with your fingernail Second accordion fold
Take the edge you've just folded up and bring it back down to the bottom fold, folding that section in half (17.5 mm). Crease firmly with your fingernail. You now have a zigzag with two folds: it's the spring.
1 Bring the edge back down to the bottom fold 2 Crease this fold firmly too 3 Look at it from the side: the body forms a Z Check: Seen from the side, the body forms a «Z».Turn it over and draw the eyes
Turn the frog over: it now rests on its legs and the spring is under the tail. Draw two 5 mm eyes 15 mm from the tip, one on each side of the centre line.
1 Turn it over: it rests on its legs, the spring goes underneath 2 Draw two 5 mm eyes 15 mm from the tip Make it jump
Put the frog on a smooth table. Rest the pad of your index finger on the back edge (the accordion), press down about 5–10 mm and slide your finger backwards sharply until it slips off.
1 Press the tail down about 5–10 mm and slide your finger backwards 2 It jumps forwards and upwards; a somersault is normal Check: It jumps forwards and upwards: 10–30 cm in distance. Sometimes it does a somersault: that's normal.Improve the spring
If it doesn't jump far, re-crease both accordion folds by running your fingernail over each one three times and leave the «Z» slightly open (about 30°), without squashing it completely.
1 Run your fingernail over each accordion fold three times 2 Leave the Z slightly open, without squashing it completely Measure the jumps
Tape the jump ruler (piece D) to the table. Put the frog's tail on the 0 and make it jump 5 times. Note where the tip lands each time and work out the average.
1 Tape ruler D down and put the tail on the 0 2 Note where the tip lands 3 Do 5 jumps and work out the average
Does it work? The test
On a smooth table, with the tail on the 0 of the jump ruler, do 5 jumps in a row with the same pressure and note the distance to where the tip lands.
What should happen: With 120–160 gsm card: 10–30 cm in distance and 5–15 cm in height. With 80 gsm paper: 5–15 cm in distance. The large frog (B) jumps further but is harder to press; the small one (C) jumps less.
If something goes wrong
- The triangle doesn't form when you push — The horizontal and the diagonals are folded the same way. Solution: Re-crease the horizontal the other way (mountain) and push again.
- It hardly jumps — Soft accordion folds or paper that is too thin. Solution: Crease both folds with your fingernail; use 120–160 gsm card.
- It springs open when you press it — The sides haven't been folded to the centre or the accordion is too open. Solution: Do the «Narrow the body» step and flatten the Z a little more.
- It somersaults instead of jumping forwards — You're pressing too far back or lifting your finger straight up. Solution: Press right on the edge of the accordion and slide your finger backwards, not upwards.
- It jumps crooked — Uneven side folds. Solution: Check that the body is 40 mm wide and that both sides are at 20 mm.
- After lots of jumps it stops jumping — The paper fatigues and the fold loses stiffness. Solution: Re-crease the accordion or fold a new frog (paper gets tired like a paperclip bent many times).
Safety
- Make the frog jump towards the table, never towards anyone's face: the card points could hit an eye.
- Paper cuts: when creasing folds, run your fingernail over the top, not your finger along the edge of the card.
- If you use self-adhesive googly eyes, they are small parts: not for children under 3.
The science behind it
For children
When you press the tail, you squash the paper zigzag as if you were pressing the spring in a pen. The paper doesn't want to stay folded: it stores the force you gave it. When you suddenly let go, the zigzag stretches out all at once, pushes against the table and the frog flies off, just like a real frog suddenly stretching out its back legs.
For the adult
The accordion (two Z folds) acts as a bending spring: when compressed, the paper bends at the fold lines and stores elastic energy E ≈ ½·k·x². When suddenly released, that energy becomes kinetic energy of the frog (mass ≈ 1 g with 80 gsm paper and ≈ 2 g with 160 gsm card), and a small part is lost to friction and plastic deformation. With a compression x ≈ 8 mm and k of the order of 30–50 N/m, E ≈ 1–1.6 mJ; the maximum possible height is h = E/(m·g) ≈ 5–15 cm for 1–2 g, somewhat less because of losses: hence jumps of 5–15 cm. Stiffness k increases with the modulus of the paper and with the cube of its thickness: a 160 gsm card, roughly twice as thick as 80 gsm paper, is several times stiffer, stores more energy for the same compression and jumps higher (until it is so stiff it can't be compressed with a finger). Creasing the folds reduces slack in the spring; folding it many times fatigues the cellulose fibres and softens it. On release, the reaction from the surface acts behind and below the centre of mass, which creates a turning moment: hence the somersaults.
- elastic energy: energy stored by a deformed object (spring, rubber band, folded paper) and given back when it is released.
- spring: a part that gets squashed or stretched and returns to its shape.
- valley fold: a fold towards you: it forms a «V» like a valley.
- mountain fold: a fold away from you: it forms a «Λ» like a mountain.
- stiffness: how hard it is to bend or squash a material.
By age
- 5–7 years: The adult does steps 2–4 (diagonals and triangle) and the child narrows the body, makes the accordion with help, draws the eyes and makes it jump. Use thin card in bright colours.
- 8–10 years: They fold the whole frog following the diagram and measure jumps with the ruler. Let them discover why the accordion needs to be creased firmly.
- 11–12 years: Have them make the three frogs of different sizes and the paper experiment, work out averages and jumps in «body lengths» and come up with their own spring design (more folds, wider folds).
In a group or in class
Individual, with 3 card rectangles per child (you get 3 from a 160 gsm A4 sheet if you cut them by hand; the printed template has 2 per sheet). Before: print or cut all the rectangles and mark a track with the jump ruler on each table. 45-minute session: 15 min guided folding step by step (the teacher folds in view of everyone with a large 24 × 45 cm frog), 10 min adjusting and first jumps, 15 min experiments by table (each table tests one paper or one size and the results are combined on the board), 5 min final race.
Challenges
- Make the frog land inside a jar lid 20 cm away.
- Get a frog to jump more than 40 cm by changing only the paper and the spring.
- Design a frog that always lands the right way up (no somersaults).
- Fold a tiny frog from a 4 × 7.5 cm rectangle and a giant one from 24 × 45 cm: which jumps more times its own body length?