Shoebox table football
A table football game in a shoebox: 6 wooden skewer rods cross the box 61 mm above the floor, 12 glued-on clothes pegs act as players (1-2-3-3-2-1) and a 22 mm paper ball is kicked by turning the rods towards the 60 × 35 mm goals.
What they will learn
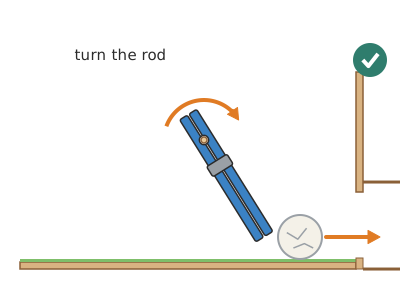
- That a rod is an axis of rotation: when you turn it, the player's foot moves in an arc and strikes the ball (a lever with a 57 mm radius).
- That the height of the axle can be calculated: length of the player below the rod + clearance above the floor.
- That for an axle to turn smoothly it needs clearance (a hole 1.5 mm bigger than the rod) and lined-up holes.
- How to space players to cover the whole width of the pitch (gap between players ≤ the rod's sliding travel).
- How to keep statistics: goals, shots, success rate.
Prepare beforehand
- Measure your box inside. If it is not 26 × 17 cm, leave 40 mm between the goal and the first rod and space the others out evenly.
- Check the notch on your pegs: measure from the centre of the notch to the furthest tip (L). The rod height will be L + 4 mm (with 72 mm pegs, 61 mm).
- Paint the pegs the day before (6 blue and 6 orange) and leave them to dry open.
- Cut the tips off the 6 skewers.
- Print hole template B and goal template G at 100 %.
Materials and tools
- Shoebox without its lid — 1
inside floor ≈ 26 × 17 cm and walls at least 9 cm high; sturdy card - Wooden skewers — 6 (+ 2 spares)
Ø 3 mm × 30 cm, straight - Wooden clothes pegs — 12
72 mm long, with a round notch in the jaws - Paint or felt-tip pens — 2 colours
blue and orange poster paint or acrylic (6 pegs of each) - Green paper or green card — 1 sheet, 26 × 17 cm
to cover the floor; white felt-tip pen for the lines - Paper for the ball and sticky tape — half an A4 sheet + 40 cm of tape
tight ball, Ø 22 mm, wrapped in clear tape - Card — 1 A4 sheet
200 gsm, for the goal boxes and deflectors - PVA glue or hot glue — a squirt / 1 stick
to fix the pegs to the rods - Masking tape — 1 roll
for handles and stops
Tools
- Awl and round pencil — pierce the 12 holes and widen them to Ø 4–5 mm adult
- Craft knife and cutting mat — cut the two goals adult
- Side cutters or strong scissors — remove the sharp tips of the skewers adult
- Ruler and set square — mark heights and spacings
- Paintbrush — paint the pegs
Pieces and templates
- A · Pitch plan ×1 — green paper or card
- B · Hole template (half wall) ×1 — paper
- C · Goal box ×2 — card 200 gsm
- D · Corner deflector ×4 — card 200 gsm
- E · Rods ×6 — wooden skewer Ø 3 mm × 300 mm
- F · Ball ×1 — half an A4 sheet + tape
- G · Goal template ×1 — paper
Step by step
Cover the pitch
Stick the green paper to the floor of the box with PVA glue or a glue stick. With a white felt-tip pen, draw the halfway line 130 mm from each goal, the 50 mm diameter circle and the 25 × 80 mm areas in front of each goal.
1 Spread glue over the whole floor of the box 2 Lower the green paper A into the box and smooth it with your hand 3 Draw the halfway line, the circle and the two areas in white Mark the holes
Place template B on the outside of a long wall, with its bottom edge on the base of the box and its side edge on the corner. Mark the 3 holes. Repeat from the other corner and on the other long wall (12 marks in total).
1 Put template B in the corner, bottom edge on the base 2 Mark the 3 holes and repeat from the other corner 3 Do the same on the other long wall: 12 marks at 63 mm Check: All 12 marks must be 63 mm from the base and facing each other: measure from the same end on both walls.Pierce the holes adult
Pierce the 12 marks with the awl from the outside inwards and widen each hole by twisting a round pencil until it is about 4–5 mm. Support the wall from the inside with a block of wood or a book.
1 Hold a book on the inside and pierce each mark from outside 2 Widen the hole by twisting a pencil to 4–5 mm 3 Push a skewer through: it should be level and turn freely Check: Push a skewer through: it should go straight across from one side to the other and turn without rubbing.Cut the goals adult
Centre template G on each short wall, with its edge on the base, and use a craft knife to cut the 4 sides of the opening, 60 mm wide by 35 mm high. The bottom side is 2 mm above the base, level with the inside floor: don't cut the floor.
1 Centre template G on the short wall, against the base 2 Cut out the opening with a craft knife, following the template 3 Remove the rectangle and repeat on the other short wall Check: The ball must roll out through the opening along the floor, with no step.Build the goal boxes
Cut out the two C pieces, fold the 4 flaps and join their corners with tape. Stick each box to the outside of a short wall, covering the goal opening.
1 Cut out piece C and fold the 4 flaps towards the same side 2 Join the corners with tape: a 70 × 40 × 40 mm box 3 Stick it outside over the opening: it catches the goal ball Check: The ball must go in through the goal and stay in the box.Fit the deflectors
Fold the flaps of the 4 D pieces and glue them upright diagonally in each corner of the pitch (with the flaps ≈ 32 mm from the corner on each wall).
1 Fold the two 7 mm flaps on each piece D 2 Glue it upright on the diagonal, flaps 32 mm from the corner 3 Put one in each corner: the ball no longer gets stuck Insert the rods
Push the 6 skewers through their holes: numbers 1, 3 and 5 (blue team) with the 70 mm handle on your side; numbers 2, 4 and 6 (orange) with the handle on the other side. Put them in empty: the pegs are clipped on afterwards, with the rod already in place (next step).
1 Each 300 mm skewer has a 70 mm handle 2 Insert 1, 3 and 5 from your side and 2, 4 and 6 from the far side 3 Each team ends up with its three 70 mm handles on its side Fit the players
Open each peg, put the rod in the round notch and close it with the jaws at the top and the rest hanging down towards the floor. Place them as shown on the plan: 1 on rod 1, 2 on rod 2, 3 on rod 3, 3 on rod 4, 2 on rod 5 and 1 on rod 6, alternating colours.
1 Squeeze the peg to open it and bring it up to the rod 2 Close it on the notch, jaws at the top: it clears the floor by 4 mm 3 Put on 1-2-3-3-2-1 players, alternating the two colours Check: Turn each rod: the bottom tip of the pegs must pass 3–5 mm above the floor without touching it.Fix the players adult
Set each peg in its position (on the 3-player rod, 42.5, 85 and 127.5 mm from the wall; on the 2-player rod, 57 and 113 mm; the goalkeeper in the centre, at 85 mm) and put a drop of PVA glue or hot glue in the notch. Leave to dry for 20 min.
1 Place the pegs 42.5, 85 and 127.5 mm from the wall 2 Put a drop of hot glue or PVA glue in each peg's notch 3 Leave to dry 20 min: turn the rod and they all turn with it Check: Turn the rod: all the pegs must turn with it, without slipping.Goalkeeper stops
On rods 1 and 6, wrap 10 turns of masking tape round the rod 50 mm either side of the goalkeeper, inside the box. That way the goalkeeper can only move in front of its goal.
1 Wrap 10 turns of tape 50 mm either side of the goalkeeper 2 When you slide it, the stop hits the wall: it stays in its goal Tip: The goalkeeper is 40 mm from its wall and the peg reaches 57 mm below the rod: it can kick forwards and swing back only until it touches the wall, but it cannot go all the way round. Don't force it.Handles
Wrap masking tape round the last 50 mm of each handle until it is about 8 mm thick, so it is easy to grip. Put a little tape on the tip of the tail as well so it doesn't scratch.
1 Wrap tape round the last 50 mm of each handle 2 Build the handle up to 8 mm and cover the tail tip too Make the ball and play
Make the 22 mm ball F. Kick off from the centre by dropping it into the circle. Each player works their 3 rods: sliding them to get into position and turning them to kick. The first to reach 5 goals wins.
1 Scrunch half a sheet up tightly and wrap it in tape: Ø 22 mm 2 Kick off by dropping the ball into the centre circle 3 Slide to get into position, turn to kick: first to 5 wins
Does it work? The test
Put the ball in front of each player and turn the rod with a flick of the wrist. Also check that all the rods can slide from wall to wall.
What should happen: Every player strikes the ball cleanly (at mid-height) and sends it 20–30 cm; from the attacking rod, a straight shot reaches the goal. No part of the pitch is left uncovered when the rods slide, and the rods don't come out.
If something goes wrong
- The rods are hard to turn — Holes too small or not lined up. Solution: Widen the holes with a pencil to 4–5 mm; if they are out of line, make a new, carefully measured one and cover the old one with tape.
- The players rub on the floor — Holes too low or longer pegs. Solution: Make the holes 3–5 mm higher or sand 2–3 mm off the tip of the pegs that rub (the peg always hangs from its notch, so it can't be raised).
- The players don't reach the ball — Holes too high. Solution: Use a bigger ball (30 mm paper ball or ping-pong ball) or lower the holes.
- The pegs spin on their own on the rod — They haven't been glued. Solution: A drop of hot glue in the notch, or 3 turns of tape on the rod just below the peg.
- The goalkeeper jams when turned backwards — Rods 1 and 6 are 40 mm from their goal wall and the peg hangs down 57 mm: when it turns backwards it hits the wall. Solution: This is normal: the goalkeeper only saves and kicks forwards. Turn it back only until it brushes the wall and don't force it all the way round, as that unsticks the peg or breaks the wall. If it has come unstuck, glue it back on with hot glue.
- The ball sits still in a corner — Area with no players. Solution: Fit the corner deflectors or tilt the box slightly.
- The rod slips out the other side — Tail too short. Solution: Leave at least 55 mm of tail or put a tape stop on the outside.
- The box bends out of shape during play — Floppy walls. Solution: Reinforce the long walls on the inside with a 260 × 40 mm strip of corrugated cardboard below the holes.
Safety
- Cut the tips off the skewers before fitting them: the rods stick out 7 cm from the box at the height of hands and faces.
- Don't push the rods hard inwards with your face close to your opponent's side of the box.
- Only an adult uses the awl and the craft knife.
- The pegs have a metal spring that pinches: watch out for small fingers.
The science behind it
For children
Each rod is like the axle of a wheel: when you turn it with your hand, the players swing round it. Because their feet are far from the axle, they move very fast and kick the ball. If you slide the rod, the player moves sideways to block the ball. So a small twist of the wrist gives you a powerful kick.
For the adult
Each rod is an axis of rotation supported in two bearings (the holes). Turning the rod through an angle θ moves the player's foot along an arc s = r·θ, with r ≈ 57 mm: since the handle has a radius of ≈ 4 mm, the wrist moves the foot about 14 times faster (a speed lever). The energy of the kick depends on the speed of the foot at impact (½·I·ω²); the paper ball (≈ 3 g) leaves at 1–2 m/s. The axle height is chosen so that the player's lowest point (r = 57 mm) is ≈ 4 mm above the floor and strikes the ball (Ø 22 mm) below its centre (11 mm), pushing it forwards rather than into the floor. The clearance in the hole (Ø 4–5 mm for 3 mm) prevents friction caused by misalignment; the outermost players act as axial stops. Side-to-side coverage requires the gap between players on the same rod to be less than or equal to its travel: 3 players 42.5 mm apart with ±37 mm of travel cover the 170 mm width.
- axis of rotation: the line something turns around.
- lever: a bar that turns about a point and multiplies force or speed.
- clearance: free space that lets a part move without rubbing.
- symmetry: when the two halves are the same, as in a mirror.
- statistics: counting and comparing data, such as goals and shots.
By age
- 5–7 years: The adult pierces, cuts and fits the rods. The child paints the players, covers the pitch, makes the ball and plays; with 1 rod per child it is easier at first.
- 8–10 years: They build everything, with help for the awl and craft knife. They check heights with the ruler and decide where the players go.
- 11–12 years: They work out the rod height for their own pegs, design a scoreboard and organise a league with a table (points, goals for and against).
In a group or in class
Pairs (one per game, 12–13 games). Per pair: 1 box, 8 skewers, 12 pegs painted the day before. Before the session: pierce the boxes using the template (5 min per box) and cut off the tips. 75-minute session: 10 min explaining axle height, 45 min building, 20 min mini-league of 3-minute matches with a table on the board.
Challenges
- Make a scoreboard with two sticks and coloured beads on the side of the box.
- Build a 4-player table football game with a longer box and 8 rods.
- Design a goalkeeper with wider ‘hands’ by gluing a 30 mm strip of cardboard to the peg: is it fair?
- Add a kick-off system: a paper tube in the side through which the ball enters the centre.