Recycled paper workshop
With 50 g of used paper, water and a frame mould covered in tulle, you can make 10–15 sheets of postcard-sized handmade paper (15 × 11 cm), which can have petals, threads or seeds inside.
What they will learn
- That paper is a web of cellulose fibres that separate in water and join together again when they dry (hydrogen bonds).
- That filtering separates solids (fibres) from a liquid (water), and that the amount of pulp in the water decides how thick the sheet is.
- That recycling paper saves trees, water and energy, and that every time it is recycled the fibre gets shorter.
- To follow a process in stages (soaking, blending, forming, pressing, drying) while controlling quantities.
Prepare beforehand
- The night before: tear 50 g of paper into 2–3 cm pieces and leave them to soak in 1 L of hot tap water.
- Assemble the mould (frame + tight tulle) and the deckle before the workshop; if they are made of cardboard, make sure the tape is firmly stuck along every edge.
- Cover the table with plastic or an old tablecloth and set up the pressing area: folded towel + newspaper + cloths.
- Have a bucket ready so nothing goes down the sink.
- Find a flat place to dry for 24 h (clothes airer with pegs or on top of dry newspaper).
Materials and tools
- Used paper — 50 g (≈ 10 A4 sheets or 2 double pages of newspaper)
printed A4 sheets, newspaper, card without plastic; NOT glossy magazine paper, laminated paper or till receipts - Tap water — ≈ 6 litres
1 L for soaking and 4–5 L in the basin (about 5–7 cm deep in a 30 × 25 cm one) - Wooden photo frame — 2 identical
wooden, without glass or backing, about 19 × 15 cm on the outside with an opening of about 15 × 11 cm (one gets tulle: the mould; the other has no tulle: the deckle). If yours are a slightly different size they work just as well: the sheets will come out the size of the opening, and the tulle is cut 2 cm bigger than the frame on each side - Tulle or fly screen mesh — 1 piece of 23 × 19 cm
fine 1–2 mm mesh (costume tulle, net curtain, fine tights) - Washing-up bowl or tub — 1
at least 30 × 25 cm at the bottom and 10 cm high (the mould must fit lying flat) - Kitchen cloths — 6–10
‘Vileda’-type cloths or plain cotton rags of ≈ 25 × 20 cm (one per sheet) - Old towels and newspapers — 2 towels + 1 newspaper
to soak up the water under the cloths - Sponge — 1
washing-up sponge, clean, without a scourer side - Petals, threads or seeds — 1 handful
dried petals, strands of wool, tissue-paper confetti, small seeds (poppy, radish) - PVA glue (optional) — 1 teaspoon (5 ml)
dissolved in the basin, so you can write on the paper without the ink running - Staples or drawing pins and packing tape — ≈ 20 staples
to stretch the tulle tight over the frame
Tools
- Jug blender (1.5 L jug or larger) — blend the soaked paper in batches (if the jug is smaller, do batches with 500 ml of water) adult
- Stapler (staple gun or open office stapler) — fix the tight tulle to the frame adult
- Rolling pin — press the sheets between cloths
- Large sieve — collect the leftover pulp at the end
- Kitchen scales — weigh the 50 g of paper
- Iron (optional) — dry and flatten faster, with a cloth on top adult
Pieces and templates
- A · Cardboard frame (mould and deckle) ×4 — 3–4 mm corrugated cardboard covered in packing tape
- B · Mould tulle ×1 — tulle or fly screen with 1–2 mm mesh
- C · Card template (optional) ×1 — paper
Step by step
Weigh and soak
Weigh 50 g of used paper, tear it into 2–3 cm pieces and leave it in a bowl with 1 litre of hot tap water overnight (at least 2 hours).
1 Weigh 50 g of used paper (about 10 A4 sheets) 2 Tear it by hand into 2–3 cm pieces, no scissors 3 Leave it to soak in 1 L of hot water overnight Tip: Tearing by hand is better than cutting with scissors: it leaves the fibres longer.Assemble the mould adult
Place the tulle (23 × 19 cm) on the flat side of the frame so that 20 mm overhangs on each side. Fold those 20 mm round the back and staple them, starting from the middle of each side and working towards the corners, pulling the tulle tight each time.
1 Put tulle B on the flat side of the frame: 20 mm overhangs on each side 2 On the back, staple the middle of each side, then work to the corners 3 Tap it: it should make a sound, not sag and have no wrinkles Check: When you tap the tulle with your finger it should make a sound and not sag; no wrinkles.Blend the pulp adult
Put a handful of soaked paper (a quarter of the total) into the blender (with a 1.5 L jug or larger, so it is no more than half full) with 750 ml of water and blend in 10-second bursts for 30–40 seconds. Repeat in 4 batches. If your jug is smaller, use 500 ml of water and do 6 batches.
1 Put a quarter of the paper and 750 ml of water in the jug 2 With the lid on, blend in 10 s bursts (30–40 s in total) 3 A drop in a glass of water: just a cloud, no bits Check: When you put a drop of pulp in a glass of water you should see no bits of paper, just a cloud of fibres.Fill the basin
Pour the pulp into the basin and add water until you have about 4–5 litres: in a 30 × 25 cm basin that is about 5–7 cm deep, enough for the mould and deckle to be covered when laid flat. Stir with your hand. If you want to be able to write on the paper, dissolve 1 teaspoon of PVA glue.
1 Pour all the blended pulp into the basin 2 Add water up to 4–5 litres and stir well with your hand 3 Adjust: if it looks like thin soup, more pulp; if it is purée, more water Tip: If the pulp looks like a very thin soup, add more; if it is like a purée, add water.Pull the first sheet
Stir, put the deckle on the mould (tulle facing up) and hold them together. Slide them in edge first on the far side, turn them under the water until they are level and lift them out slowly and straight.
1 Put the deckle on the mould and hold them together 2 Slide them in edge first on the far side and turn them under the water 3 Lift them slowly and straight: an even layer of pulp is left Check: As you lift, an even 2–3 mm layer of pulp should be left on the tulle with water draining out.Drain and decorate
Hold the mould level over the basin for 20–30 seconds and gently move it backwards and forwards to interlock the fibres. Carefully remove the deckle. Now you can place petals or threads on top.
1 Hold it level for 20–30 s and move it a little backwards and forwards 2 Carefully lift the deckle off 3 Place petals, threads or seeds on the pulp Tip: If the layer has holes or is very thick, dip it back into the basin and repeat: the pulp comes off by itself.Transfer the sheet to the cloth
Lay a damp, smooth cloth on the towel. Turn the mould over and place it face down on the cloth in one firm movement, putting one edge down first and then the rest.
1 Lay a damp, smooth cloth, stretched out well, on the towel 2 Turn it over and put one edge down on the cloth first 3 Lower the rest in one firm movement Drain with the sponge
With the mould face down, press the sponge onto the tulle over the whole surface and wring it out into the bucket. Repeat 3–4 times until little water comes out.
1 Press the sponge onto the tulle over the whole surface 2 Wring it out into the bucket and repeat 3–4 times 3 Lift one corner: the sheet should stay on the cloth Check: Lift one corner of the mould: the sheet should stay stuck to the cloth, not to the tulle.Lift the mould
Lift the mould slowly, starting from one side. If a corner stays on the tulle, press that area with the sponge again and try once more.
1 Lift the mould slowly, starting from one side 2 If a corner stays on the tulle, press it again with the sponge 3 The whole sheet is left on the cloth Stack and press
Cover the sheet with another cloth and form the next one on top (up to 6–8 sheets in a stack). Put a board or a tray on top and 3–4 thick books on that for 10 minutes, or press down hard with the rolling pin.
1 Cover the sheet with another cloth and form the next one on top 2 Put a board and 3–4 thick books on top for 10 minutes 3 Or press down hard with the rolling pin over the top Leave to dry
Separate each cloth with its sheet and hang it up with pegs or lay it flat on dry newspaper. After 24 hours, peel the sheet off the cloth by pulling on one corner.
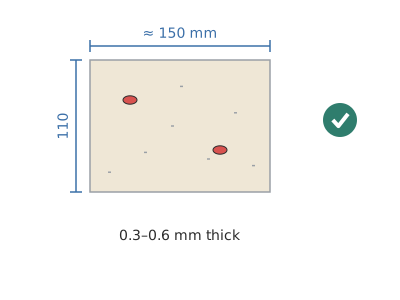
1 Hang each cloth with its sheet, or lay it flat on newspaper 2 After 24 h, peel the sheet off by pulling on one corner 3 Dry sheet: about 150 × 110 mm, ready to use Tip: For one very smooth side, stick the damp sheet onto a tile or a window pane: as it dries it comes off by itself.Clear up the leftovers
Strain the water from the basin through the sieve: squeeze out the pulp that is left, roll it into balls and keep it in the freezer for another day or put it in the food waste bin. The strained water can go down the drain.
1 Strain the basin water through the sieve over the bucket 2 Roll the pulp into balls: into the freezer or the food waste bin 3 The strained water can go down the drain; the pulp, never
Does it work? The test
Once they are dry, check each sheet: thickness (fold it and look at the edge), whether you can write on it with a felt-tip pen, whether it tears when folded and how much it weighs.
What should happen: Sheets of ≈ 150 × 110 mm, 0.3 to 0.6 mm thick and 2–4 g each (≈ 120–240 gsm, like thin card). With newspaper they come out grey and rather fragile; with A4 sheets, white and stronger. With glue in the basin you can write with a felt-tip pen without it running.
If something goes wrong
- The sheet comes out with holes — Too little pulp in the water or it was lifted out at an angle. Solution: Add more pulp (another blended handful) and lift the mould out perfectly level.
- The sheet sticks to the tulle — It was not drained enough or the cloth was dry. Solution: Use a damp cloth, press harder with the sponge and lift the mould very slowly.
- It tears when you peel it off — It is still damp or it is too thin. Solution: Wait until it is completely dry (24–48 h) or make thicker sheets by dipping the mould twice.
- It curls as it dries — Uneven drying. Solution: Dry it flat under a book when it is almost dry, between two sheets of paper, or iron it with a cloth on top.
- The ink runs when you write — Handmade paper soaks things up like blotting paper. Solution: Add 1 teaspoon of PVA glue to the basin or brush the dry sheet with water and glue (1:10).
- The cardboard frame goes soft — Water got in through the edges. Solution: Cover it completely in packing tape, edges included, or use a wooden frame.
Safety
- Only an adult uses the blender, with the lid on, and never puts a hand or cutlery inside while it is plugged in. Fill it no more than halfway up the jug (with 750 ml of water you need a 1.5 L jug or larger) and with plenty of water so as not to strain the motor.
- A wet floor is slippery: work with towels underneath and wipe up any puddles.
- Do not use till receipt paper (it contains bisphenol) or glossy magazines; wash your hands afterwards if you use newspaper.
- Do not pour the pulp down the sink: it blocks the pipes.
- The iron (optional) burns: an adult uses it, with a cloth between the iron and the sheet.
The science behind it
For children
Paper is made of very thin little threads that come from trees, called fibres. When we wet it and blend it, the little threads come loose and float in the water like tiny noodles. When you lift out the frame, the tulle lets the water through but catches the little threads, which stay tangled up with each other. When it dries, the little threads grip each other and become paper again: brand-new paper made by you!
For the adult
Paper is a web of cellulose fibres (a glucose polymer) 1–3 mm long and 20–40 µm thick. When dry, the fibres are held together by hydrogen bonds between the –OH groups of the cellulose. Water breaks those bonds and the fibres separate; blending also ‘fibrillates’ them (frays their surface), which increases the contact area. When the sheet is formed, the tulle acts as a filter: it holds back the fibres and lets the water through. During pressing and drying, the surface tension of the evaporating water draws the fibres together and hydrogen bonds form again: no glue is needed. The grammage depends on the concentration of the pulp (≈ 1 % = 10 g of fibre per litre) and on the depth of water the mould holds. Newspaper has short mechanical-pulp fibre (containing lignin, which yellows) that has already been recycled, which is why it gives weaker, greyer sheets than A4 paper made from chemical pulp. Each recycling cycle shortens the fibres: paper can only be recycled 5–7 times. The PVA glue acts as ‘sizing’: it seals the pores so the ink does not spread by capillary action. Recycling 1 tonne of paper saves in the order of 15–17 trees, tens of thousands of litres of water and around half the energy needed to make new paper.
- cellulose: material from plants that paper is made from.
- fibre: a very thin, long little thread.
- pulp: a mixture of broken-down paper fibres in water.
- filter: to separate solids from liquids with a mesh or a sieve.
- grammage: how much one square metre of paper weighs; it tells you whether it is thin or thick.
By age
- 5–7 years: The adult blends and pulls the first sheets; the child tears the paper, stirs the basin, presses with the sponge and decorates with petals. Focus on ‘the paper falls apart and is made again’.
- 8–10 years: They pull and transfer the sheets themselves, try newspaper and A4 paper and keep the record. Let them discover why the sheets come out thinner at the end.
- 11–12 years: They calculate the grammage (weight ÷ area: 2.5 g ÷ 0.0165 m² ≈ 150 gsm), compare strengths and design a product: seed cards, envelopes or a stitched notebook.
In a group or in class
4 stations with an adult at the blending one: 1) blending (adult, prepares pulp for everyone), 2) two basins for forming sheets, with 2 moulds each, 3) pressing table with cloths and books, 4) decorating and drying line. Groups of 5–6 rotating every 15 min; each child pulls 2 sheets. For 25 children: 300 g of paper soaked from the day before, 4 moulds, 50 cloths or cotton scraps, 4 buckets for leftovers. Duration 75–90 min + 15 min clearing up.
Challenges
- Make a greetings card with seeds that can be planted.
- Make a watermark: sew or glue a design in thick thread onto the tulle and pull a sheet: the design will be thinner and will show when held up to the light.
- Make the thinnest possible sheet that can still be peeled off in one piece.
- Bind an 8-sheet notebook stitched with thread.