Tabletop pinball machine
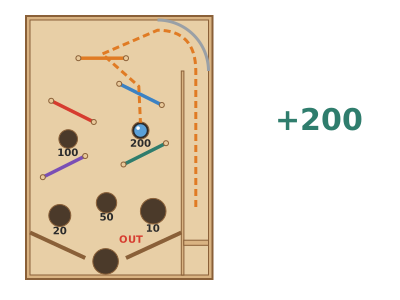
A tabletop pinball in the lid of a 21 × 30 cm shoebox: a spring launcher fires a marble up a side channel, the ball falls bouncing between rubber bands stretched across posts and scores points by dropping into holes of different sizes.
What they will learn
- That a compressed spring stores elastic energy and turns it into the marble's movement energy.
- That on an inclined plane gravity speeds the ball up downhill: more tilt, more speed.
- What an elastic bounce is and why a tight rubber band sends the ball back faster than a cardboard wall.
- To design with measurements: size of the holes compared with the ball (Ø 16 mm), spacing of the posts to suit the rubber band, width of the channel.
- To link probability and points: the small holes are harder to hit and worth more.
Prepare beforehand
- Measure the inside of the lid. If it is not 21 × 30 cm, keep the 28 mm channel on the right and space out the obstacles in proportion.
- Check that the lid, rim facing up, sits well on the open box (it will be the collecting tray).
- Take apart a retractable pen to get the spring out; check that it fits over the skewer and is 30–35 mm long (if it is shorter, get another one and you will use two in a row).
- Cut the 10 posts of 40 mm and the 105 mm launcher, and remove the sharp points.
- Pre-cut the round holes with a craft knife if the children are young.
Materials and tools
- Shoebox with lid — 1
lid of ≈ 21 × 30 cm inside with a 2.5–4 cm rim; the box must fit under the lid - Corrugated cardboard — 1 sheet of 30 × 20 cm
3 mm, for the channel wall, guides, reinforcements, hammer and stop - Card — 1 strip of 110 × 25 mm
200 gsm, for the top curve - Wooden skewers — 2
Ø 3 mm × 25–30 cm (10 posts of 40 mm + 1 launcher of 105 mm) - Office rubber bands — 5 (+ 3 spare)
≈ 90 mm long laid flat and 2–3 mm wide (No. 33), coloured - Straws — 1
Ø 6 mm; 10 pieces of 7 mm as spacers - Pen spring — 1 (2 is better)
from a retractable pen, 30–35 mm long with a 4 mm inside diameter (fits over the skewer); the gap it sits in is 29 mm, so a shorter one will be loose: if you only have 20–25 mm springs, thread two on one after the other - Marbles — 3–5
glass, Ø 16 mm (≈ 5 g) - Hot glue sticks and PVA glue — 3 sticks
hot glue for the posts, walls and launcher; PVA glue for templates - Felt-tip pens — 2–3 colours
for the points and decoration
Tools
- Craft knife and cutting mat — cut the 6 round holes and the corrugated pieces adult
- Awl or pointed skewer — pierce the 10 post holes and the launcher hole adult
- Hot glue gun — fix the posts, walls, stop and collar adult
- Ruler, set square and compasses — draw the full-size plan on the lid
- Strong scissors or side cutters — cut the wooden skewers adult
- Protractor (optional) — measure the tilt of the board
Pieces and templates
- A · Board plan (floor of the lid) ×1 — shoebox lid
- B · Channel wall ×1 — 3 mm corrugated cardboard
- C · Top curve ×1 — card 200 gsm
- D · Bottom guides ×2 — 3 mm corrugated cardboard
- E · Post reinforcements ×10 — 3 mm corrugated cardboard
- F · Posts ×10 — Ø 3 mm wooden skewer
- G · Launcher hammer ×2 — 3 mm corrugated cardboard
- H · Spring collar ×2 — 3 mm corrugated cardboard
- K · Launcher stop-guide ×2 — 3 mm corrugated cardboard
- L · Handle ×2 — 3 mm corrugated cardboard
- M · Rubber band spacers ×10 — Ø 6 mm straw
- N · Launcher rod ×1 — Ø 3 mm wooden skewer
Step by step
Draw the plan
With a ruler and set square, copy plan A onto the inside floor of the lid: 10 post points, 6 circles (20, 22, 24, 26 and 30 mm for points and 30 mm for the drain), the channel line 179.5 mm from the left edge and the two guides.
1 Measure the inside floor of the lid: 210 × 300 mm 2 Copy the posts, circles, channel line and guides with a ruler and pencil 3 Check there are 28–30 mm between the line and the edge Check: There should be 28–30 mm between the channel line and the right edge.Cut the holes adult
With the craft knife, cut out the 6 circles using several gentle passes. Test each one to check the marble drops through without touching the edges.
1 Cut each circle with the craft knife using several gentle passes 2 Check the marble drops through each hole without touching the edge 3 You end up with 5 scoring holes and the 30 mm drain at the bottom Tip: Draw the circles with compasses or with bottle caps and coins of exactly the right size.Pierce and reinforce the posts adult
Pierce the 10 post points with the awl (Ø 3 mm). Underneath the lid, glue a reinforcement square E centred on each hole and pierce through it again.
1 Pierce the 10 post points with the awl: Ø 3 mm 2 Glue a 20 mm square E centred under each hole 3 Pierce again, going through reinforcement E as well Fit the posts adult
Push each 40 mm post in from above until 20 mm sticks up from the board. Put a drop of hot glue on top and another underneath, and hold it straight until it sets (30 s).
1 Push the 40 mm post F in from above 2 Leave 20 mm above and put hot glue on top and underneath 3 Check with the set square that it is upright and does not move Check: Check each post with the set square: it should be upright and not move when you push it.Add the spacers and rubber bands
Slide a 7 mm piece of straw onto each post. Then loop a rubber band round each pair of posts twice, lying flat (without crossing it into a figure of 8), so that it sits on the straw and is good and tight.
1 Slide a 7 mm piece of straw M onto each post 2 Loop the band round two posts twice, without crossing it into an 8 3 Push it: it gives 3–5 mm and springs back like a trampoline Check: When you push the rubber band with your finger it should give 3–5 mm and spring back like a trampoline.Glue the channel wall adult
Glue wall B standing up on the channel line, from 60 mm below the top edge to the bottom wall, with a bead of hot glue along each side of the base.
1 Place the 240 × 25 mm wall B on the channel line 2 Glue it standing up with a bead of hot glue on each side 3 Roll a marble along the channel: it should not rub Check: A marble should roll along the channel from top to bottom without rubbing.Glue the curve and the guides adult
Bend strip C and glue it standing up in the top right corner, following the 60 mm radius arc. Glue the two guides D at an angle at the bottom, leaving a 48 mm exit in the centre.
1 Bend the 110 × 25 mm strip C with your hands 2 Glue it standing up in the corner, 60 mm from the corner on each side 3 Glue guides D with a 48 mm exit and test the curve Check: Send the marble up the channel by hand: the curve should send it to the left without it bouncing back.Fit the launcher stop adult
Glue the two layers of K together and stand them across the channel 38 mm from the bottom wall. Pierce the bottom wall of the lid in the centre of the channel (x = 196 mm), 10 mm above the floor, with a 4 mm hole.
1 Glue the 2 layers of K and stand them 38 mm from the bottom wall 2 Pierce the bottom wall in the centre of the channel, 10 mm above the floor 3 A skewer should pass straight through both holes Check: A skewer should pass straight through both holes and slide easily.Assemble the launcher adult
From outside, push rod N in through the bottom wall, thread on the spring (30–35 mm; if it is short, two in a row), then the two discs of collar H, and pass it through stop K. Glue hammer G onto the tip (about 30 mm from the stop) and glue the collar with hot glue so it rests right against K.
1 Push rod N in from outside and thread on the spring and collar H 2 Glue hammer G 30 mm from the stop and the collar against K 3 At rest the spring is slightly squashed between wall and collar Check: At rest the spring should be slightly squashed between the wall and the collar: if it rattles loosely in the 29 mm gap, add the second spring.Fit the handle adult
Glue the two layers of handle L onto the outer end of the rod, leaving about 25 mm of skewer free between the handle and the wall so you can pull. If you cut the rod longer than 105 mm, trim off the excess before gluing on the handle.
1 Glue together the two layers of the 25 × 25 mm handle L 2 Glue it on the outside, leaving 25 mm of skewer so you can pull Write the points and decorate
Write each hole's value next to it: 200 (20 mm), 100 (22 mm), 50 (24 mm), 20 (26 mm) and 10 (30 mm). Mark ‘OUT’ in red next to the drain. Decorate without covering the holes.
1 Write next to each hole how many points it is worth 2 Mark OUT in red next to the drain and do not cover any hole Set up and tilt
Put the open box on the table and rest the lid on top with the rim facing up. Slide a book 3–4 cm thick under the top end of the box (away from the launcher): about 6° of tilt.
1 Rest the lid on the open box, with the rim facing up 2 Slide a 3–4 cm book under the end away from the launcher 3 Release a marble at the top: it rolls down by itself in 1–2 seconds Check: A marble released at the top should roll down by itself to the launcher or the drain in 1–2 seconds.Let's play!
Put the marble in the channel against the hammer, pull the handle back 15 mm and let go. Add up the points for the hole it drops into; if it goes down the drain, it scores 0. Each player launches 5 balls.
1 With the marble against the hammer, pull the handle back 15 mm 2 Let go: the ball goes up, bounces off the bands and scores its hole 3 Each player launches 5 balls; the drain scores 0 and the points are added up
Does it work? The test
With the tilt at ≈ 6°, launch 10 balls pulling the handle all the way back and note where each one ends up.
What should happen: The marble goes up the channel (≈ 25 cm) in under 1 s, the curve sends it to the left and it comes down bouncing off 1–3 rubber bands before dropping into a hole or the drain. If it is well built, 4–7 out of 10 balls score points.
If something goes wrong
- The ball does not reach the top of the channel — Weak spring, short pull or too much tilt. Solution: Use two springs in a row, pull the handle back further or reduce the tilt to about 4° (a 2 cm book).
- The ball rolls back down the channel — Not enough force to get out, or it bounces off the curve. Solution: At the channel exit, glue a 28 × 20 mm paper flap hanging down from the top of the wall: it lets the ball out but not back in (a valve).
- The ball goes over the rubber bands — The rubber band is down on the floor. Solution: Fit the 7 mm straw spacers so the rubber band sits 7–10 mm high.
- The posts lean over — Missing reinforcement or glue. Solution: Glue reinforcement E underneath and put hot glue on top and underneath; use less tension (rubber band looped once).
- The launcher jams — Holes misaligned or too small. Solution: Enlarge the holes in the wall and the stop to 4 mm, and check they are at the same height (10 mm).
- The ball gets stuck somewhere — Warped board or not enough tilt. Solution: Increase the tilt by 1–2° or strengthen the lid underneath with a strip of cardboard.
Safety
- Marbles are small parts: not suitable for children under 3; make sure nobody puts them in their mouth.
- The craft knife, awl and hot glue are used by an adult.
- Cut the sharp points off the wooden skewers before giving them to the children.
- Stretched rubber bands can snap off: keep your face away when fitting them.
- When pulling the launcher, do not point the lid at anyone's face.
The science behind it
For children
When you squash the spring, it stores energy like a jump ready to go. When you let go, the spring stretches out all at once and passes that energy to the marble, which shoots upwards. Because the board is tilted, gravity pulls the marble downwards all the time, like when you go down a slide. The tight rubber bands are like trampolines: when the ball hits one, the band stretches and pushes it back.
For the adult
The spring stores elastic energy E = ½·k·x². A pen spring (k ≈ 150–300 N/m) compressed by 15 mm stores ≈ 0.02–0.03 J. A 16 mm glass marble weighs ≈ 5 g; even though some of the energy is lost (friction, mass of the rod, non-ideal collision), it only needs ≈ 0.0013 J to climb 25 cm of channel at a 6° slope (m·g·h = 0.005 × 9.8 × 0.026 m). The surplus explains why it shoots out so fast. On the inclined plane, the component of gravity that accelerates the ball is g·sin θ (≈ 1 m/s² at 6°); when rolling, the actual acceleration is 5/7 of that because part of the energy goes into rotation. The bumpers work like springs: the tight rubber band deforms and gives back almost all the energy (a lightly damped bounce), whereas a cardboard wall absorbs it. The rubber band must be at the height of the centre of the ball (8 mm) so that the force passes through the centre and does not make it jump. A hole only ‘captures’ the ball if it does not cross it too quickly: the smaller the diameter compared with the ball (20 versus 16 mm), the slower the ball has to be going, which is why it is worth more.
- elastic energy: energy stored by a spring or a rubber band when you squash or stretch it.
- inclined plane: a sloping surface that things roll down by themselves.
- elastic bounce: a collision in which the ball leaves almost as fast as it arrived.
- gravity: the force that pulls things towards the ground.
- probability: how easy or hard it is for something to happen.
By age
- 5–7 years: The adult builds the board; the child writes the points, puts the rubber bands on the posts and plays, adding up the points with help.
- 8–10 years: They build it with an adult's help for the craft knife, awl and hot glue. They design where the holes go and decide how many points each one is worth.
- 11–12 years: They design their own board on graph paper at 1:2 scale before building, add flippers with split pins and work out the average points per ball over 20 launches.
In a group or in class
Teams of 3–4, one pinball per team (6–7 teams per class). Beforehand: the adult pierces the lids and cuts the holes using a template (≈ 10 min per lid) and prepares the launchers without gluing. Session of 2 × 60 min: day 1, posts, rubber bands, walls and guides; day 2, launcher, decoration and a tournament with a league table on the board. One hot glue gun for every 2 teams, with an adult.
Challenges
- Add two flippers: 50 mm cardboard levers that pivot on a split pin and are worked with a stick that comes out of the side.
- Design a ‘bonus’ hole that can only be reached by bouncing off two rubber bands.
- Make a raised card ramp that carries the ball from one side to the other.
- Build a scoreboard with balls that are collected in numbered lanes inside the box.