Marble maze tray
An 18 × 18 cm cardboard tray with zigzag walls and trap holes: tilting it with both hands, you have to guide a marble from the START to the FINISH hole without it dropping into a trap.
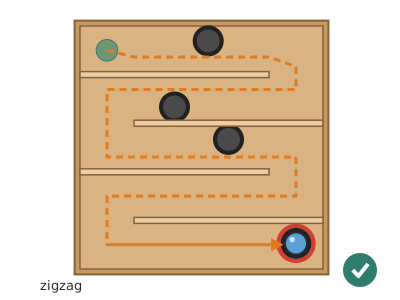
What they will learn
- That gravity pulls the marble towards the lowest part: tilting the tray is ‘choosing’ which way is downhill.
- That a ball rolls faster the steeper the surface, and that stopping it means tilting the other way (inertia).
- To measure and draw with a ruler: equal 36 mm corridors, 140 mm walls and 20 mm holes.
- To design a difficulty: a trap next to the wall leaves a ‘tightrope path’ of just 5 mm for the centre of the marble.
Prepare beforehand
- Measure your marble: if it isn’t 16 mm, make the traps marble + 4 mm (e.g. 14 mm marble → 18 mm traps).
- If template A doesn’t fit your printer, draw it directly with a ruler: it is a 240 mm square with the 4 corners cut off.
- Cut the 4 wall strips (140 × 30 mm) before the session if the children are 5–6 years old.
- Have 20 pieces of tape 4 cm long ready, stuck along the edge of the table (5 per wall: 4 in an L and 1 for the end): that makes fitting the walls really quick.
- If you are going to use poster paint, paint the floor of the tray before the session and leave it to dry for 20 minutes.
Materials and tools
- Corrugated cardboard — 1 sheet of 25 × 25 cm (tray) + 1 strip of 15 × 13 cm (walls)
single-wall, 3 mm (shipping box), flat and uncrushed - Marble — 1 (2 is better: one spare)
glass, Ø 16 mm - Masking tape — ≈ 1.5 m
18–25 mm wide (tears by hand and takes felt-tip pen) - PVA glue — a squirt
to strengthen the corners of the tray and the base of the walls - Poster paints or felt-tip pens — green, red, black and any colours you like
green for the START, red for the FINISH, black for the edges of the traps - A4 paper — 2 sheets
to print the plan (piece A in two parts or traced) and strips B
Tools
- 30 cm ruler and pencil — drawing the tray, the wall lines and the centres of the traps
- Scissors — cutting out the tray and the strips
- Craft knife and cutting mat — cutting the 20 mm holes adult
- Empty ballpoint pen — scoring the folds of the tray
- 1-cent coin (Ø 16 mm) and a Ø 20 mm bottle cap — templates for drawing the traps and checking the marble
- Paintbrush — poster paint
Pieces and templates
- A · Fold-up tray (180 × 180 floor + 30 mm sides) ×1 — corrugated cardboard 3 mm
- B · Inner walls ×4 — corrugated cardboard 3 mm
- C · Trap template and marble test ×1 — paper
Step by step
Draw and cut out the tray
Stick template A onto the cardboard with a glue stick (or draw it with a ruler: a 240 × 240 mm square with the 4 corners of 30 × 30 mm removed, leaving the tabs). Cut along the solid line.
1 Stick template A onto the cardboard with a glue stick 2 Cut along the line: remove the 4 corners and leave the tabs 3 Check that the central floor measures 180 × 180 mm Check: The central square (floor) measures exactly 180 × 180 mm.Draw the route
With a ruler and pencil, mark the 4 wall lines on the floor: 36, 72, 108 and 144 mm from the top edge of the floor, each 140 mm long, leaving a 40 mm gap alternately on the right, left, right, left. Mark the START top left and the FINISH bottom right.
1 Rule the lines 36, 72, 108 and 144 mm from the top edge 2 Each line is 140 mm long and leaves a 40 mm gap, alternating 3 Mark START and FINISH and follow the route with your finger Tip: Trace the route with your finger from the START: it must be able to reach the FINISH zigzagging without jumping over any line.Mark and cut the traps adult
Using template C (or a Ø 20 mm bottle cap), draw the 3 traps and the FINISH in the marked positions, each one almost touching the wall or side. An adult cuts them with the craft knife using 8 short straight cuts around the circle; then they are tidied up with pointed scissors.
1 Draw the 3 traps and the FINISH with template C 2 Cut the circle with 8 straight cuts and tidy with scissors 3 The 16 mm marble must drop through without touching the edge Check: The 16 mm marble drops through each hole without touching the edge.Paint the floor (optional)
If you want poster paint, paint the floor now: a green Ø 16 mm circle at the START, a red ring round the FINISH and a 3 mm black border round each trap. Leave it to dry for 20 minutes before carrying on.
1 Paint the START green, a red ring at FINISH and black borders 2 Use little paint and leave it to dry for 20 minutes Tip: Don’t use much paint: wet cardboard warps and the marble veers off course.Fold up the sides
Go over the 4 fold lines of the floor with an empty ballpoint pen and the ruler. Fold the 4 sides of 30 mm upwards, at a right angle.
1 Score the 4 fold lines with the ruler and empty ballpoint pen 2 Fold the 4 sides of 30 mm upwards, at a right angle 3 The 4 sides stand up; the tabs are still loose Close the corners
Fold each tab of the top and bottom sides outwards, round the corner, and stick it to the outside of the adjoining side with PVA glue and a 6 cm piece of tape wrapped round it. Repeat on all 4 corners.
1 Fold the tab outwards, round the corner 2 Glue it on the outside and wrap tape round the corner 3 The tray sits flat on the table and the sides stand straight Check: The tray sits flat on the table without wobbling and the sides stand straight.Cut the walls
Cut 4 strips B of 140 × 30 mm with the cardboard’s flutes running top to bottom. Check that the long bottom edge is straight by standing the strip up on the table.
1 Cut 4 strips B of 140 × 30 mm with the flutes top to bottom 2 Stand it up: the bottom edge rests fully on the table Check: Each strip stands up on its own with no gaps under the edge.Stick down wall 1
Stand the first strip on its edge on the 36 mm line, with one end touching the left side. Fix it with 4 pieces of 4 cm tape folded into an L (half on the wall, half on the floor), alternating one side and the other, and another piece joining the end to the side.
1 Stand the strip on the 36 mm line, against the left side 2 Fix it with 4 pieces of tape in an L, alternating both sides 3 Check there is a 40 mm gap up to the right side Check: There is a 40 mm gap between the end of the wall and the right side.Tip: Press the tape firmly onto the floor: a raised crease of tape slows the marble down.Stick down walls 2, 3 and 4
Repeat with the other three strips on the lines at 72, 108 and 144 mm. Walls 2 and 4 touch the right side and leave the 40 mm gap on the left; wall 3 touches the left side, like wall 1.
1 Walls 2 and 4 touch the right side; wall 3, the left 2 There are 33 mm between walls: the marble passes freely Check: The 5 corridors are about 33 mm clear: the marble passes between two walls without rubbing.Strengthen with glue
Run a thin line of PVA glue along the base of each wall, on both sides, and spread it with a cocktail stick so it doesn’t leave a bump. Leave it to dry for 15 minutes with the tray flat.
1 Run a thin line of glue on both sides and smooth it with a stick 2 Leave it to dry for 15 minutes with the tray flat Tip: With a hot glue gun (adult) it is instant: a thin bead, flattened straight away with a cocktail stick.First game
Place the marble on the green circle. Hold the tray with both hands by the left and right sides and tilt it only very slightly: about 5°, meaning one side of the tray is just 16 mm higher than the other (the thickness of a finger). That way you guide the marble along the zigzag until it drops into the FINISH.
1 Put the marble on the green START circle 2 Hold it by the sides with both hands and tilt very slightly 3 Guide it along the zigzag, past the traps, into the FINISH Check: You can reach the FINISH passing beside the 3 traps without falling in, even if it’s tricky.Adjust the difficulty adult
If it is too hard, cover a trap from underneath with a piece of cardboard and tape. If it is easy, cut the extra trap marked on the plan (Ø 20 mm) or add a new one against a wall using template C.
1 Easier: cover a trap from underneath with card and tape 2 Harder: the adult cuts the extra trap, against a wall
Does it work? The test
Put the marble on the START and time how long it takes to drop into the FINISH. Play 5 games and write down the times and how many times it fell into traps.
What should happen: An 8-year-old usually completes the route (about 0.9 m long) in 20–60 s after 2–3 tries. If the marble stops by itself anywhere with the tray flat, there is a bump of tape or glue that needs smoothing.
If something goes wrong
- The marble gets stuck on the turns — The gap between the end of the wall and the side is less than 30 mm, or the tape at the end gets in the way. Solution: Leave 40 mm gaps and stick the end tape on the side away from the gap.
- The marble rolls over the traps without falling in — Trap smaller than the marble (or a large 25 mm marble). Solution: Enlarge the trap to marble Ø + 4 mm.
- It is impossible to get past a trap — The trap is in the middle of the corridor and leaves no room on either side. Solution: The trap must almost touch a wall. Cover the hole from underneath with cardboard and tape and cut another one next to the wall.
- The marble jumps or veers off by itself — Floor warped by the paint, or bumps of tape and glue. Solution: Smooth the glue with a cocktail stick, press the tape down and don’t soak the cardboard when painting; if it is warped, glue a smooth piece of card on top of the floor.
- The walls fall over when the marble hits them — Not enough tape, or a strip with the flutes running lengthways. Solution: Put tape every 4 cm on both sides and strengthen with glue; cut the strips with the flutes running top to bottom.
- The tray comes apart at the corners — Tabs without glue, or stuck on the inside with too little surface. Solution: Glue each tab on the outside and add a piece of tape that wraps round the corner.
Safety
- Marbles are small: choking hazard for children under 3. Keep them out of their reach and count the marbles when tidying up.
- An adult cuts the holes with a craft knife on a cutting mat, keeping the other hand away from the blade’s path.
- If you use a hot glue gun, the adult uses it: the nozzle and the glue burn.
- A marble on the floor is slippery: play sitting at the table and pick up any that fall.
The science behind it
For children
The Earth pulls everything downwards: that is gravity. If the tray is flat, the marble doesn’t know where to go and stays still. But if you lift one side a tiny bit, that side becomes a slope and the marble rolls towards the low part. You are the one who decides where the slope is. And watch out: the marble builds up speed, so to stop it you have to tilt a little the other way before it gets there.
For the adult
On a plane inclined at an angle θ, the component of the weight parallel to the plane is m·g·sin θ. A solid sphere rolling without slipping accelerates at a = (5/7)·g·sin θ, because part of the energy goes into making it spin (moment of inertia 2/5·m·r²). With just 5° of tilt, a ≈ 0.61 m/s²: it covers an 18 cm corridor in ≈ 0.8 s from rest and reaches ≈ 0.47 m/s, which is why you have to tilt the other way to brake (inertia, Newton’s first law). A Ø 20 mm trap catches the 16 mm marble as soon as its centre passes over the hole: the support point ends up on the rim and the torque of the weight makes it drop in. That is why traps against the wall leave a path of only ≈ 5 mm for the centre of the marble and demand fine control of the tilt (hand–eye coordination and anticipation). Designing the route also introduces algorithmic ideas: a sequence of turns R-L-R-L.
- gravity: the force with which the Earth pulls things towards its centre.
- inclined plane: a surface with one side higher than the other.
- inertia: the tendency of things to keep moving (or stay still) if nothing changes them.
- friction: a force that slows things down when two surfaces rub as they move.
- angle: how far one line opens away from another; here, how much you tilt the tray.
By age
- 5–7 years: The adult cuts out the tray, the strips and the traps. The child traces the route with a finger, tapes on the walls and decorates the START and FINISH. Start without traps and add one once they have completed it 3 times.
- 8–10 years: They build everything except cutting the holes. Let them measure the 36 mm between walls themselves and decide where to put the traps, checking that it is possible to get past.
- 11–12 years: Let them design their own maze on squared paper (1 square = 6 mm) with dead ends and build it. Challenge: calculate the acceleration with a = 5/7·g·sin θ and check it by timing the marble along a straight corridor.
In a group or in class
Pairs, one tray per pair (25 × 25 cm cardboard, 4 strips, 1 marble, 1.5 m of tape). Beforehand: cut out the trays and strips and have the holes already cut in half of the trays (the other pairs choose where to put them and the teacher cuts them). 50-minute session: 5 min demonstration, 30 min building, 15 min ‘tournament’ rotating round the tables to play other people’s mazes. Have a pot for the marbles and count them at the end.
Challenges
- Design a maze with a dead end and two possible routes to the FINISH.
- Make the marble cross a 20 mm wide ‘bridge’ between two traps.
- Build a maze for two marbles at once: both have to reach their own FINISH.
- Add a second floor with a ramp and a hole that drops the marble down to the first floor.
- Make up a story (a mouse looking for cheese, a spaceship dodging black holes) and decorate the maze with it.