Arcade claw machine
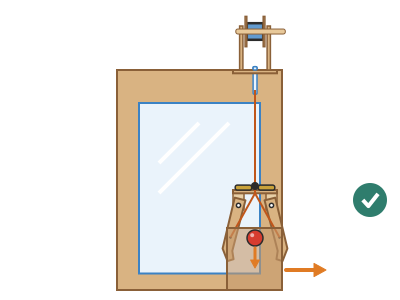
A cardboard box with a clear window turned into an arcade machine: a carriage slides along a slot in the roof, a crank winds up the thread and a three-fingered claw drops down, closes by itself when the thread is pulled, grabs a prize and carries it to the prize chute.
What they will learn
- How a single thread shares the force between three fingers and why the three threads must be the same length.
- That the claw closes because of its own weight: while it hangs, the weight of the head pulls on the threads and closes the fingers; when it rests on something, the thread goes slack and a rubber band opens them.
- What a winch is (crank + reel): with a crank radius bigger than the reel's, you lift the load with less force, in exchange for more turns.
- How to adjust a mechanism by trial and error while measuring: weight of the head, strength of the rubber band, length of the threads.
Prepare beforehand
- Print the templates at 100 % and check the red 50 mm line in the header.
- Close the box and reinforce all the edges with tape; the roof must be firm (if the flaps don't meet, glue a flat 30 × 25 cm piece of cardboard on top).
- Mark the window, slot and door on the box in pencil before the session; do the craft-knife cutting yourself if the children are young.
- Weigh out 80–100 g of ballast (coins or rice in a small bag) and get the prizes ready.
- Cut the skewer pieces: 3 pivots of 20 mm, 1 axle of 90 mm and 1 handle of 40 mm.
Materials and tools
- Tall cardboard box — 1
about 30 × 25 × 40 cm (width × depth × height), with a lid or flaps that make a firm roof. The window and slot measurements can be adjusted if your box is a little different - Corrugated cardboard — 1 sheet, 50 × 40 cm
single-wall, 3–4 mm, flat (for the claw, carriage, chute and divider) - Clear plastic — 1 piece, 24 × 33 cm
acetate, a rigid plastic folder sleeve or the lid of a clear container - Strong thread — 1.2 m
thin cotton string, kite line or fine twine (≥ 2 kg load); sewing thread snaps - Straws — 1
straight, Ø 6–7 mm (thread guide) - Wooden skewers — 2
Ø 3 mm (reel axle, finger pivots and handle) - Plastic bottle caps — 3
Ø 30 mm, all the same (2 for the reel core, 1 for the handle) - Ballast for the head — 80–100 g
10–12 €1 or €2 coins, or a small bag with 100 g of rice, taped onto the head - Very thin rubber band — 2 (1 spare)
small and loose: orthodontic elastic or a thin hair band, Ø 2–3 cm - Ordinary rubber band — 1
office type, for the reel brake - Prizes — 8–12
light (≤ 5 g) and 25–40 mm: pompoms, aluminium foil balls, wrapped sweets, erasers - PVA glue and hot glue sticks — 1 bottle / 3 sticks
hot glue for quick joints (brackets, supports, reel); PVA glue for sticking the double layers - Sticky tape — 1 roll
clear or masking tape
Tools
- Craft knife, metal ruler and cutting mat — window, slot, door and cardboard pieces adult
- Awl or sharpened skewer — pierce 3–4 mm holes in the double-layer cardboard adult
- Hot glue gun — brackets, supports and reel adult
- Scissors — cut out templates, plastic and straw
- Empty ballpoint pen — score the folds
- Tape measure and set square — mark the window and slot on the box
- Kitchen scales — weigh the ballast for the head
Pieces and templates
- A · Head (2 layers) ×2 — corrugated cardboard 3 mm
- B · Pivot brackets ×3 — corrugated cardboard 3 mm
- C · Fingers (2 layers each) ×6 — corrugated cardboard 3 mm
- D · Carriage plate ×2 — corrugated cardboard 3 mm (2 layers)
- E · Axle supports ×4 — corrugated cardboard 3 mm (2 layers)
- F · Reel flanges ×2 — corrugated cardboard 3 mm
- G · Crank ×2 — corrugated cardboard 3 mm (2 layers)
- H · Prize chute walls ×1 — corrugated cardboard 3 mm
- I · Prize divider ×1 — corrugated cardboard 3 mm
- J · Guide straw ×1 — straw Ø 6–7 mm
- K · Threads ×4 — strong thread
Step by step
Prepare and measure the box
Stand the box upright with the firm roof at the top. Measure the width, depth and height. The measurements in this guide are for 30 × 25 × 40 cm; if yours is different, keep the margins: 40 mm either side of the window and the slot 50 mm from the front.
1 Stand the box upright and measure width, height and depth 2 Press on the roof with your hand: it must not cave in Check: The box doesn't bend out of shape when you press on the roof with your hand.Cut the window adult
On the front face, mark a 220 × 310 mm rectangle, 40 mm from each side and 30 mm from the floor. The adult cuts it with a craft knife and metal ruler.
1 Mark a 220 × 310 mm rectangle 40 mm from each side 2 The adult cuts along the lines with a craft knife and metal ruler 3 This leaves 40 mm frames at the sides and 60 mm at the top Check: There are 40 mm frames at the sides and 60 mm at the top: the box stays rigid.Stick on the plastic
Cut the clear plastic to 240 × 330 mm and stick it on the INSIDE of the window, overlapping 10 mm on each side, using sticky tape all round the edge.
1 Cut the clear plastic to 240 × 330 mm 2 Stick it inside with a 10 mm overlap and tape all round the edge 3 Check that it is taut and free of wrinkles Check: The plastic is taut, with no wrinkles in the middle.Cut the slot in the roof adult
On the roof, draw a line parallel to the front, 50 mm from the front edge. Mark a 10 mm wide slot on it from 35 to 265 mm from the left-hand side (230 mm long) and cut it with a craft knife.
1 Draw the 230 × 10 mm slot 50 mm from the front edge 2 The adult cuts the slot with a craft knife against the ruler 3 A straw must slide along the whole slot without catching Check: A 7 mm straw slides along the whole slot without catching.Make the prize door adult
In the right-hand wall, low down and near the front, cut a door 80 mm wide (from 10 to 90 mm from the front) and 70 mm high (from 5 to 75 mm above the floor).
1 Mark the 80 × 70 mm door low down, next to the front 2 The adult cuts the door with a craft knife Fit the chute and the divider adult
Fold piece H into an L and place it in the front right-hand corner, forming a 100 × 100 mm chute around the door. Hot-glue the tab on the right-hand wall and the base of H to the floor; the front tab lands on the plastic of the window: hold it with clear sticky tape, not hot glue. Fold divider I and glue it from wall to wall 110 mm from the front.
1 Fold H along its three folds to make an L 2 Glue H in the front right corner and the divider at 110 mm 3 A prize that drops into the chute comes out of the side door Check: A prize dropped into the chute comes out through the side door when you reach in.Make the head adult
Cut two Ø 80 mm discs A, glue them with the corrugations crossed and pierce the 4 mm centre hole. On the underside, hot-glue the three B brackets onto the radial lines, with the pierced face hanging vertically, along the radius and with its outer edge flush with the disc.
1 Glue two Ø 80 mm discs A with the corrugations crossed 2 Pierce the centre (4 mm) and glue the three B brackets on their lines 3 The pierced faces hang straight, the hole 30 mm from the centre Check: Seen from below, the three brackets form a 120° star and their holes are about 30 mm from the centre.Make the fingers adult
Cut the six C pieces, with the talon already cut out at an angle, and glue them in pairs with PVA glue, outlines flush (3 double-layer fingers). Pierce the 4 mm pivot hole and the 2.5 mm thread hole. The talon is not folded: it is already angled 30° to one side.
1 Cut the six C pieces and glue them in pairs with PVA glue 2 Pierce the 4 mm pivot hole and the 2.5 mm thread hole 3 Stack the three fingers on top of each other: the holes line up Check: The three fingers are identical: stack them on top of each other and the holes line up.Fit the fingers on their pivots adult
Push a 20 mm piece of skewer through the hole in each bracket (tight fit), leaving almost all of it sticking out of one face, and fix it with a drop of hot glue. Thread the finger onto the part of the skewer that sticks out, turning it so the talon points to the centre of the claw, and put a strip of tape on the end of the stick so it doesn't slip off. Do the same on all three brackets.
1 Push the 20 mm skewer into the bracket and fix it with hot glue 2 Thread the finger onto the skewer and cover the end with tape 3 Each finger swings freely, without rubbing on the head Check: Each finger swings freely inwards and outwards without rubbing on the head.Fit the opening band
Put a very thin rubber band round the three heads of the fingers (the 12 mm above the pivot). By pulling the heads towards the centre, it makes the tips open.
1 Put the thin band round the heads: the tips open 2 Resting on the table, it opens 10–12 cm between tips Check: With the claw resting on the table, the fingers stay open about 10–12 cm between tips.Tip: The band must be loose: if it is hard to close the fingers with one finger of your hand, it is too strong.Tie the finger threads
Tie a 150 mm thread to the thread hole of each finger and pass all three up through the centre hole of the head. Close the three fingers with your hand until the talons touch, pull the three threads taut at the same time and tie them together with a double knot 15–20 mm above the head, not right against it: that length is the slack the fingers need to open when the claw rests on something.
1 Tie a thread to each finger and pass all three through the centre hole 2 Close the fingers, pull the threads taut and tie a double knot 3 Pull the knot: the three fingers close at the same time Check: Pull the knot upwards: the three fingers close at the same time and the talons meet together. When you let go with the claw resting, the knot drops towards the head and the fingers open.Add the ballast
Tape 80–100 g of ballast (10–12 coins or the small bag of rice) onto the head, spread around the centre hole and leaving a 2 cm circle clear: the knot must be able to drop down to the head when the claw rests on something.
1 Tape 80–100 g of coins round the hole, without covering it 2 Hang it by the knot: its weight must close it by itself Check: Hang the claw by the knot: it must close by itself under its own weight, overcoming the rubber band.Build the reel adult
Glue two Ø 30 mm bottle caps open end to open end and a flange F on each side. Pierce through the centre of the whole thing and push a 90 mm skewer through it; fix it to the flanges with hot glue.
1 Glue two caps open end to open end and a flange F on each side 2 Push the 90 mm skewer through it all and fix it with hot glue 3 Turn the axle: the reel turns with it and doesn't wobble Check: When you turn the axle, the reel turns with it and doesn't wobble.Build the carriage adult
Glue the two layers of plate D together, and those of each support E. Glue the supports upright on the lines at 15 and 65 mm, with the holes lined up. Push the 50 mm guide straw into the 7 mm hole, leaving 6 mm above, and fix it with hot glue.
1 Glue the two layers of D and mark the lines at 15 and 65 mm 2 Glue supports E upright on the lines and insert the guide straw 3 Look through the two holes: they must be in a straight line Check: Look through the two holes in the supports: you can see straight through both.Fit the reel and crank adult
Pass the reel axle through the two supports. Glue crank G to one end of the axle, and a 40 mm piece of skewer with a bottle-cap handle in its other hole. Wrap an office rubber band round the axle next to the support as a brake.
1 Pass the reel axle through the two supports 2 Glue crank G onto the axle and the handle with the cap 3 Put a band on the axle next to the support: the reel won't slip Check: When you let go of the crank with 150 g hanging, the reel doesn't unwind by itself.Hang the claw
Place the carriage on the roof with the straw in the slot. Tie the 600 mm main thread to the reel, wind it on 2 turns, take it down through the straw and tie it to the knot of the finger threads inside the box.
1 Put the carriage on the roof with the straw in the slot 2 Tie the 600 mm thread to the reel, 2 turns, and feed it down the straw 3 Fully wound, the claw sits 2–3 cm below the straw Check: With the thread fully wound, the claw sits 2–3 cm below the straw; with the thread fully unwound, the talons touch the floor.Adjust it outside the box
Before playing, test the claw on the table with a prize: lower it until it rests, wait for it to open, lower it 2 cm more and lift it. If it closes without grabbing, add 10 g of ballast; if it doesn't open when it rests, swap the band for a slightly tighter one.
1 Lower the claw onto a prize until it rests and opens 2 Lower it 2 cm more and lift it: it must grab the prize 3 If it doesn't grab, add 10 g; if it won't open, fit a tighter band Check: It grabs a pompom or a foil ball 3 times out of 5.Add the prizes and play
Spread 8–12 prizes in the front area, between the front and the divider, without filling the chute. Slide the carriage to a prize, lower, lift, move the carriage to the right over the chute and lower the claw into it until it rests: it opens and drops the prize.
1 Slide the carriage to a prize, lower the claw and lift it 2 Move it over the chute and lower it: it opens and the prize comes out Check: The prize comes out through the side door.
Does it work? The test
Make 10 attempts in a row to pick up a prize and take it to the chute. Count the crank turns needed to lift the claw from the floor to the top.
What should happen: The claw goes down closed, opens when it rests on the prizes, closes when pulled and lifts the prize. With light prizes (≤ 5 g) you win 3–6 times out of 10, just like a real machine. With the Ø 30 mm core, lifting 25 cm takes about 2.5–3 turns.
If something goes wrong
- The claw goes down open and doesn't close when pulled — The opening band is stronger than the closing force from the weight. Solution: Fit a looser band or add 10–20 g of ballast to the head.
- It doesn't open when it rests — The band is missing or too loose, or the fingers rub on the head. Solution: Switch to a slightly tighter band and check that the fingers swing freely on their pivots.
- One finger closes before the others — The three threads are not the same length. Solution: Untie the knot, close the three fingers by hand and tie the threads again, pulled taut at the same time, with the knot 15–20 mm from the head.
- It picks up the prize but drops it on the way up — Prize too heavy, too big or too smooth. Solution: Use prizes of ≤ 5 g and 25–40 mm. Stick a piece of rubber band or double-sided tape on each talon to give it more grip.
- The claw drops by itself when you let go of the crank — No brake. Solution: Wrap the office rubber band round the axle, pressed tight against the support, or clip the handle with a clothes peg.
- The thread tangles or comes off the reel — Slack thread or small flanges. Solution: Keep the thread taut as you wind and check that the Ø 55 mm flanges are firmly glued to the core.
- The carriage sticks in the slot — Slot too narrow or with rough edges. Solution: Go over the slot with the craft knife so it is a clean 10 mm; rub the edges with a candle so it slides.
- The claw doesn't open when it rests even though the band is loose — The knot of the three threads is right against the head: there is no slack for the fingers to spread. Solution: Retie the knot 15–20 mm above the head with the fingers closed, and check that the ballast isn't covering the centre hole.
Safety
- All the cuts in the box (window, slot, door) are made by an adult with a craft knife, metal ruler and cutting mat; the child holds the box from the opposite side.
- Hot glue burns: the adult applies it, the child points to where it goes. Keep a glass of cold water nearby.
- Skewers are sharp: cut the tips off before giving them to children.
- Small prizes and the ballast coins are a choking hazard for children under 3.
- Don't hang anything heavier than 50 g from the claw: the thread and cardboard may give way.
The science behind it
For children
The claw works like your hand when you pick something up: the fingers all close at once because a single thread pulls all three. While the claw is hanging, its own weight pulls on the threads and the hand closes. When it rests on the prizes, the thread goes slack and the rubber band opens the fingers, like when you relax your hand. When you turn the crank, the thread winds onto the reel and the claw goes up. The crank is long and the reel is small, so you have to turn it more times, but it takes very little effort.
For the adult
The claw is a mechanism of three arms hinged on tangential pivots. When it hangs, all its weight (≈ 150 g with the ballast) is transmitted through the three threads, which pull on each finger at a point 60 mm below the pivot and towards the central axis: that closing torque (≈ 50 gf per thread × ≈ 24 mm lever arm ≈ 1200 gf·mm per finger) is greater than the opening torque of the band (≈ 15 gf × 12 mm ≈ 180 gf·mm), so the claw hangs closed. When it rests on something, the tension in the threads drops to zero and the band, which pulls the heads of the fingers inwards above the pivot, opens the tips. When it is pulled again, it closes before the claw lifts off, because the weight of the head has to pass through the threads. That is why the ballast is essential: it is the same principle as the claw in arcade machines, whose closing force is adjusted precisely so that it doesn't always grab. Having the three threads the same length ensures the tension is shared equally and the talons close at the same time (a parallel load-sharing system). The reel with crank is a winch: with a crank radius R = 54 mm and a winding radius r = 15 mm, the ideal mechanical advantage is R/r ≈ 3.6, in exchange for your hand travelling 3.6 times as far. One turn winds 2πr ≈ 94 mm of thread. The straw acts as a guide and changes the direction of the thread with little friction, a role similar to that of a fixed pulley.
- pivot: an axle that a part turns on, like a hinge.
- winch: a cylinder with a crank that winds up a rope to lift loads.
- ballast: weight added so that something works better or doesn't tip over.
- mechanical advantage: how many times a machine multiplies your force.
- tension: the force with which a stretched thread pulls.
By age
- 5–7 years: Not recommended except as a family: the adult builds the box, carriage and claw; the child decorates the box, places the prizes and plays, counting crank turns.
- 8–10 years: As a team with an adult: the children cut out the fingers, make the reel and tie the threads; the adult cuts the box and uses the hot glue. Let them adjust the ballast and band by testing.
- 11–12 years: They build almost everything, with supervision for the cutting. Challenge: design their own claw (four fingers, longer fingers) and measure the success rate with each design.
In a group or in class
Teams of 4, one machine per team (or a single class machine with 6 teams each making one part: box, chute, carriage, reel, claw, prizes). Beforehand: get identical boxes, cut windows and slots, pre-cut the claw pieces and weigh the ballast. Session 1 (60 min): box, chute, carriage and reel. Session 2 (60 min): claw, adjustment and tournament with a record sheet. Have spare thread and thin bands to hand.
Challenges
- Add a second axis of movement: a cross-shaped slot or a roof with a carriage that also moves from front to back.
- Build a four-fingered claw and compare its success rate.
- Use a sand timer or a phone timer: 30 seconds per game.
- Design a cardboard coin to ‘play’ with and a slot with a ramp that takes it inside.
- Light up the inside with a battery-powered LED strip (3 AA batteries, 4.5 V, with its resistor) placed under the roof.