Push-button telegraph
Two cardboard stations joined by a 5 m, 3-wire cable: press the paperclip button on either one and the buzzers sound and the LEDs light up at both stations, so you can send Morse messages in both directions.
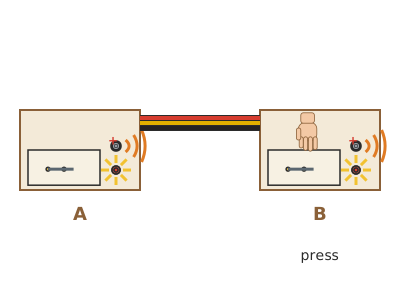
What they will learn
- That a circuit can be metres long: the current reaches the other end of the cable in a fraction of a second.
- What a push button (normally open) is and how two push buttons in parallel can control the same signalling devices.
- How to encode and decode letters with dots and dashes, and why the pauses matter (1–3–7 rhythm).
- That the LED and the active buzzer have polarity and that the LED needs a resistor (100 Ω at 3 V).
- How Morse and Vail's telegraph (1844), the first instant messaging system, worked.
Prepare beforehand
- Print the templates at 100 %: 2 push buttons B, 2 top bases A and 2 Morse cards C.
- Test each buzzer and LED with the battery holder beforehand (buzzer: red to red; LED: long leg to + through the resistor).
- Cut the 3 wires of 5 m (or separate 3 wires from the multi-core cable) and strip 15 mm from each end.
- Check that the drawing pins are metal: scrape the head with a coin; if paint comes off, they won't work.
- Glue the 3 layers of each base with PVA glue and put a weight on top 30 min before the session.
Materials and tools
- Active buzzer — 2 (one per station) buy
active, 3–24 V (or «3 V»), Ø 12 mm, with legs or wires; the long leg / red wire is + - Red LED — 2 (+1 spare) buy
5 mm, 2 V / 20 mA, long leg = + - 100 Ω resistor — 2 buy
1/4 W (brown-black-brown bands) - AA batteries — 2 buy
1.5 V alkaline (3 V in total) - 2 × AA battery holder — 1 buy
with red (+) and black (−) wires, ideally with a switch - 3-wire cable — 5 m (+ 30 cm for connections) buy
4-core alarm or telephone cable (0.22 mm²), or 3 thin 5 m wires in different colours (red, yellow, black) - Metal drawing pins — 4 (2 per station)
brass or steel with an unpainted METAL head, point ≤ 8 mm - Metal paperclips — 2 (1 per station)
32 mm, plain steel (not plastic-coated) - Corrugated cardboard — 6 rectangles of 150 × 100 mm
3–4 mm (3 layers per station) - Card — 1 A4
200 gsm, for the push buttons and the Morse cards - Electrical tape — 1 m
electrician's tape, to wrap the joints - Sticky tape and PVA glue — ≈ 1 m of tape and a squirt of glue
to hold the wires down and laminate the bases
Tools
- Scissors and ruler — cutting out templates and measuring the cable
- Craft knife and cutting mat — cutting the cardboard layers adult
- Wire strippers or old scissors — stripping 15 mm from each end of wire adult
- Needle-nose pliers — twisting joints and bending the paperclip
- Awl — making the pilot hole for the drawing pins adult
Pieces and templates
- A · Top base (assembly plan) ×2 — corrugated cardboard 3–4 mm
- A2 · Lower base layers ×4 — corrugated cardboard 3–4 mm
- B · Push button (card) ×2 — card (200 gsm)
- C · Morse card ×2 — card (200 gsm), covered with clear tape
Step by step
Laminate the bases
For each station, glue together 3 rectangles of 150 × 100 mm cardboard with PVA glue: the two A2 layers at the bottom and layer A with the printed plan on top. Alternate the direction of the corrugations and put a weight on top for 30 minutes.
1 Cut 3 pieces of 150 × 100 mm cardboard per station: one A and two A2 2 Spread glue and stack: two A2 below, A on top, corrugations crossed 3 Put a weight on top for 30 minutes: you get a 10 mm base Check: The base is about 10 mm thick and doesn't bend.Glue on the push button adult
Cut out cards B and glue one onto the «BUTTON» area of each base. Use the awl to make the two pilot holes, 20 mm apart, going through the card and 3–4 mm into the cardboard.
1 Cut out card B and spread glue on the back 2 Stick it on the BUTTON area and mark 2 holes 20 mm apart 3 The pilot holes go through the card and 3–4 mm of cardboard Prepare the short push-button wires adult
Cut 2 pieces of wire 15 cm long per station (red for X, yellow for Y) and strip 15 mm from one end of each. Twist the copper of each one into a small 3 mm ring.
1 Cut 2 wires of 15 cm per station: red (X) and yellow (Y) 2 Strip 15 mm from one end without cutting the copper 3 Twist the copper and bend it into a 3 mm ring Push in drawing pin 1 with the paperclip
Pass drawing pin 1 through the ring of the red wire and through the small loop at one end of the paperclip, and push it all the way into the left-hand hole. Head, paperclip and copper should be pressed tightly together, though the paperclip can still turn around the pin.
1 Pass the pin through the red ring and the paperclip loop 2 Push it all the way into the left-hand hole 3 Head, paperclip and copper are pressed tightly together Push in drawing pin 2
Turn the paperclip to one side to leave the other hole free. Pass drawing pin 2 through the ring of the yellow wire and push it into that hole, 20 mm away. Turn the paperclip back so it passes over drawing pin 2 and bend it upwards from drawing pin 1, so that the part of the paperclip over the head of drawing pin 2 is 4–5 mm above it, without touching it. The tip sticks out about 12 mm further: that's where you press.
1 Move the paperclip aside and push in pin 2 with the yellow ring 2 Bend the paperclip up: 4–5 mm above drawing pin 2 3 Press: it touches pin 2. Release: it springs up Check: When you press the paperclip it touches drawing pin 2; when you let go it springs up on its own. If it stays down, bend it up a little more.Fit the buzzer and the LED
At each station, tape the buzzer over its mark and the LED over its own. Twist the 100 Ω resistor onto the long leg of the LED (4 turns). Bend the legs flat so they lie on the cardboard.
1 Tape the buzzer and the LED over their marks 2 Twist the 100 Ω resistor onto the long leg, 4 turns 3 Bend the legs flat on the cardboard Tip: Write «+» in felt-tip pen next to the long leg of the LED and the red wire of the buzzer so you don't mix them up later.Make the Y joint at each station adult
Join into a single joint: the yellow wire from the push button, the buzzer's + and the free end of the LED's resistor. Twist the copper ends together at least 4 turns and leave one strand free for the long yellow wire.
1 Bring 3 ends together: yellow, buzzer + and resistor 2 Twist them together 4 turns and leave one strand free Make the Z joint at each station adult
Join the buzzer's − (black wire) and the LED's short leg in another joint. This joint will go to the long black wire. Wrap both joints in electrical tape so they don't touch each other.
1 Twist the buzzer's − with the LED's short leg 2 Wrap each joint in electrical tape 3 No bare copper may touch the other joint Check: No bare copper from one joint should be able to touch the other joint or the paperclip.Lay the line
Stretch the 3 wires of 5 m between the two stations (red, yellow, black). Tape them together every 50 cm so they stay together. Tape each end to the base 3 cm before the stripped part, so a tug doesn't pull the connections apart.
1 Stretch the 3 wires of 5 m between the two stations 2 Tape them together every 50 cm so they stay together 3 Tape each end to the base 3 cm before the stripped part Connect station A
At station A: join the long red wire to the red push-button wire (X), the long yellow to the Y joint and the long black to the Z joint. Twist 4 turns and wrap each connection in electrical tape.
1 Join red to X, yellow to Y and black to Z: 4 turns 2 Wrap each connection in electrical tape Connect station B and the battery holder adult
At station B make the same three connections and also: battery holder red wire to joint X (red) and battery holder black wire to joint Z (black). Tape the battery holder to the back of the base.
1 Connect the battery holder's red to X and black to Z 2 Tape the battery holder to the back 3 Before adding batteries, check where each colour goes Check: Before putting in the batteries, check: the battery holder's red only goes to the push-button paperclips; the black only to the − of the buzzer and the LED.Put in the batteries and test
Insert the 2 AA batteries the right way round (+ and −). Press the paperclip at station B: both buzzers should sound and both LEDs should light up. Let go and try the paperclip at station A.
1 Insert the 2 AA batteries the right way round (+ and −) 2 Press at B: both buzzers sound and both LEDs light up 3 If it sounds but the LED stays dark, it's the wrong way round: flip it Check: If the LED doesn't light but the buzzer sounds, the LED is the wrong way round: turn it around.Prepare the Morse cards
Print card C on card, cut it out and cover it with wide clear tape. Put one next to each station, with the rule: dot = 1 unit, dash = 3, gap between letters = 3, between words = 7.
1 Print card C on card and cut it out 2 Cover it with wide clear tape 3 Put a card next to each station First message
Put the stations in two different rooms. Send SOS (··· ——— ···) several times, then your name, letter by letter, while the other person writes it down on paper.
1 Put each station in a different room 2 Send SOS: three short, three long, three short 3 At the other end, write each letter down on paper
Does it work? The test
With the stations 5 m apart (or in different rooms), one person sends a secretly chosen 4-letter word and the other writes it down. Then swap roles.
What should happen: Each press makes both stations sound and light up at the same time, with no noticeable delay. A beginner sends a short word in ≈ 20–40 s. When you let go, everything should be silent and dark.
If something goes wrong
- Nothing sounds or lights up — Batteries the wrong way round or flat, a drawing pin with a painted head or a loose joint. Solution: Test the battery holder by connecting red directly to the Y joint: if it sounds, the fault is in the push button. Use metal drawing pins and press the copper ring tightly under the head.
- It sounds all the time, without pressing — The paperclip touches drawing pin 2 at rest or joints X and Y are touching. Solution: Bend the paperclip up 4–5 mm and wrap each joint well in electrical tape.
- The buzzer doesn't sound but the LED lights up — Passive buzzer or connected the wrong way round. Solution: Turn it around (red/long leg to the Y joint). If it's still silent, it's passive: replace it with an active 3–24 V one.
- The LED doesn't light but the buzzer sounds — LED the wrong way round or resistor badly joined. Solution: Turn the LED around (long leg towards the resistor and the Y joint).
- It works at one station but not the other — A broken wire in the line or a loose joint at that station. Solution: Check the three connections at the faulty station; pull each wire gently: if it comes out, redo the joint with more turns.
- The sound is weak — Flat batteries or a 5–12 V buzzer that is quiet at 3 V. Solution: Replace the batteries or use a 3 × AA battery holder (4.5 V) instead of the 2 × AA one, and then change the resistors to 150 Ω.
Safety
- The 5 m cable crosses the floor: tape it down or run it along the wall so nobody trips.
- Drawing pins are sharp: push them in with your thumb protected by an eraser, and keep them away from children under 3.
- Stripping wires with scissors or a craft knife is done by an adult.
- Don't join the battery holder's red and black wires directly: it's a short circuit and the batteries get hot.
- Take the batteries out when not in use and take used ones to a battery recycling point.
- Never connect the telegraph to a mains socket or a charger.
The science behind it
For children
Electricity is like water inside a full hosepipe: when you turn on the tap at one end, water comes out of the other end straight away, even if the hose is really long. When you press the paperclip you open the «tap» and the electricity makes the buzzer at the other station sound at once. Morse code turns letters into short and long beeps, like a secret language of rhythms. Almost 200 years ago people sent messages from one city to another like this.
For the adult
The two push buttons are in parallel between wire X (+3 V) and wire Y (signal); the two buzzers and the two LED + resistor branches are in parallel between Y and Z (−). Closing either push button puts Y at 3 V and activates all four signalling devices; that's why 3 wires are enough for two-way communication (half-duplex: one talks and the other listens). An active buzzer contains an oscillator (≈ 2–4 kHz) and a piezoelectric disc or a coil: it sounds on DC and draws ≈ 10–30 mA. Red LED: I = (3.0 − 2.0)/100 ≈ 10 mA. Total consumption ≈ 40–80 mA only while pressed. The 2 × 5 m line of 0.22 mm² copper has R ≈ 0.0175·10/0.22 ≈ 0.8 Ω: the drop is < 0.1 V, negligible. The signal does not travel at the speed of the electrons (very slow) but at that of the electromagnetic field in the cable, ≈ 2/3 of the speed of light: 5 m is covered in ≈ 25 ns. Morse code (Morse and Vail, 1838; first line Washington–Baltimore in 1844) uses a time unit: dot = 1, dash = 3, gap within a letter = 1, between letters = 3, between words = 7. The most frequent letters in English have the shortest codes (E = ·, T = —): it is a variable-length code, a forerunner of data compression.
- telegraph: a device for sending messages over a distance using electrical pulses along a wire.
- Morse code: an alphabet of dots (short taps) and dashes (long taps).
- push button: a switch that only closes the circuit while you press it.
- in parallel: connected side by side, so that each one can work on its own.
- encode: to turn a message into signals following rules that both the sender and the receiver know.
By age
- 5–7 years: The adult makes the connections; the child laminates the bases, pushes in the drawing pins with help, decorates and plays at sending SOS and their initial.
- 8–10 years: They assemble the push buttons and signalling devices and make the joints under supervision; they practise with the card on 1–2 symbol letters and then short words.
- 11–12 years: They draw the circuit diagram, calculate the current in each branch and design a third station or a system with their own code (Caesar cipher + Morse).
In a group or in class
Teams of 4 (2 per station), one telegraph per team (≈ €5–6 of components). Beforehand: laminate the bases, cut and strip the wires, test the buzzers and LEDs. 90 min session: 10 min of history and demonstration, 50 min of assembly, 30 min of play (each team's stations at opposite ends of the classroom or corridor, secret messages in envelopes). Have spare batteries, LEDs and paperclips, and tape to fix the cables to the floor.
Challenges
- Add a main switch to the battery holder so you don't waste batteries.
- Build a third station and set up a 3-station «network» with turns to speak.
- Replace the LED with an RGB one, or fit two coloured LEDs and a selector to send messages with colour.
- Design a wooden telegraph key with a spring (clothes peg) that's more comfortable than the paperclip.
- Invent your own beep code for 5 common messages (come, yes, no, wait, dinner).