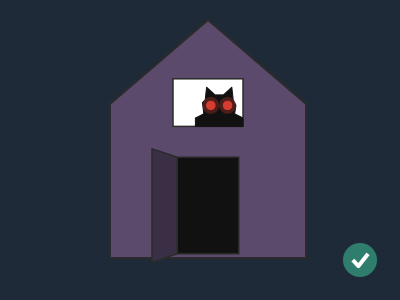
Haunted house with glowing eyes
A 14 × 11 × 17 cm cardboard house with a black cat peering out of the window: when you open the door, the thread tied inside pulls a tab out of a clothes peg, the peg closes the circuit and two red eyes light up. They stay on even if you close the door, telling tales on whoever has been snooping, until you reset it.
What they will learn
- That a «normally closed» switch lets current through while nobody touches it, and a «normally open» one only lets it through when you press it; and that an insulating piece (the tab) can turn one into the other, like the light in the fridge.
- What a parallel circuit is: two LEDs connected to the same two wires, each with its own path, so that if one fails the other stays lit.
- Why each LED has its own 100 Ω resistor at 3 V: without it too much current would flow and the LED would be damaged; and why one resistor isn't shared between the two.
- Which materials are conductors (aluminium, the copper in the wires) and which are insulators (cardboard, sticky tape), and that an insulator can also be used to switch off.
- How a lever (the door with its hinge) turns a small swing into a pull of several millimetres that works a mechanism.
Prepare beforehand
- Print the templates at 100 % (without «fit to page») and check the 50 mm mark in the header with the ruler.
- Open out and flatten the cereal boxes. The templates are stuck on the grey side (the inside of the box): that side will be the inside of the house.
- Test each LED with the two batteries and a 100 Ω resistor before the session, and discard any that don't light.
- Strip 15 mm from the wire ends (adult) and put the batteries in the holder following the + and − marks.
- If you are going to paint the outside of the house, do it after cutting out the pieces and before assembling them (step 2): the paint takes 20–30 min to dry.
- For groups: pre-cut the windows and doors with a craft knife, and have the LEDs ready joined to their resistors.
Materials and tools
- Thin card — 2 large cereal boxes (≈ 30 × 20 cm per side)
0.4–0.6 mm, folds cleanly without cracking; walls, roof, eye holder, tab and stops - Corrugated cardboard — 1 piece of 17 × 14 cm
single-wall, 3–4 mm (from a delivery box), for the base - Red LED — 2 (+1 spare) buy
5 mm, diffused or clear, ≈ 2 V / 20 mA, long legs untrimmed (the long one is +) - 100 Ω resistor — 2 buy
¼ W, colours brown-black-brown (and gold) - 2 × AA battery holder with wires — 1 buy
for 2 AA batteries in series (3 V), with red (+) and black (−) wires 10–15 cm long; with or without a switch - AA batteries — 2 buy
1.5 V alkaline (or 1.2 V rechargeables: the eyes are slightly dimmer) - Thin electrical wire — 25 cm red + 25 cm black buy
solid or stranded, 0.2–0.5 mm² (bell wire or speaker cable) - Wooden clothes peg — 1
with a metal spring, ≈ 72 mm long; it acts as the switch - Aluminium foil — 2 squares of 4 × 4 cm
ordinary kitchen foil; contacts for the peg - Strong thread — 20 cm
button thread, embroidery thread or kite string (one that doesn't stretch) - White A4 sheet — 1 piece of 7 × 5 cm
80 gsm paper: acts as the window pane and lets the red light through - Black card — 1 piece of 5 × 4 cm
for the cat silhouette - Sticky tape — ≈ 1 m
19 mm clear tape (insulates the joints and holds the hinge) - PVA glue and glue stick — 1 small bottle and 1 stick
PVA glue for the tabs; glue stick for sticking on the templates and the window pane - Reusable adhesive putty — 1 pea-sized ball
Blu Tack type; keeps the door closed - Button — 1
10–15 mm, for the door knob - Active buzzer (optional extension) — 1 buy
3–5 V, «active» (it sounds as soon as you connect it), with red (+) and black (−) wires or legs - Paint or card for decorating — as you like
black, purple or grey acrylic or poster paint; or card to cover the outside
Tools
- Scissors — cutting out the walls, roof, cat and foil
- Craft knife with metal ruler and cutting mat — opening the window and the three sides of the door adult
- Used-up (empty) ballpoint pen and ruler — scoring the folds so they fold straight
- Awl or sharp pencil — making the 5 mm holes in the eye holder, the 6 mm holes in the cat and the hole in the tab adult
- Wire strippers or scissors — stripping 15 mm from the wire ends adult
- Hot glue gun — fixing the peg and the battery holder to the base adult
- Extra clothes pegs — holding the tabs while the glue dries
Pieces and templates
- A · Front wall with door and window ×1 — thin card (cereal box)
- B · Back wall ×1 — thin card (cereal box)
- C · Side wall ×2 — thin card (cereal box)
- D · Roof ×1 — thin card (cereal box)
- E · Window pane ×1 — 80 gsm paper (white A4 sheet)
- F · Cat silhouette ×1 — black card
- G · Eye holder ×1 — thin card (cereal box)
- H · Insulating tab ×1 — thin card (cereal box)
- I · Door stop ×1 — thin card (cereal box)
- J · Base ×1 — 3 mm corrugated cardboard
- K · Roof stops ×4 — thin card (cereal box)
Step by step
Stick the templates onto the card
Cut out the printed templates leaving a 1 cm margin and stick them with a glue stick onto the grey side of the thin card: A and B (front and back walls), C twice (sides), D (roof), G (eye holder), H (tab), I (stop) and the 4 K stops. Smooth them with your hand so there are no bubbles. Pane E is used as it is, printed on the A4 sheet, and cat F is traced onto black card.
1 Put glue stick on the grey side of the card 2 Stick the template on and smooth it with your hand Check: The templates are completely flat and stuck down at the edges too.Tip: Make the most of the card: A and one C fit together on one large side of the box.Cut out the pieces and score the folds
Cut out A, B, C, D, G, H, I and K along the solid outer line. Then run an empty ballpoint pen along the ruler over each fold line (green and red), pressing hard, so they fold straight later: the bottom of A and B, the three edges of the C pieces, the ridge of roof D and the four lines of G.
1 Cut along the solid outer line 2 Go over each fold with an empty pen and the ruler Check: When you bend each fold slightly, it folds exactly along the mark without creasing.Tip: Halloween decoration: if you want to paint the house black or purple, paint it now on the coloured side (the outside) and leave it to dry for 20–30 min before folding. Fake windows and roof tiles can be drawn with a white felt-tip pen.Open the window and the door adult
Lay front wall A on the cutting mat. With the craft knife and metal ruler, cut out the 50 × 34 mm window completely. Then cut the door (44 × 69 mm) on three sides only: the top, the bottom and the knob side; the fourth side is the hinge and is not cut. Fold the door outwards 5 or 6 times along the hinge so it moves freely.
1 Cut out the whole window with craft knife and ruler 2 Cut the door on three sides only 3 Fold the door outwards several times Check: The door opens outwards with one finger and, when you let go, doesn't swing open by itself more than 1 cm.Tip: Cut with several light passes rather than one hard one: the cut is finer and the door rubs slightly against the frame, which helps it stay shut.Make the cat window
Cut cat F out of black card and pierce its eyes with the awl until they are 6 mm across. Stick the cat with glue stick onto pane E (A4 sheet), over its drawn silhouette. Then stick E behind the window of A, with the cat facing out and the frame of E on the guides of A.
1 Cut out the cat and pierce its 6 mm eyes 2 Stick it over its silhouette drawn on pane E 3 Stick E behind the window, by the frame only Check: Looking at the front wall from outside, you see the black cat on a white background in the window, with two white eyes.Tip: Stick E by the frame only (the 8 mm border): the centre must stay smooth and clean so the light passes equally through both eyes.Assemble the eye holder adult
Pierce the two holes in G with the awl until they are 5 mm across (they must be 12 mm apart, like the cat's eyes). Fold G into a bridge shape: the two outer 8 mm flaps outwards and the two 8 mm walls backwards, so that the panel with the holes stands 8 mm away.
1 Pierce the two 5 mm holes in G 2 Fold it into a bridge shape: panel at 8 mm Check: Resting on the table on its flaps, G looks like a bridge and the panel with the holes is parallel to the table, 8 mm high.Fit the LEDs and their resistors
Push the two LEDs through the holes in G from the wall side until their rim stops them, with both long legs on the same side. Wind one leg of each 100 Ω resistor round the long leg of each LED, 5 tight turns 5 mm from the base, and cover the joint with tape.
1 Push both LEDs in with the long legs on the same side 2 Wind a resistor round each long leg Check: Each LED has its resistor on the long leg and the short leg is free, not touching the other.Tip: The long leg of the LED is + (anode). If the legs have already been trimmed, the one on the flat side of the rim is − (cathode).Join the two eyes in parallel
Bring the free ends of the two resistors together with 15 mm of stripped red wire and twist them together. Do the same with the two short legs and the black wire. Wrap each joint with tape and keep the two bundles at least 1 cm apart so the red and black don't touch.
1 Join resistors to red and short legs to black 2 Wrap the joints with tape and keep them 1 cm apart Check: Only two wires, red and black, come out of holder G, and no bare metal is visible.Tip: Twist the wire round the legs, not the other way round: the wire is softer and grips the leg better.Test the eyes
With the batteries in the holder, touch the end of the eyes' red wire to the end of the holder's red wire, and black to black. Both LEDs should light up at the same time with the same brightness. If not, check the joints before carrying on.
1 Touch red to red and black to black 2 Both eyes light up at once Check: Both eyes light up together. If only one lights, that LED has a loose joint or is the wrong way round.Tip: If both stay off, swap the connection round (red to black): if they light that way, you have joined the long legs to the black wire.Glue the holder behind the window
Put PVA or glue stick on the two flaps of G and stick them behind pane E, so that each LED sits just behind one of the cat's eyes. Check the position by lighting the LEDs for a moment: the two red dots should appear centred in the eyes.
1 Stick the flaps of G behind pane E 2 Check that the red dots are in the cat's eyes Check: From outside, with the LEDs on, you see two red eyes inside the cat and no light outside them.Prepare the peg switch
Strip 2 cm from the battery holder's red wire and from the eyes' red wire and fan the strands out. Lay each one on the inner face of one jaw of the peg, near the tip. Fold each square of foil into a 1 × 4 cm strip, wrap it round the tip of the jaw over the wire and hold it with tape on the outer face only.
1 Lay each stripped wire on the tip of one jaw 2 Wrap the tip in foil and tape it on the outside 3 When you let go, the two pieces of foil touch Check: When you let go of the peg, the two pieces of foil touch; and each wire is pressed flat under its foil.Tip: There must be no tape on the inner face: that is where the foil on one jaw has to touch the foil on the other.Test the switch and the tab
Join the battery holder's black wire to the eyes' black wire (twist and wrap with tape). The eyes light up because the peg is closed. Cover tab H with tape on both sides, open the peg and slide the 10 mm end of H between the jaws: the eyes go out. Pull it out sharply: they light up.
1 Cover tab H with tape on both sides 2 Slide it 10 mm between the jaws: the eyes go out 3 Pull it out sharply: they light up Check: With H in, the eyes are completely off; without H, they are on.Tip: The peg on its own is a «normally closed» switch: its spring pushes the contacts together. The insulating tab holds it open, just as the fridge door presses the button for its light.Fix the peg and the battery holder to the base adult
Cut out base J from corrugated cardboard and mark its guides. Glue the bottom half of the peg onto its mark with hot glue, with the tips 25 mm from the front wall line and pointing towards the door; the top half must stay free. Stick the battery holder in its rectangle.
1 Hot-glue the bottom half of the peg onto its mark 2 The top half must still open Check: When you pull the tab, the peg doesn't move at all; and the top half still opens when you squeeze.Tip: Put the hot glue only on the bottom half of the peg and away from the spring: if it gets on the top half, the peg won't open any more.Assemble the walls
Put PVA glue on the side tabs of one C wall and stick them inside front wall A, on the guides at its edges; repeat with the other C and finally glue on back wall B. Hold each joint with a clothes peg while it dries for 20 min. Run the wires inside without pinching them.
1 Glue the tab of each side wall C inside A 2 Close the box with B and hold the corners for 20 min Check: The house stands up on its own, the corners are right angles and the triangular gables of A and B are at the same height.Tip: The bottom tabs must all point into the house.Glue the house to the base
Put PVA glue on the bottom tabs and lower the house onto base J, fitting the walls into the drawn 140 × 110 mm rectangle, with the front wall on the «FRONT» side: the peg must end up behind the door, on the knob side. Press the tabs down with a finger from the inside.
1 Put glue on the tabs and lower the house onto J 2 The peg sits behind the door, on the knob side Check: With the door open, you can see the tip of the peg just behind it, about 2.5 cm from the threshold.Fit the knob and the door catch
Glue stop I inside the front wall, next to the edge of the door on the knob side, with 4 mm of the stop sticking out over the door. Put a ball of adhesive putty on the stop, where the door rests. Glue the button on the outside of the door, 7 mm from its free edge and 20 mm from the floor.
1 Glue stop I on the inside with 4 mm over the door 2 Glue the button on the outside, on the knob side Check: The door stays shut by itself and opens outwards with a gentle tug on the knob.Tip: The stop prevents the door opening inwards and the putty keeps it shut: that way the thread doesn't pull until someone really opens it.Tie the door thread to the tab
Tie one end of the thread to the hole in tab H with two knots. Slide H 10 mm into the peg. Close the door and stick the other end of the thread on the inside, at the cross on the door (behind the knob), with two strips of tape crossed over: the thread should be straight but not pulling on H.
1 Tie the thread to H and stick it at the cross on the door 2 When the door opens, the thread pulls the tab out 3 And the cat's eyes light up Check: Open the door slowly: when it is about 20–30° open (2 cm at the edge), the tab comes out and the eyes light up.Tip: Tie a fat knot in the end that goes to the door before taping it: that way it won't slip out from under the tape.Put the roof on
Glue the four K stops on the printed side of roof D, at their guides. Fold D along the ridge and place it on the house without gluing it: the stops sit just inside the front and back walls and stop it sliding. That way you can lift it to reset the tab and change the batteries.
1 Glue the four K stops at their guides 2 Rest it on the house: it lifts off to reset Check: The roof sits centred, with 1 cm of overhang at the front and back, and doesn't slide when you push it sideways.Tip: To reset: with the door closed, lift the roof, squeeze the peg, slide the tab in 10 mm and let go. The eyes go out.Extension: add the buzzer
If you have a 3–5 V active buzzer, join its red wire to the eyes' red wire at the peg jaw (under the same foil) and its black wire to the joint of the black wires. Stick it to the base with double-sided tape. Now, when you open the door, the eyes light up and it sounds at the same time.
1 Join the buzzer's red to the eyes' red, at the peg 2 When the door opens it sounds and the eyes light up Check: With the tab in, it is silent; when you open the door it sounds and the eyes light up.Tip: If it is too loud, cover the buzzer's hole with a piece of sticky tape.
Does it work? The test
In a dimly lit room, reset the house (tab in, door closed) and open the door slowly by pulling the knob. Close it, reset and repeat 10 times in a row.
What should happen: With the door closed, the eyes are off. When it is about 20–30° open (about 2 cm at the edge of the door), the tab comes out of the peg and the two red eyes light up at the same time, with the same brightness, inside the cat silhouette. They stay on even if you close the door, until you lift the roof and slide the tab back in. It should work all 10 times.
If something goes wrong
- The eyes never light, not even without the tab — A loose wire under the foil, an LED the wrong way round or batteries in the holder the wrong way round. Solution: Repeat the test from step 8, touching the wires together directly. If they work then, the fault is in the peg: press the wires flat under the foil again and check there is no tape on the inner face.
- They light even with the tab in — The tab doesn't cover all the foil (it is in less than 10 mm), or the tape on H has torn and a bit of foil touches the other at one side. Solution: Slide H in up to the 10 mm mark and check it is wider than the jaws (14 mm). Trim any foil sticking out at the sides of the peg.
- Only one eye lights — That LED has a loose joint with its resistor or with the black wire, or it is the wrong way round. Solution: Check its two joints by twisting them again. If it is still off, take it out and turn it round (long leg to the resistor) or swap it for the spare. The other eye keeps working because they are in parallel.
- The door opens and the eyes don't light — The thread is slack and doesn't pull the tab out, the knot has slipped out from under the tape or the peg moves instead of releasing the tab. Solution: Shorten the thread until it is straight with the door closed. Tape the knot down again with two crossed strips. If the peg moves, glue it again with more hot glue on the bottom half.
- The eyes light up by themselves without the door opening — The door springs slightly open at the folded hinge and the thread pulls, or the thread is too tight from the start. Solution: Give the thread a little slack (2–3 mm) and put more putty on stop I. Fold the hinge back and forth several times again so it loses its springiness.
- The batteries get hot or run flat in a day — Short circuit: the bare red wire is touching the black one (or the foil is touching a black-wire joint), or the door has been left open for a long time. Solution: Take a battery out straight away. Wrap all the joints with tape and keep them 1 cm apart. If it has been left on by accident, reset the tab: that way it uses nothing.
- The eyes are very dim — Flat or rechargeable batteries, resistors of a higher value (for example 1000 Ω, brown-black-red) or paper E too thick. Solution: Check for the colours brown-black-brown (100 Ω). Put in new alkaline batteries. Swap the A4 sheet for tracing paper, which lets more light through.
Safety
- The craft knife (window and door), the awl, the wire strippers and the hot glue gun are used by an adult. Hot glue burns: wait 1 min before touching the freshly glued peg.
- Don't bring the two bare wires of the battery holder together or touch them to the foil without an LED in between: that is a short circuit, the batteries get hot and run flat quickly.
- LEDs, resistors, buttons and batteries are small parts: keep them out of reach of children under 3.
- This project is the safe alternative to putting a candle or a tea light inside a cardboard house: never put fire inside, cardboard burns very easily.
- If you are not going to use the house for a few days, take the batteries out of the holder. Used batteries go in the battery recycling bin.
The science behind it
For children
Electricity leaves the batteries, travels along a metal path and goes back into the batteries at the other end; if the path has a gap, it stops. The clothes peg is a tiny door on that path: its spring keeps it closed, so the electricity always gets through. But if we put a piece of card between its teeth, which doesn't let electricity through, the path is broken and the eyes go out. When you open the door of the house, the thread pulls the card out, the peg's teeth come together and the cat's eyes light up! It's just like the light in the fridge: the closed door presses a button that switches it off, and when you open it the button is released and the light comes on.
For the adult
The circuit is: battery + → peg (switch) → two branches in parallel, each with a 100 Ω resistor and a red LED → battery −. A red LED has a forward voltage of ≈ 1.9–2.1 V; the resistor limits the current: I = (V_batteries − V_LED)/R = (3.0 − 2.0)/100 = 10 mA per LED (≈ 12 mA with new batteries at 3.2 V and ≈ 6 mA when they drop to 2.6 V, which is why the brightness falls gradually). The resistor dissipates I²·R ≈ 0.012² × 100 ≈ 14 mW, far below its ¼ W. Each LED has its own resistor because two LEDs never have exactly the same forward voltage: with a single shared resistor, the one with the lower voltage would take almost all the current and be brighter than the other. Total consumption ≈ 20–24 mA; an alkaline AA battery gives around 2000 mAh at that rate, so, as an estimate, about 80–100 h of glowing eyes (with the active buzzer, which uses ≈ 15–30 mA more, roughly half that). The switch: a «normally closed» (NC) contact conducts at rest and opens when operated; a «normally open» (NO) one, like a doorbell push, is open at rest and conducts when operated. The peg is NC (the spring pushes the two pieces of foil together); the insulating tab holds it open while the door is closed, so that, seen from the door, the whole thing behaves like a switch that closes when it opens: it is the same principle as a fridge light or the door contacts on burglar alarms, which use NC circuits because they also trigger if someone cuts the wire. The door is a lever: the thread is ≈ 37 mm from the hinge, so when it opens by an angle θ the anchor point moves ≈ 37·sin θ; with 10 mm of tab inside the peg and 2–3 mm of slack, it switches on at around θ ≈ 20°. To pull the tab out, the friction with both jaws has to be overcome: F ≈ 2·μ·N; with the spring pressing at ≈ 4–8 N and μ ≈ 0.2–0.3 (smooth tape on aluminium), F ≈ 2–5 N (estimate): that is why the peg is hot-glued down and the tab is covered in tape, which has less friction than card. Once out, the tab doesn't go back by itself: the house works like an alarm latch that has to be reset. Aluminium and copper conduct with a negligible resistance compared with the 100 Ω; card, paper and tape are insulators. The 80 gsm sheet lets through part of the red light (around 20–40 %, estimate) and diffuses it, which is why the eye looks like an even red circle rather than a point.
- normally closed switch: one that lets current through while nobody touches it and cuts it off when operated (the clothes peg).
- normally open switch: one that doesn't let current through at rest and lets it through when operated (a doorbell).
- parallel circuit: several devices connected to the same two wires, each with its own path.
- resistor: a component that holds back the current so the LED isn't damaged.
- insulator: a material that doesn't let electricity through, like card or sticky tape.
- polarity: the + side and the − side of a component; the LED only works with the long leg towards +.
By age
- 5–7 years: The adult cuts the window and door, joins the LEDs to their resistors and prepares the peg. The child sticks on the templates, cuts out the straight walls and the roof, sticks the cat on the pane, assembles the walls with help, does the tab test and decorates. Focus on «card between the teeth = off».
- 8–10 years: They do all the steps except the craft knife, wire stripping and hot glue. Let them find out with the first experiment which materials turn the eyes off, and explain in their own words why the peg is a «normally closed» switch.
- 11–12 years: Ask them to draw the diagram with symbols, calculate the current through each LED with Ohm's law, measure the opening angle that lights the eyes and design a second window with another pair of eyes (how much current will it use in total?).
In a group or in class
Teams of 2–3 children, one house per team. Before the session: print and pre-cut the windows and doors with a craft knife, prepare the LEDs with their resistors and test them, strip the wires and hot-glue the pegs to the bases. Per team: 2 cereal boxes, a base, 2 LEDs with resistors, battery holder with batteries, peg, foil, thread and tape. Two 60-minute sessions (in the first, assemble the window, eyes and switch; in the second, the now-dry walls, the base, the thread and the roof) or one 2-hour session with 20 min of drying time for decorating. At the end, «haunted street»: all the houses in a row with the lights off and each team opens its door in turn. Keep spare LEDs, resistors and batteries.
Challenges
- Make a Halloween «haunted street»: several houses in a row, a fence of lolly sticks, black card bats hanging from the eaves on thread and an orange modelling clay pumpkin at the door.
- Swap one eye for a flashing red LED (one that blinks by itself): the cat will wink. It takes the same 100 Ω resistor.
- Add a second window with another two eyes in parallel, each with its own resistor, and calculate how much current all four use together.
- Build a «normally open» switch: a cardboard doormat with two layers of aluminium foil separated by sponge, which lights the eyes when someone steps in front of the door.
- Invent a way for the tab to reset itself when the door closes (for example, with a rubber band that pushes it towards the peg while someone squeezes it from outside).