Circuits with conductive dough
Two home-made doughs, one that conducts electricity (made with salt) and one that doesn't (made with sugar), let you model figures with LEDs that really light up: the modelling-dough monster opens its glowing eyes when you connect the battery holder, with no wires or soldering.
What they will learn
- That some materials let electricity through (salt dough, metals, salty water) and others don't (sugar dough, plastic, paper).
- That a circuit has to be a closed path from the + to the − of the batteries, passing through the LED.
- That an LED has polarity: the long leg (+) must go on the side of the red wire.
- What a short circuit is: if the two lumps touch, the current takes the shortcut and the LED goes out.
- That connecting several LEDs in parallel (each with its legs in the same two lumps) lights them all at once.
Prepare beforehand
- The day before, cook the conductive dough (recipe in steps 1–2) and make the insulating one. Keep them in sealed bags in the fridge; they last 2–3 weeks.
- Check that the batteries and each LED work: touch the LED's legs directly with the wires for 1 second (long leg to red). If it doesn't light, change the LED.
- If the battery holder's wire ends are short, strip them to leave 15 mm of copper and twist the strands so they don't splay.
- Bend each LED's legs apart into a V: about 15 mm between the tips (25 mm for the 3 traffic-light ones).
- Print template A (work mat) so the first circuits can be built on the marks.
Materials and tools
- Plain wheat flour — 1 cup (≈ 125 g) for the conductive dough + 1½ cups (≈ 190 g) for the insulating dough
ordinary wheat flour - Fine salt — ¼ cup (≈ 70 g)
table salt; it's what makes the dough conductive - Cream of tartar — 3 tablespoons (≈ 25 g) buy
potassium bitartrate, in the baking aisle; it adds stretch and helps the dough keep - White sugar — ½ cup (≈ 100 g)
for the insulating dough (dissolved sugar doesn't conduct) - Vegetable oil — 1 tablespoon (conductive) + 3 tablespoons (insulating)
sunflower or mild olive oil - Tap water — 1 cup (240 ml)
for the conductive dough - Distilled water — ½ cup (≈ 120 ml) buy
for the insulating dough: tap water contains salts and would make it slightly conductive - Food colouring — 4–6 drops per dough
a strong colour for the conductive dough (e.g. green) and leave the insulating one white or yellow, so you can always tell them apart - 5 mm LEDs — 6 (2 for the eyes + spares and traffic light) buy
5 mm diffused: 2 red, 2 yellow, 2 green (2 V, 20 mA) - 3 × AA battery holder with switch — 1 buy
4.5 V, with 15 cm red (+) and black (−) wires, ends stripped 15 mm - Alkaline AA batteries — 3 buy
1.5 V each, new - Zip-lock bags — 2
to keep each dough separately in the fridge
Tools
- Non-stick saucepan and wooden spoon — cook the conductive dough adult
- Large bowl — mix the insulating dough (it isn't cooked)
- 240 ml measuring cup and measuring spoons — measure the ingredients
- Modelling tools or cocktail sticks — shape the figure and make holes for the legs
- Ruler — check the gap between lumps and between wire and LED
- Scissors or wire strippers — strip 15 mm off the wire ends if they don't come stripped adult
Pieces and templates
- A · Work mat: first circuit ×1 — paper or 160 gsm card (laminated or covered with wide tape, so it doesn't get dirty)
- B · Traffic-light guide (3 LEDs in parallel) ×1 — 80 gsm paper
Step by step
Cook the conductive dough adult
In a non-stick saucepan, mix while cold 1 cup of water, 1 cup of flour, ¼ cup of salt, 3 tablespoons of cream of tartar, 1 tablespoon of oil and 5 drops of green colouring. Stir with a wooden spoon until there are no lumps.
1 Put all the ingredients in the saucepan, with the heat still off 2 The adult stirs with the wooden spoon until the lumps are gone 3 Check the mixture is smooth: it's still runny, that's normal Tip: Mixing while cold prevents lumps: don't heat it until everything has dissolved.Thicken the dough on the hob adult
Heat over a medium heat, stirring constantly, for 3–5 minutes. When it forms a ball that comes away from the bottom of the pan, turn off the heat and tip the dough onto a plate. Leave it to cool for 10 minutes and knead it for 1 minute.
1 The adult stirs constantly over a medium heat for 3–5 minutes 2 Turn off the heat when the dough forms a ball that comes away from the bottom 3 Leave it to cool for 10 minutes on a plate and knead it for 1 minute Check: The dough doesn't stick to your fingers and springs back into shape when you squeeze it. If it's sticky, cook it for 1 more minute.Make the insulating dough
In a bowl, mix 1 cup of flour, ½ cup of sugar and 3 tablespoons of oil. Add distilled water one tablespoon at a time, kneading, until a ball forms (about 6–8 tablespoons). Finally, work in another ½ cup of flour bit by bit until it stops sticking.
1 Mix the flour, sugar and oil in the bowl 2 Add distilled water one tablespoon at a time and knead 3 Leave it white: that way you'll never confuse it with the green conductive one Check: If it sticks to your hands, add flour one tablespoon at a time.Tip: Leave it white or a very different colour from the conductive one: that way you'll never mix them up.Prepare the battery holder and the LEDs
Put 3 AA batteries in the battery holder, checking the + and − signs, and leave the switch on OFF. Bend apart the legs of 2 LEDs into a V with your fingers, until the tips are 15 mm apart. Look for the long leg (+).
1 Put in 3 AA batteries following the signs and leave the switch on OFF 2 Bend the legs into a V until the tips are 15 mm apart 3 Test: brush the legs with the wires (long to red) and switch back to OFF Check: With the switch on ON, briefly touch the LED's legs with the wires (long to red): it should light up. Switch back to OFF.Make the two lumps
With conductive dough, shape two balls of Ø 50–60 mm (the size of a small satsuma) and place them on the circles of mat A, with the 10 mm thick strip of insulating dough between them.
1 Shape two balls of conductive dough the size of a satsuma 2 Put them on the circles of mat A with the insulating strip in between 3 Check there are 10 mm of insulating dough between the lumps and they don't touch Check: Measure with the ruler: there are 10 mm of insulating dough between the two lumps and they don't touch anywhere.Push in the wires
Push 15 mm of the red wire's stripped end into the left-hand lump, at the red dot on the mat, and the black wire into the right-hand lump, at the black dot. Twist the end first so it's like a little nail and goes in straight.
1 Twist the 15 mm stripped end so it's like a little nail 2 Push 15 mm of the red wire into the left-hand lump 3 Push the black wire into the right-hand lump Tip: If the copper splays when you push it in, bend the end into a 10 mm U shape: it goes in better and makes more contact.Put the LED in as a bridge
Push the LED's long leg into the lump with the red wire and the short leg into the lump with the black wire, 5–8 mm deep, close to the insulating dough. Each leg must be at least 20 mm from the wire in its lump.
1 Lower the LED with the long leg over the red wire's lump 2 Push each leg in 5–8 mm, close to the insulating dough 3 Check each leg is 20 mm or more from the wire in its lump Check: The two legs don't touch each other and each is in a different lump.Switch on
Turn the switch to ON. The LED should light up straight away. If it doesn't, pull the LED out, turn it round (long leg to the other lump) and push it back in.
1 Turn the battery holder's switch to ON 2 The LED lights up: if not, turn it round and push it back in 3 Without the insulating strip, push the lumps together: the LED goes out Check: Switch off, remove the insulating strip and push the lumps together until they touch; when you switch on, the LED doesn't light (short circuit). Switch off straight away, separate them, put the strip back and it will light again.Model the monster's body
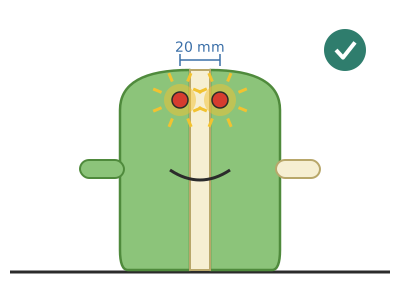
Switch off. Put the two conductive lumps together in the shape of a body (one is the left side and the other the right) with a 10 mm wall of insulating dough between them, from top to bottom, like a stripe down the middle. Add arms and feet of insulating or conductive dough, but each conductive piece may only touch ONE side.
1 Switch off and join the two halves with the 10 mm insulating wall 2 Add arms: each conductive bit touches only one side 3 Not like this: a conductive piece touching both sides turns the LED off Tip: Cover the insulating stripe with a thin outer layer of coloured insulating dough if you don't want the join to show.Add the glowing eyes
Push 2 LEDs into the head, each with the long leg on the left side (red) and the short one on the right (black), crossing the insulating wall. Space the two eyes about 20 mm apart.
1 Push in 2 LEDs across the stripe: long legs on the red side 2 Switch on: both eyes light at once, 20 mm apart Check: Switch on: both eyes light up at once. If only one lights, the other is the wrong way round.Make the traffic light
Using guide B, form two columns of conductive dough, 45 × 115 mm, separated by 20 mm of insulating dough. Spread the legs of a red, a yellow and a green LED to 25 mm (at 15 mm they don't reach from one column to the other) and push them in with all the long legs in the red wire's column.
1 Form two 45 × 115 mm conductive columns on guide B 2 Push in the red, yellow and green LEDs with the long leg on the left 3 Take one out: the others stay on because they are in parallel Check: When you switch on, all three LEDs light. If you take one out, the others stay on: they are in parallel.Tidy up and store
Switch off and remove the LEDs and wires. Keep each dough in its own well-sealed bag in the fridge, without mixing them. Wipe the LED legs with a damp paper towel and dry them so they don't corrode.
1 Switch off and pull the LED and the wires out of the dough 2 Keep each dough in its sealed bag, in the fridge and unmixed 3 Wipe the legs with a damp paper towel and dry them
Does it work? The test
Build the first circuit on mat A with a red LED and 4.5 V. Then push the lumps together, separate them, and change the LED's position.
What should happen: The red LED lights up nicely when you turn the switch to ON. If the lumps touch, it goes out instantly. If the LED is the wrong way round, it doesn't light (and isn't damaged). Moving the LED closer to the wires makes it brighter; moving it further away, dimmer, because the dough has resistance.
If something goes wrong
- The LED won't light at all — Non-conductive dough (shop-bought wax-based modelling clay) or LED the wrong way round. Solution: Use the salt dough (or Play-Doh type). Turn the LED round: long leg into the red wire's lump.
- It lights very dimly — Too few batteries, flat batteries, lumps too long, or a white/blue LED. Solution: Use 3 new AA batteries, move the LED closer to the wires (no closer than 2 cm), make the lumps thicker and try a red LED.
- It lights, but goes out when you touch the figure — The two lumps touch somewhere (short circuit) when squeezed. Solution: Widen the insulating dough wall to 10 mm and check underneath the figure, where they often meet.
- The LED lit very brightly and went out for good — The LED's leg was right next to the wire: with hardly any dough in between, the current was too high. Solution: Change the LED and always leave at least 2 cm of dough between the wire and the leg.
- With several LEDs, one lights and the other doesn't — One is the wrong way round or both its legs are in the same lump. Solution: Check that all the long legs are in the red wire's lump and that each LED crosses the insulating wall.
- The insulating dough also makes it light — It was made with tap water or has bits of salt dough in it. Solution: Make it with distilled water and wash your hands between handling one dough and the other.
- The conductive dough dries out and cracks — It has been left out in the air. Solution: Knead it with a few drops of water; always keep it in a sealed bag.
Safety
- The doughs contain a lot of salt: they are not to be eaten. Wash your hands afterwards and keep an eye on children under 5.
- The conductive dough is cooked on the hob: the adult makes it and waits for it to cool before giving it to the children.
- Never connect the battery holder's wires directly to each other: the batteries heat up.
- Use only AA batteries (maximum 4 × AA = 6 V). Never use mains sockets or chargers: mains electricity is dangerous.
- LEDs and batteries are small parts: keep them away from children under 3. LED legs are sharp.
- Turn the switch off when you finish: if the lumps touch with the battery holder switched on, the batteries go flat within a few hours.
The science behind it
For children
Electricity is like lots of tiny ants that leave the battery along the red wire and want to get back home along the black wire. Salt dough is a path they can walk along; sugar dough is like a wall. If we leave a wall between the two lumps, the only bridge across is the LED, and when the ants go through it, it lights up. But if the lumps touch, the ants take the shortcut and nobody goes through the LED: it goes out.
For the adult
Salt (NaCl) dissolves in the water in the dough into Na⁺ and Cl⁻ ions that can move: the dough is an ionic conductor with a resistivity of the order of tens of Ω·cm, so a lump a few centimetres across has a resistance of hundreds of ohms. Sugar, on the other hand, dissolves without forming ions, and with distilled water the insulating dough has a much higher resistance (MΩ). A red LED needs ≈ 1.8–2 V to start conducting and its useful current is 5–20 mA; at 4.5 V, the leftover drop (≈ 2.5 V) is taken up by the resistance of the dough, which acts as a current-limiting resistor: with about 300 Ω of dough (≈ 150 Ω per lump) ≈ 8 mA flows. That is why no resistor is needed, but if the leg is pushed in next to the wire the resistance of that section drops and the LED may be overloaded. The LED is a diode: it only conducts when the anode (long leg) is at a higher potential than the cathode. If the lumps touch, the resistance of the shortcut is much lower than that of the LED branch and almost all the current goes through it (short circuit). Several LEDs in parallel receive the same voltage; white and blue ones (≈ 3 V) barely light up because there is little voltage left for the dough.
- conductor: a material that electricity passes through easily (metal, salty water, salt dough).
- insulator: a material that doesn't let electricity through (plastic, sugar dough).
- closed circuit: a complete path from the battery's + to its −, passing through the LED.
- short circuit: a shortcut that lets the current skip the LED.
- polarity: the LED has a + side (long leg) and a − side; it only works one way round.
- ion: a tiny bit of dissolved salt with an electric charge that moves through the dough.
By age
- 5–7 years: The adult prepares the doughs, the battery holder and the LEDs with their legs spread, and marks the long leg with a red felt-tip pen. The child makes the lumps, puts in the insulating dough wall and pushes in the LED following the mat. The key point: «if they touch, it goes out».
- 8–10 years: They follow all the steps, help measure the ingredients and make the insulating dough. They build the monster with two eyes and the traffic light, and work out for themselves why an LED the wrong way round doesn't work.
- 11–12 years: Have them measure the resistance of a 5, 10 and 20 cm sausage of dough with a multimeter and draw a graph. Challenge: calculate the LED current with Ohm's law and design a figure with LEDs in series and in parallel.
In a group or in class
Teams of 2–3 children. The day before, make 2 full batches of conductive dough and 2 of insulating dough (enough for 8–10 teams). Per team: a 150 g conductive lump, 80 g of insulating dough, 1 × 3 × AA battery holder with batteries, 4 LEDs (red, yellow, green and one spare) and mat A printed out. 50-minute session: 10 min demonstrating the short circuit, 15 min first circuit on the mat, 20 min free figure or traffic light, 5 min tidying up. Have a pot for used LEDs and labelled bags for the doughs.
Challenges
- Make a monster with eyes of one colour and a mouth of another, all with a single battery holder.
- Build a dough switch: a piece of conductive dough that, when you push it, closes the gap and lights the LED.
- Add a 3–5 V active buzzer (long leg into the + lump) and create a figure that beeps.
- Put two LEDs in series (one after the other across three lumps) and compare their brightness with two in parallel: why are they dimmer?
- Design a dough town with street lamps: several conductive columns joined by «streets» and a single battery holder.