Door alarm with buzzer
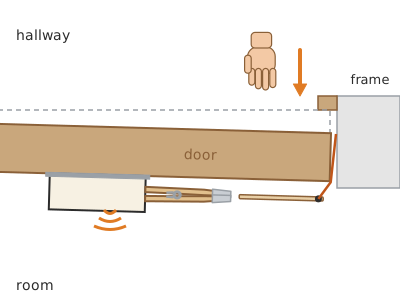
A small cardboard box with a buzzer and a coin cell that sticks onto the door: a thread running to the frame pulls a tab out of a clothes peg and, as soon as someone opens the door 1–2 cm, the peg closes the circuit and the alarm beeps.
What they will learn
- What a closed circuit and an open circuit are, and that a switch only opens or closes the path of the current.
- Which materials conduct electricity (metals) and which insulate (card, plastic).
- That there are «normally open» and «normally closed» switches, and why an alarm needs the right one.
- That the buzzer and the LED have polarity (+ and −) and only work when connected one way round.
- How a simple sensor (the thread and the tab) turns a movement into a signal.
Prepare beforehand
- Test the buzzer BEFORE you start: touch its red wire to the + side of the battery (the side with lettering) and the black one to the − side. If it does not beep, it is passive or the wrong way round.
- Print the template at 100 % on card (or stick it on) and check the red 50 mm line at the top of each sheet.
- Strip 15 mm from each wire end and cut 3 lengths: one of 15 cm to connect the battery holder to the peg (step 6), a spare 15 cm one to extend the buzzer's black wire if it does not reach the peg, and one of 25 cm for the LED in the experiment or for a second peg (challenges).
- Keep the coin cell somewhere high until it is time to fit it: if there are children under 6 at home, the adult fits it.
Materials and tools
- 3 V active buzzer — 1 buy
«active buzzer» (with oscillator), 3–5 V or 3–24 V, Ø 12 mm; red wire/long leg = +. Draws 5–30 mA - CR2032 coin cell — 1 buy
3 V, Ø 20 mm × 3.2 mm; large side with lettering = +, small side = − - Thin wire — 60 cm
solid or stranded, 0.2–0.5 mm², ideally red and black (from an old charger or doorbell wire) - Aluminium tape — 30 cm
plumbing type, 25–50 mm wide (conducts on the shiny side) - Wooden clothes peg — 1
with metal spring, ≈ 7 cm - Card — 1 A4 sheet
200–250 gsm for the box; 1 piece for the tab - Thin card — 1 piece of 3 × 7 cm
cereal-box card (battery holder) - Strong thread — 50 cm
thick sewing thread, fishing line or dental floss - Clear sticky tape — 1 roll
for securing joints and laminating the tab - Reusable adhesive putty or masking tape — 1 strip
for fixing the box and thread to the door without damaging the paint - Small metal clip (stationery) — 1
to keep the cardboard battery holder closed - 5 mm red LED and 100 Ω resistor — 1 + 1 (optional, experiment) buy
LED: long leg = +; 1/4 W resistor, colours brown-black-brown
Tools
- Scissors — cutting out the box, the tab and the aluminium tape
- Wire strippers or scissors used carefully — stripping 15 mm from each wire end adult
- Ruler and empty ballpoint pen — scoring the box's fold lines
- Awl or sharp pencil — making the sound hole and the wire hole
- Glue stick or PVA glue — closing the box's tabs
Pieces and templates
- A · Hiding box (net 80 × 50 × 30 mm) ×1 — card 200–250 gsm
- B · Folding battery holder ×1 — thin card (cereal box)
- C · Insulating tab ×1 — card laminated with tape
- D · Trigger thread ×1 — strong thread
Step by step
Test the buzzer adult
Rest the buzzer's red wire on the + side of the CR2032 battery (the large side, with lettering) and the black one on the − side (the small one). It should beep. If it does not, turn it round: if it still does not beep, it is a passive buzzer and will not work.
1 Find the battery's + side: the large one, with lettering 2 Touch the + side with the red wire and the − side with the black one 3 It should beep loudly; if it never beeps, it is passive: no good Check: It beeps loudly and continuously when touching, and goes quiet when you lift off one wire.Build the box
Cut out piece A from card, and make the 8 mm hole in the front and the 4 mm hole in the side. Score the fold lines with the empty ballpoint pen, fold inwards and glue the 4 tabs inside the sides.
1 Cut out piece A from card along the red line 2 Make a Ø 8 mm hole in the front and Ø 4 mm in the side; score the folds 3 Fold inwards and glue the 4 tabs: an 80 × 50 × 30 mm box Check: The box measures 80 × 50 × 30 mm and the lid closes by tucking in the flap.Make the battery holder
Cut out piece B from thin card and fold it in half. Stick a 20 × 20 mm square of aluminium tape on each half, on the inside. Mark one «+» and the other «−» with a felt-tip pen.
1 Cut B from cereal-box card and mark the halfway line 2 Stick a 20 × 20 mm aluminium square on each half 3 Fold B in half: the aluminium is inside, face to face Connect the buzzer to the battery holder
Lay the stripped end of the buzzer's red wire on top of the + pad, at its edge, and hold it down with a piece of clear tape, pressing firmly. That way the copper touches the shiny side of the aluminium.
1 Lay the red wire's copper on top of the + aluminium, at its edge 2 Hold it with a piece of clear tape and press firmly 3 Never put the wire under the aluminium: its adhesive does not conduct Tip: Never put the wire under the aluminium tape: its adhesive does not conduct.Prepare the peg contacts
Cut 2 strips of aluminium tape, 15 × 40 mm. Stick each one round the tip of one of the peg's jaws, wrapping it over: the shiny side must end up on the inside, where the jaws touch.
1 Cut two 15 × 40 mm strips of aluminium tape 2 Wrap the tip of each jaw with a strip: top and bottom 3 When the peg closes, aluminium touches aluminium at both tips Check: When the peg closes, aluminium touches aluminium at both tips.Wire up the peg
Connect the buzzer's black wire to the aluminium strip on one jaw: copper on the shiny side, on the outside of the peg, with tape over it. If it does not reach, extend it with the spare 15 cm length: twist the two copper ends together and wrap them in tape. Connect a 15 cm wire from the battery holder's − pad to the strip on the other jaw in the same way.
1 Tape the buzzer's black wire onto the top aluminium 2 Connect a 15 cm wire from the − pad to the other jaw 3 Check: each copper end on the shiny side with tape over it Check: No copper joint is covered by the aluminium's adhesive.Test the circuit adult
Put the CR2032 battery in the holder with the + side facing the + pad, close it and hold it shut with the stationery clip. Open the clothes peg: silence. Let it go: it should beep.
1 Put the battery in with the + side facing the + pad 2 Close it and hold it shut with the stationery clip 3 Open the clothes peg: silence. Let it go: it should beep Check: It beeps when you let go of the peg and goes quiet when you open it. If it never beeps, check each joint and which way the battery faces.Insert the tab
Cut out tab C, cover it with clear tape and tie thread D to its hole. Push 10 mm of the tab between the jaws: the alarm goes quiet.
1 Cut out tab C and cover both sides with tape 2 Tie thread D to the hole and push 10 mm of tab between the jaws 3 Pull the thread gently: the tab comes out and the alarm beeps Check: When you pull the thread gently, the tab comes out and the alarm beeps.Fit everything into the box
Glue the buzzer inside the front, with its opening facing the 8 mm hole. Put the battery holder in the bottom. Bring the two wires out through the hole in the side. Put a dot of glue on the tail of the peg (the end of the legs, away from the jaws) and glue it on the outside of that side, next to the hole, halfway up, with the jaws pointing away from the box. Leave to dry for 10 minutes without opening the peg.
1 Glue the buzzer behind the hole and put the battery holder in the bottom 2 Bring the wires out through the side hole and glue the peg there 3 Close the lid by tucking in the flap: the alarm is ready Tip: Glue alone does not hold up well to the pull of the thread: in step 10 the peg is reinforced with a small ball of putty against the door.Fit the alarm on the door adult
Stick the box with adhesive putty by its BASE (the large side with no holes) onto the face of the door on your room's side, 1.3 m above the floor (away from the latch), with the lid facing you and the peg side facing the handle-side edge. Place it about 15 cm from the edge: the box, the peg (7 cm) and the tab (6 cm sticking out) take up about 21 cm, and the tip of the tab should end up ≈ 2 cm from the edge. Put a 1 cm ball of putty between the door and the peg leg facing the door, without covering the jaws. Close the door. Take the thread round the edge and stick it with masking tape to the inner face of the frame (the one facing the edge), 2 cm beyond the face of the door, on the side OPPOSITE to the way it opens.
1 Stick the box with putty on your side of the door, 1.3 m above the floor 2 Close the door and pass the thread through the gap, round the edge 3 Stick the thread to the frame, 2 cm towards the side opposite the opening Check: With the door closed, the thread is taut, the tab is still inside the peg and the peg does not move when you pull the thread gently.Tip: Thin thread fits through the 2–3 mm gap between the edge and the frame. If the door opens into your room, the thread is stuck to the frame on the hallway side; if it opens into the hallway, on the frame on the room side.Test the door
From outside, open the door slowly and use the ruler to measure how many centimetres the edge has opened when it starts beeping. To silence it, put the tab back into the peg.
1 From the hallway, open the door very slowly: it should beep 2 Measure how far the edge has opened: it should beep before 2 cm 3 To silence it, put the tab back between the jaws Check: It beeps before the door has opened 2 cm.Camouflage it
Decorate the box in the colour of the door or stick a drawing or a small poster over it to hide it. Run the thread along the edge, held with a small piece of tape, so it cannot be seen.
1 Paint the box the colour of the door or stick a drawing on it 2 Tape the thread along the edge with a small piece of tape to hide it
Does it work? The test
Close the door with the tab in place. Open it slowly from outside and measure how far the edge has opened at the moment it starts to sound. Repeat 3 times.
What should happen: The alarm sounds continuously as soon as the door opens 1–2 cm and does not stop even if you close it again (the tab has already come out). With a new CR2032 and an active piezo buzzer it can sound for several hours non-stop.
If something goes wrong
- It never beeps — Battery the wrong way round, a joint with the copper under the aluminium's adhesive, or a passive buzzer. Solution: Test the buzzer directly on the battery; check that the + side (lettering) faces the + pad and that each wire touches the shiny side.
- It beeps with the tab in place — The aluminium strips touch at one side of the tab, or the tab is too narrow. Solution: Use a 20 mm wide tab that covers the whole tip and trim off any aluminium sticking out at the sides.
- It beeps weakly or sounds «hoarse» — Worn-out coin cell, or a magnetic buzzer that needs more current than the CR2032 can give. Solution: Replace the battery or use 2 AA batteries in a battery holder (3 V).
- The door has to open a long way before it sounds — Thread slack or too long, or tab pushed in too far. Solution: Tighten the thread with the door closed, check that it goes to the frame on the side opposite the way the door opens, and push in only 8–10 mm of tab.
- The box comes off when the door opens — The tab is gripped too tightly and the thread drags the box off the door. Solution: Use more adhesive putty, a thinner tab, or slightly loosen the peg's spring.
- It sounds on and off — Loose contact in the battery holder. Solution: Squeeze the battery holder with the stationery clip or with a rubber band wrapped round twice.
Safety
- Coin cells are VERY dangerous if swallowed: within 2 hours they can burn the oesophagus. Keep them out of reach of young children; have an adult fit the battery and close the box securely. If you suspect one has been swallowed, go to A&E immediately.
- Do not put the coin cell in your mouth or keep it with coins or keys in your pocket (it short-circuits and heats up).
- Stripping wires with scissors or a craft knife is done by an adult.
- Use putty or masking tape on the door: duct tape pulls the paint off.
- Tell everyone at home where the thread is so nobody trips over it or yanks the box hard.
The science behind it
For children
Electricity is like a train that can only go round if the track is complete, from one side of the battery to the other. The buzzer is on that track and beeps when the train goes past. The clothes peg is a drawbridge: while the card tab is in the middle, the bridge is open and the train cannot pass. When someone opens the door, the thread pulls out the tab, the peg closes, the bridge is complete... and it beeps!
For the adult
The circuit is a series loop: 3 V battery → buzzer → switch → battery. Current only flows if the loop is continuous; the card tab (an insulator) holds the switch open and, when it is removed, the peg's spring presses the two aluminium strips together and closes the circuit. This is a «normally closed» switch held open by the tab: the sensor is triggered by the removal of an object, the same principle as «tripwire» alarms and the safety cord on treadmills. A set-up with contacts that touch when the door closes is a switch that is closed while the door is shut; to make it warn on opening you would need to add a transistor to invert the logic. The active buzzer contains an internal oscillator that turns direct current into a ≈ 2–4 kHz vibration of a piezoelectric or magnetic membrane; a passive one is just the speaker, and on direct current it only makes a «click». A CR2032 (3 V, ≈ 220 mAh, internal resistance 10–20 Ω) powers a 5 mA piezoelectric buzzer well for tens of hours; a 30 mA magnetic one pulls the battery voltage down and sounds weaker. For the red LED (drop ≈ 1.8–2 V) a 100 Ω series resistor is used: I = (3 − 2) / 100 ≈ 10 mA. Aluminium tape only conducts through the metal; the acrylic adhesive is an insulator, which is why joints must be metal to metal.
- circuit: a closed path along which electricity flows from one terminal of the battery to the other.
- switch: a part that opens or closes the circuit.
- conductor: a material that lets electricity through, such as metals.
- insulator: a material that does not let electricity through, such as paper or plastic.
- polarity: the + side and the − side of a battery or a component.
- sensor: a device that detects a change (here, the door opening).
By age
- 5–7 years: The adult tests the buzzer, strips the wires and fits the battery. The child builds the box, sticks the aluminium on the peg and does the «tab in, tab out» tests. Focus on «closed path = it sounds».
- 8–10 years: They assemble everything, with help only for stripping wires and fitting the battery. Let them find the fault themselves if it does not sound, checking joint by joint.
- 11–12 years: Have them draw the circuit diagram with symbols and add the LED with its resistor, calculating the current. Challenge: an arming switch (another peg or a paperclip) to disarm the alarm without removing the battery.
In a group or in class
Pairs. Materials per pair: 1 buzzer, 1 CR2032 (handed out and collected by the teacher), 1 clothes peg, 60 cm of stripped wire, 30 cm of aluminium tape, card with the template. Beforehand: test all the buzzers, strip and cut the wires. 50-minute session: 10 min explaining the circuit with an example, 30 min assembly, 10 min «trap doors» testing on the classroom door and on drawers. Count the batteries at the start and at the end.
Challenges
- Make the alarm stop sounding when the door is closed again (hint: you need a different type of switch or a transistor).
- Add an arm/disarm switch in series made from a paperclip and two drawing pins.
- Connect two sensors (two pegs) to guard a door and a window: in series or in parallel?
- Design an alarm that sounds when an object is lifted (a biscuit tin) instead of when a door opens.