Motorised desk fan
A desk fan about 17 cm tall: an upside-down paper cup holds a mini motor that spins a 4-blade card propeller, Ø 12.6 cm. With 2 AA batteries it moves just enough air to make a paper strip flutter at 30 cm.
What they will learn
- That a circuit needs a closed path: battery → switch → motor → battery, and that opening it stops the motor.
- That swapping the wires reverses the motor's rotation and, with it, the direction of the air.
- That the blades push air because they are tilted: flat (0°) or edge-on (90°) they don't blow.
- That more voltage (more batteries in series) makes the motor spin faster and move more air.
- Why a propeller must be balanced: 4 identical, symmetrical blades don't vibrate.
Prepare beforehand
- Print the templates at 100 % and check the red 50 mm line in the header.
- Test the motor before you start: touch its wires to both ends of the battery holder with batteries in. If it doesn't spin, change the motor or the batteries.
- Pierce the bottle cap: a centred 1.5–2 mm hole (a touch smaller than the shaft) so it fits tightly.
- Strip 15 mm off each wire end if they don't come stripped.
- With a group, cut out the card blades yourself if the children are under 7: they must be identical.
Materials and tools
- Type 130 DC motor — 1 buy
1.5–6 V, body 25 × 20 × 15 mm, 2 mm shaft; ideally with wires already soldered on (red and black) - 2 × AA battery holder with wires — 1 buy
3 V output, red (+) and black (−) wires at least 15 cm long, with the wires coming out of one end - Alkaline AA batteries — 2
1.5 V each, new - Paper cup — 1
200 ml: about 90 mm tall, rim Ø 75 mm and base Ø 52 mm - Corrugated cardboard — 1 piece, 15 × 20 cm
3–4 mm, for the base and the platform - Card — 1 A4 sheet
250–300 gsm (stiff); cereal-box card also works - Plastic bottle cap — 1
Ø 30 mm, 12–14 mm tall (water or fizzy drink) - Split pins (butterfly fasteners) — 2
metal, with 15–25 mm legs - Metal paperclip — 1
32 mm, not plastic-coated - Thin electrical wire — 20 cm
insulated, 0.2–0.5 mm² (doorbell wire or from an old charger) - Glue sticks for the glue gun — 2
for a hot glue gun - Electrical tape — 1 roll
to cover the wire joints
Tools
- Scissors — cutting out blades, templates and card
- Craft knife and ruler — cutting the cardboard base and platform adult
- 2 mm nail or fine awl — making the centre hole in the bottle cap (slightly smaller than the shaft) adult
- Hot glue gun — gluing the motor, the bottle cap and the blades adult
- Scissors or wire strippers — stripping 15 mm off the wire ends adult
- Glue stick — sticking the templates onto the card
Pieces and templates
- A · Base ×1 — corrugated cardboard 3–4 mm
- B · Motor platform ×1 — corrugated cardboard 3–4 mm
- C · Bottle cap centring guide ×1 — paper
- D · Blade ×4 — card 250–300 gsm
- E · 30° marking band ×1 — paper
- F · 30° set square (checker) ×1 — card
- G · Jumper wire ×1 — thin insulated wire
Step by step
Test the motor
Put the 2 AA batteries in the battery holder and touch the motor wires to the red and black wires of the battery holder. The shaft should spin fast. Stick a little piece of tape on the shaft as a flag to see which way it turns.
1 Put in the 2 AA batteries and stick a tape flag on the shaft 2 Touch the motor wires to the battery holder wires: the shaft spins 3 If it doesn't spin, check each battery + matches the + drawn Check: If it doesn't spin, check the polarity of the batteries (the + of each battery matching the + drawn in the battery holder).Cut out the blades
Stick template D onto the card with a glue stick and cut out 4 identical blades, 48 mm long (from the fold to the tip) plus the 6 mm tab. Fold each tab to 90° along the fold line, all towards the same side.
1 Stick template D onto the card and cut out 4 identical blades 2 Fold the tab to 90° along the fold line 3 Stack them: they should match, with the tabs on the same side Check: Stack the 4 blades on top of each other: they should match. Trim any that stick out.Mark the bottle cap
Cut out band E and wrap it round the outside wall of the bottle cap with the top of the band at the open edge. Hold it with tape and go over the 4 lines slanted at 30° with a felt-tip pen. Remove the band.
1 Cut out band E: it's the same length as the way round the cap 2 Wrap it with the top edge at the open end of the cap and trace 3 Remove the band: 4 identical slanted lines are left Pierce the bottle cap adult
Put centring guide C inside the bottle cap and mark the centre. With a hot 2 mm nail or an awl, make a 1.5–2 mm hole right in the centre, resting the cap on a piece of wood.
1 Put centring guide C inside the cap and mark the centre 2 Rest the cap on some wood and pierce it with a 2 mm nail 3 The hole is centred and a little tighter than the shaft Tip: The hole should be tighter than the 2 mm shaft: that way it's a push fit and doesn't wobble.Glue on the blades adult
Put a small blob of hot glue on the tab of the first blade and stick it along one line on the cap, with the blade pointing outwards. Repeat with the other 3, always with the tab on its line and the fold on the same side of the line.
1 Put a blob of hot glue on the tab and stick it along a line 2 Repeat with the other 3, each tab on its line 3 Check with set square F: all at 30° and facing the same way Check: Look at the propeller side-on with set square F: all 4 blades are at 30° to the plane of rotation and point the same way, like a pinwheel.Cut the base and platform adult
Cut base A (120 × 120 mm) and platform B (60 × 70 mm) from corrugated cardboard. Pierce the 2 switch holes in the base with the awl.
1 Measure base A at 120 × 120 mm and platform B at 60 × 70 mm 2 Cut with a craft knife against the ruler, taking your time 3 Pierce switch holes 1 and 2 with the awl Glue on the cup adult
Place the cup upside down on the circle on the base and glue the rim with a bead of hot glue all round. Glue platform B onto the bottom of the cup with the template circle over the cup and the MOTOR side towards the FRONT of the base.
1 Place the cup upside down on the circle and hot glue it 2 Glue platform B on top, with the MOTOR side at the front 3 From above: the edge of B sticks out 40 mm in front of the centre Check: Look from above: the front edge of the platform is 40 mm in front of the centre of the cup.Glue on the motor adult
Lay the motor on its flat side on the marked rectangle, with the shaft facing forwards and the shaft end flush with the edge of the platform. Glue it with 2 beads of hot glue along the sides of the body, without touching the shaft or the ventilation slot at the back.
1 Lay the motor on the rectangle, with the shaft facing forwards 2 Glue it with a bead of hot glue on each side, not touching the shaft 3 Side view: the shaft is horizontal and sticks out at the front Check: The shaft is horizontal and sticks out past the front of the platform.Fit the propeller adult
Push the hole in the bottle cap onto the motor shaft, with the bottom of the cap towards the motor and its open edge facing forwards, leaving 2 mm between the cap and the motor. If it's loose, put a blob of hot glue on the joint.
1 Push the cap onto the shaft: bottom to the motor, open end forwards 2 Leave 2 mm between cap and motor; if it wobbles, a blob of hot glue 3 Turn it with your finger: no rubbing, and the tips clear the base Check: Turn the propeller with your finger: it doesn't rub on the platform or the cup, and the tips pass about 38 mm above the base.Build the switch
Push a split pin into hole 1 with the paperclip hooked under its head, and another into hole 2. Open the legs out under the base. The paperclip should swing round and touch the head of split pin 2.
1 Push in split pin 1 with the paperclip under its head; then pin 2 2 Open the legs out under the base, nice and flat 3 Swing the paperclip: it has to reach the head of pin 2 Connect the circuit
Fix the battery holder upright against the back of the cup (the switch side), with the wires coming out at the bottom, using two turns of electrical tape round the cup (they come off to change the batteries). Wind the copper of the battery holder's red wire round the leg of split pin 1 (underneath, running it round the back edge of the base) and the 200 mm jumper wire G round the leg of split pin 2. Run jumper G up one side of the cup to the motor and the black wire up the back: join the jumper to one motor terminal and the black wire to the other, twisting 3 turns. Cover each joint with electrical tape.
1 Underneath: wind the red on pin 1's leg and jumper G on pin 2's 2 Twist jumper G onto one motor terminal and the black onto the other 3 Cover each joint with electrical tape: no copper touches another Check: No bare copper touches any other except at its own joint, and the wires reach without pulling (the black one has 1–2 cm to spare; if it doesn't reach, extend it with a piece of wire twisted on and taped).Test and set the direction
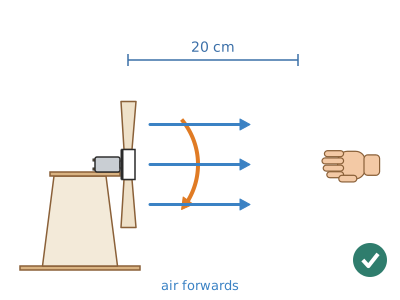
Put the paperclip on split pin 2. The propeller should spin and blow forwards: hold your hand 20 cm in front and feel the air. If it blows towards the motor, swap the two wires on the motor terminals.
1 Put the paperclip on split pin 2 to switch on 2 Hold your hand 20 cm in front: you should feel the air 3 If it blows backwards, swap the wires on the motor Check: When you move the paperclip away, the propeller stops.
Does it work? The test
Hang a 2 × 15 cm strip of tissue paper from a ruler and place it in front of the fan at 10, 20 and 30 cm. Switch on and see how far the strip tilts.
What should happen: With 2 new batteries the propeller spins at about 2000–3000 revolutions per minute (it looks like a blurry disc). The strip tilts clearly at 10 cm (about 30–45°), a little at 20 cm and barely flutters at 30 cm. With the paperclip open, it stops in 2–3 seconds.
If something goes wrong
- Nothing turns — Open circuit: loose wire, battery the wrong way round or paperclip not touching properly. Solution: Check the polarity battery by battery, tighten the joints and rub the head of the split pin with a little sandpaper if it's varnished.
- It spins but doesn't blow forwards — It's spinning the wrong way or the blades are flat. Solution: Swap the motor wires. Check that the blades are at 30° with set square F.
- It vibrates a lot and the cup moves — Blades not the same, one more tilted, or the bottle cap off-centre. Solution: Even up the blades by trimming the biggest one; reposition the cap in the centre. Glue the cup firmly to the base.
- The propeller rubs on the cup — Motor too far back or cup wider than expected. Solution: Unstick the motor and move it forwards until it's flush with the edge, or extend the platform 10 mm forwards.
- It spins very slowly — Flat batteries, blades tilted too much or bottle cap rubbing on the motor. Solution: Try new batteries; reduce the angle to 20–25°; move the cap 2 mm away from the motor.
- The propeller flies off — The bottle cap is loose on the shaft. Solution: Switch off, fill the hole with hot glue and fit it back on. Never use more than 4.5 V.
Safety
- Fast-spinning blades hit hard: don't put your fingers in or bring long hair near while the fan is on.
- Use only AA batteries (maximum 3, 4.5 V). Don't connect it to sockets or chargers.
- Don't leave the paperclip closed unattended: the motor gets hot and the batteries run down.
- If a battery gets hot, there's a short circuit (copper touching copper): disconnect and check.
- The hot glue and the hot nail are handled by an adult.
- For the candle experiment: only with an adult, the candle at 30 cm and never the card propeller near the flame.
The science behind it
For children
The batteries push electricity through the wires like a pump pushes water through a pipe. When the paperclip closes the path, the electricity goes through the motor, and inside there are magnets that make it turn. The blades are twisted, like a tilted oar: as they turn, they push the air forwards. If you swap the wires round, the motor turns the other way and the air goes backwards.
For the adult
The permanent-magnet DC motor turns when current flows through its winding: the Lorentz force on the conductors in the magnet's field produces a torque, and the commutator reverses the current every half turn to keep it going. No-load speed is roughly proportional to voltage (≈ 6000–9000 rpm at 3 V for a type 130); with the Ø 126 mm propeller loading it, it drops to 2000–3000 rpm at ≈ 0.3–0.5 A. Reversing the polarity reverses the direction of the current and, with it, that of the torque. Each blade tilted 30° to the plane of rotation deflects the air forwards (reaction: the propeller pushes the air and the air pushes the propeller backwards). With very small angles the propeller barely moves any air; with very large angles (> 45°) the blade stalls and brakes the motor: 25–30° is a good compromise for flat blades. The paperclip switch opens or closes the series circuit; being in the positive lead, it protects just as in a real appliance. An unbalanced propeller produces a centrifugal force that rotates with it: hence the vibration.
- electric motor: a machine that turns electricity into rotation.
- circuit: a closed path the current flows along, from one terminal of the battery to the other.
- switch: a part that opens or closes the circuit to turn something on or off.
- polarity: which side is + and which is −; if you swap it, the motor turns the other way.
- propeller: a set of tilted blades that push air or water as they turn.
By age
- 5–7 years: The adult pierces the bottle cap, glues the blades and motor and makes the wire joints. The child cuts out blades with thick outlines, glues the cup with PVA glue, builds the paperclip switch and switches it on. Focus on "close the path = it spins".
- 8–10 years: They do all the steps except piercing and hot gluing. Let them work out for themselves how to change the direction of the air without touching the blades.
- 11–12 years: Have them compare propellers with 2, 3 and 4 blades and angles of 15°, 30° and 45° using the strip meter, and make a table. Challenge: measure rpm by filming in slow motion with a phone.
In a group or in class
Pairs, one fan per pair (≈ €3 for motor and battery holder). Beforehand: pierce bottle caps, cut bases and platforms, test every motor. 60 min session: 10 min of circuit with loose batteries and motor, 35 min building, 15 min testing with the paper strip at 20 cm. Have spare batteries and 2 extra motors.
Challenges
- Make the paper strip move at a distance of 40 cm.
- Add a second switch that reverses the rotation (a reversing switch with 2 paperclips).
- Make the fan swing from side to side by turning the cup on a wooden skewer.
- Design a protective card guard that doesn't block the air.
- Make a balanced 3-blade propeller and compare it with the 4-blade one.