Pop-pop sailing boat
A 15 × 8 cm ‘pop-pop’ boat made from a juice carton: a tealight heats a coil of copper tube filled with water, the water boils and squirts out of the stern in little jets, and the boat moves across the bath by itself at about 2–5 cm per second.
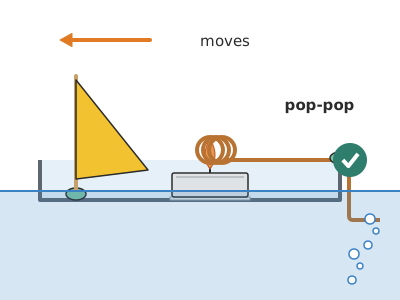
What they will learn
- That when water heats up it changes state (liquid → steam) and takes up about 1,600 times more space.
- That steam turns back into water when it cools (condensation) and leaves room, and that this cycle repeats many times a second.
- What jet propulsion is: pushing water backwards makes the boat go forwards (action and reaction).
- That a boat floats if it displaces a weight of water equal to its own (a 15 × 8 cm hull sinks only 4–5 mm).
- Real safety rules for working with fire and hot objects.
Prepare beforehand
- Wash the carton with soap and water, open it along the edges and leave it to dry flat.
- Print the templates at 100% (check the red 50 mm line in the header). The coil template is actual size: you bend the tube on top of it.
- Check the copper tube is open at both ends: blow through one end or push water through with the syringe.
- Fill the bath with 5–10 cm of water and move towels, curtains and paper away from the edge. Tie back long hair.
- Have the long lighter and a damp tea towel to hand.
Materials and tools
- Soft (annealed) copper tube — 40 cm (32 cm is used; the rest is spare) buy
3 mm outside Ø, 0.5 mm wall (model shop, hardware shop or refrigeration ‘capillary tube’) - Tealight — 2 (one spare) buy
Ø 38 mm, 12 mm high, in its aluminium cup, burns 3–4 h - 1-litre drinks carton — 1
milk or juice, washed and dry (plastic-coated card: it doesn’t get soggy) - Modelling clay — ≈ 20 g
to fix the tubes to the stern, the candle to the floor and the mast; it also works as ballast - Aluminium foil — 1 piece, 15 × 15 cm
folded into 4 layers (a 40 × 40 mm square) under the candle, to protect the hull from the heat - Duct tape — ≈ 30 cm
to hold the corners of the hull on the outside - Cocktail sticks — 2
one for the mast (≈ 65 mm) and one spare - Coloured paper — 1 piece, 6 × 5 cm
the boat’s sail - Needle-free syringe — 1
5–10 ml, to fill the tube with water - Pencil — 1
Ø 7–8 mm, to wind the coil around - Bath, washing-up bowl or paddling pool — 1
at least 50 cm long and 5 cm of water
Tools
- Craft knife, metal ruler and cutting mat — cutting the carton adult
- Scissors — cutting out templates, the paper sail and tape
- Empty ballpoint pen — scoring the hull’s folds
- Tube cutter or fine file — cutting the copper tube without crushing the ends (with a file: score all the way round and snap) adult
- Long kitchen lighter — lighting the candle inside the boat adult
- Damp tea towel — keep it to hand in case something outside the boat catches fire (the candle is blown out) adult
Pieces and templates
- A · Hull (carton tray) ×1 — drinks carton (plastic-coated card)
- B · Sail ×1 — coloured paper
- C · Template for bending the coil (actual size, side view) ×1 — paper
- D · Copper tube ×1 — copper tube Ø 3 mm
- E · Aluminium pad ×1 — aluminium foil in 4 layers
Step by step
Cut out the hull adult
Stick or trace template A (190 × 120 mm) onto the inside face of the opened carton; an adult cuts it out with a craft knife and ruler. If the carton’s crease runs across the rectangle, flatten it with your fingernail: it doesn’t matter.
1 Stick the 190 × 120 mm template A on the grey face of the carton 2 An adult cuts along the line with a craft knife against the metal ruler 3 Piece A cut out, with the carton’s crease flattened by fingernail Fold the tray
Score the 4 straight folds with the empty ballpoint pen and ruler and lift up the 20 mm walls. At each corner, pinch the diagonal outwards to form a triangular ear and fold it flat against the short wall.
1 Score the 4 folds 20 mm from the edge with empty pen and ruler 2 Lift the walls and pinch each corner outwards into an ear 3 Fold each ear against the short wall: 150 × 80 mm floor Check: The walls stand straight and the floor measures 150 × 80 mm.Seal the corners
Hold each ear against the wall with a 6 cm piece of duct tape wrapped round the corner on the outside. Don’t make any cuts or holes in the hull.
1 Cut a 6 cm piece of duct tape for each corner 2 Stick half the tape on each wall, wrapping the corner outside 3 Repeat on all 4 corners, with no cuts or holes in the hull Float test
Put the empty hull in the water for 2 minutes and then look inside. Next, put the tealight and the still-straight copper tube inside (it weighs the same as when it is a coil) to see how it floats with weight.
1 Leave the empty hull floating for 2 minutes 2 Look inside: there must not be a single drop of water 3 With the candle and tube inside, it sinks only 4–5 mm Check: Not a single drop gets in and the hull sinks only 4–5 mm with all the weight.Wind the coil adult
An adult cuts 32 cm of copper tube with the tube cutter; mark its centre, at 16 cm. Rest that point on the pencil and wind 3 tight turns, slowly, with both legs coming out on the same side. Twist the pencil to pull it out.
1 An adult cuts 32 cm of copper tube; mark the centre, at 16 cm 2 Rest the centre on the pencil and wind 3 tight turns 3 Twist the pencil out: both legs come out on the same side Tip: Bend with your thumbs close to the pencil, without jerking: if the tube gets flattened, it stops working (water can’t pass).Bend the legs on the template adult
Lay the coil on template C and bend both legs at once: a 60 mm horizontal stretch, a 90° bend downwards of 30 mm and another 90° bend backwards of 14 mm. Make each bend over the pencil so it is rounded.
1 Lay the coil on template C: 60 mm to the stern 2 Bend 90° downwards over the pencil: a 30 mm drop 3 Make the second bend backwards, 14 mm long: it must match Check: The tube matches the drawing and both ends are at the same height. If either end sticks out more than 1 cm beyond the drawing, the adult trims it with the tube cutter so both are the same length.Check water flows through the tube
Fit one end of the tube into the syringe (or wrap it with a little piece of soft tubing) and push water through: a steady little jet should come out of the other end.
1 Join the water-filled syringe to one end and push the plunger 2 A steady little jet has to come out of the other end 3 If no water comes out, a bend is crushed: redo that section Check: If no water comes out, a bend has been crushed: redo that section.Place the tealight
Put the 40 × 40 mm aluminium pad E on the floor, on the mark 65 mm from the stern, and the tealight on top, centred. Stick it down with a small ball of modelling clay so it doesn’t slide.
1 Put the 40 × 40 mm foil pad E 65 mm from the stern 2 Stick the candle on top, centred, with a small ball of clay Fit the coil
Rest both legs on the top edge of the stern wall, with the coil right above the wick, as on template C: its centre 25 mm above the floor (≈ 13 mm above the wax), so that the bottom of the turns is 3–5 mm from the tip of the wick, inside the flame. Fix the legs to the edge with a good lump of modelling clay. The ends sit outside, pointing backwards, below the floor.
1 Rest both legs on the top edge of the stern wall 2 Fix the legs to the edge with a good lump of modelling clay 3 From the side: coil over the wick, ends 10 mm below the floor Check: Seen from the side, the coil is centred over the wick and the ends are 10 mm below the floor of the hull.Add the mast and balance
Push the cocktail stick with sail B into a 1 cm ball of modelling clay stuck near the bow. Put the boat in the water: if the stern sits low, add modelling clay at the bow until it is level.
1 Thread sail B onto the stick and push it into a ball of clay 2 If the stern sits low, add modelling clay at the bow 3 It should sit level, with the tube ends under water Fill the tube with water
With the boat in the water, fit the water-filled syringe into one of the ends (under water) and push until bubbles and then water come out of the other. Remove the syringe without lifting the ends out of the water.
1 Fit the water-filled syringe into one end, under water, and push 2 Keep going until water with no bubbles comes out the other end 3 Remove the syringe without lifting the ends out of the water Check: No bubbles are left: the tube is full of water from end to end.Tip: You can also fill it by dipping the coil in a glass and sucking through a straw on the other end (without swallowing).Light it (adult only) adult
The adult lights the candle with the long lighter, without tilting the boat. Hold the boat gently for 30–60 seconds while the coil heats up and let go when you feel the first push.
1 The adult lights the candle with the long lighter, not tilting it 2 Hold the boat gently for 30–60 s while the tube heats up 3 Let go when you feel the push: it moves off going ‘pop-pop’ Check: After a minute you hear soft clicks, little bubbles come out of the ends and the boat moves off by itself.Sail and put out adult
Watch for a few minutes, timing how long it takes to cover 50 cm. To put it out, the adult blows from the side, level with the candle and below the coil (you can’t cover it with a glass: the coil is on top). Wait 5 minutes before touching the coil.
1 Time how long it takes to cover the 50 cm 2 The adult puts it out: blow from the side, below the coil 3 Wait 5 minutes before touching the coil
Does it work? The test
In the bath, mark out a 50 cm distance with two objects. Release the boat with the candle already lit and the tube full, and time it.
What should happen: It starts moving 30–60 s after lighting, with a faint ‘pop-pop’ and little bubbles at the stern, and goes straight at about 2–5 cm/s (50 cm in 10–25 s). It keeps sailing as long as there is candle left and water in the tube.
If something goes wrong
- The candle burns but the boat doesn’t move — There is air in the tube or it has emptied. Solution: Put it out, let it cool for 2 minutes and refill the tube with the syringe with the ends under water.
- It makes very big bubbles and then stops — The ends are almost at the surface and air gets in. Solution: Bend the ends lower (at least 10 mm below the floor) or add modelling clay at the stern.
- It won’t start even though the tube is full — The coil is too high or too low (it smothers the flame) relative to the wick. Solution: Adjust it as on template C: centre of the coil 25 mm above the floor (≈ 13 mm above the wax), with the bottom of the turns inside the flame.
- It goes round in circles — The ends don’t point straight backwards or the boat is crooked. Solution: Straighten both ends parallel to the boat’s centre line and balance it with modelling clay.
- Water gets into the hull — A badly folded corner or tape that has come unstuck. Solution: Dry it, refold the ear and put new duct tape on the outside; or switch to a sardine tin.
- The candle goes out — The coil is too close and smothers the flame, or the wax floods the wick. Solution: Raise the coil by 3–4 mm and use a new candle.
Safety
- Fire: an adult always lights and puts out the candle, with a long lighter; never leave the boat burning unattended.
- The copper coil gets hotter than 100 °C: don’t touch it until 5 minutes after putting it out. The candle wax and cup also burn.
- Only sail it on water, away from curtains, towels and paper. Long hair tied back and no loose clothing over the bath.
- An adult uses the craft knife and cuts the copper tube; the tube ends can cut: sand them smooth.
- To put it out, blow from the side, level with the candle and below the coil (a glass won’t fit: the coil is on top). Never pour water on hot wax outside the bath (it spatters).
The science behind it
For children
There is water inside the little tube. The candle heats it so much that it turns into steam, which needs loads more room and pushes the water out of the back of the boat – splosh! Once it moves away from the heat, the steam cools down, turns back into water and leaves a gap, so the tube sucks water in again. This happens many times every second, like a beating heart. Because the water squirts out backwards in a jet but comes in from all around, the boat goes forwards.
For the adult
This is a coil-type ‘pop-pop’ engine, a heat engine with no moving parts. The flame heats the water in the coil above 100 °C and a steam bubble forms (steam at atmospheric pressure takes up ≈ 1,600 times the volume of the water). The bubble grows and pushes water out of both ends; when it reaches the cold parts of the tube, the steam condenses, the pressure drops below atmospheric and water flows back in. The cycle, a relaxation oscillation, repeats at several hertz. Although the volume of water going out equals the volume coming in, the net thrust is not zero: the water leaves as a jet directed backwards (lots of momentum in one direction), while on intake it comes in from all directions around the opening. The net force is small (millinewtons), enough to move a ≈ 50 g hull at 2–5 cm/s, which by Archimedes’ principle sinks ≈ 50 cm³ / (15 × 8 cm²) ≈ 4 mm. The 3 mm copper tube is the key: it conducts heat very well (≈ 400 W/m·K) and its small diameter stops the water from gushing in and out. The efficiency is very low (less than 0.1% of the ≈ 30 W a tealight gives off), but you can see changes of state, condensation and Newton’s third law live.
- steam: water turned into a gas by heat.
- condensation: when steam cools down and turns back into liquid water.
- jet propulsion: moving forwards by pushing a jet of liquid or gas backwards.
- buoyancy: an object floats if it pushes aside a weight of water equal to its own.
- coil: a tube wound into a spiral to heat or cool whatever flows through it.
By age
- 5–7 years: Building it is not recommended: the adult prepares it and the child decorates the sail and hull, fills the tube with the syringe and watches, always at a distance from the flame.
- 8–10 years: They build the hull, place the candle and the template and fill the tube; the adult bends the copper and handles the flame. Ask them to explain in their own words what they see at the ends.
- 11–12 years: They bend the coil using the template (with supervision), measure speed and compare coils. Challenge: calculate how far the hull sinks under its weight and check it with a ruler.
In a group or in class
Teams of 4, with one adult for every 2–3 teams because of the flame. Before the session: the teacher cuts the hulls, prepares the coils (winding one coil per team, 6–7 for a class of 25, takes time) and tests one. 60-minute session: 20 min hull and assembly, 10 min filling, 20 min ‘harbour’ with 2–3 large washing-up bowls and candles lit only by adults, 10 min sharing. No lighters on the tables; a fire extinguisher or fire blanket close by.
Challenges
- Make your boat carry a 10 g load (a coin) without sinking or stopping.
- Build a boat with two coils and two candles and compare the speed.
- Design a rudder that makes it go round in a steady circle.
- Build a diaphragm pop-pop boat with a drinks can (look up how the classic ‘pop-pop’ that makes the sound works).