Balloon-powered car
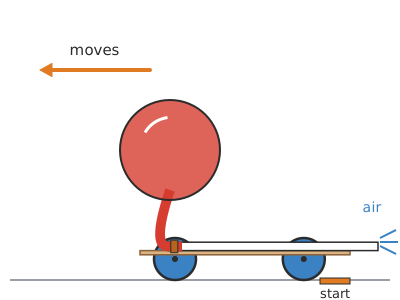
A light 15 cm cardboard car with bottle-cap wheels and a balloon mounted on a straw: when you let go, the jet of air shoots out backwards and the car shoots forwards, travelling 3–6 m with no batteries or motor.
What they will learn
- Newton's third law: the balloon pushes the air backwards and the air pushes the car forwards.
- That friction in the axles and weight slow the car down: a light car with free-spinning wheels goes much further.
- That the jet must come out straight and at the car's height for it to travel in a straight line.
- How to measure distances, repeat tests and compare results changing only one thing at a time.
Prepare beforehand
- Print the template at 100 % and check that the chassis is 150 mm long.
- Pierce the 4 bottle caps in the centre before the session if the children are young.
- Check that the skewer turns freely inside the straw; if it rubs, look for wider straws.
- Find a smooth track at least 5 m long (corridor, gym, patio) and have masking tape ready to mark the start.
- Have spare balloons: well-used ones burst or stretch.
Materials and tools
- Corrugated cardboard — 1 piece of 16 × 9 cm
single-wall, 3 mm (delivery box), flat and without creases - Offcuts of card or thin card — 2 strips: 20 × 2 cm and 10 × 2 cm
cereal-box card; the 20 cm strip is for measuring the balloon's diameter and the 10 cm one is rolled into a little roll under the neck - Plastic bottle caps — 4
identical, Ø 30 mm (water or fizzy drink bottle) - Wooden skewers — 2
Ø 3 mm, straight - Straight straws — 3
Ø 6 mm: 2 for bearings and 1 for the nozzle (without a bendy section, or with the bendy section cut off) - Balloon — 2 (one spare)
round, 25–30 cm (12"), latex - Thin rubber bands — 2
office ones, to hold the balloon onto the straw - Sticky tape — 1 roll
parcel tape or masking tape - Hot glue sticks or PVA glue — 1 stick
to fix the bottle caps to the axle
Tools
- Ruler and pencil — mark the axle lines
- Scissors — cut the chassis and the straws
- Awl, 3 mm nail or drill with a 2.5 mm bit — make a hole in the centre of the bottle caps adult
- Hot glue gun — fix the bottle caps to the axles adult
- 5 m tape measure — measure the distance travelled
Pieces and templates
- A · Chassis ×1 — 3 mm corrugated cardboard
- B · Bearing straws ×2 — Ø 6 mm straw
- C · Axles ×2 — Ø 3 mm wooden skewer
- D · Nozzle straw ×1 — Ø 6 mm straw
- E · Bottle-cap centring guide ×4 — paper
Step by step
Cut out the chassis
Stick template A onto the cardboard with a glue stick, with the corrugations running across the width, and cut out the 80 × 150 mm rectangle with scissors.
1 Stick template A with the corrugations running across the width 2 Cut out the rectangle along the line with scissors 3 An 80 × 150 mm chassis that doesn't bend when you hold it Check: It doesn't bend when you hold it by one end.Mark the axles underneath
Turn the chassis over and draw two lines across it with a ruler: one 25 mm from the front edge and another at 117 mm. That is where the bearings will go.
1 Turn the chassis over: you are working on the underside 2 Draw two lines with the ruler, 25 and 117 mm from the front edge Stick on the bearings
Cut two 80 mm straws (B) and stick each one along its line with two strips of sticky tape across the top, without squashing them.
1 Cut two 80 mm pieces of straw (B) 2 Stick each straw on its line with two strips of tape, without squashing 3 Measure 92 mm between the straws at both ends Check: The two straws are parallel: measure 92 mm between them at both ends.Pierce the bottle caps adult
Put centring guide E in each bottle cap and mark the centre. Rest the cap on a piece of wood and pierce it with a 3 mm nail or a 2.5 mm drill bit, so the skewer is a tight fit.
1 Put centring guide E in the cap and mark the centre 2 With the cap upside down on a piece of wood, pierce it with a nail 3 The skewer must be a tight fit in the hole Fit the axles and wheels adult
Cut two 110 mm skewers (C) and push them through the straws. Push a bottle cap onto each end, open side facing inwards, leaving 2 mm of clearance from the chassis, and fix it with a drop of hot glue.
1 Cut two 110 mm skewers and remove their points 2 A cap on each end, open side in, 2 mm away, with hot glue 3 Push it gently: it must roll 1 m in a straight line Check: Push the car gently across the table: it should roll at least 1 m in a straight line.Prepare the nozzle
Cut a straight 150 mm straw (D). Push 10 mm of the straw into the neck of the balloon and wind a rubber band tightly 4–5 times round the neck; cover with one turn of tape.
1 Cut a straight 150 mm straw (D) 2 Push 10 mm of straw into the neck and wind the band 4–5 times 3 Cover with tape and blow: the balloon inflates with no leaks Check: Blow through the straw: the balloon inflates and no air escapes from the neck.Stick the nozzle onto the chassis
Place the straw on the centre line of the chassis, with the balloon at the front and 20 mm of straw sticking out past the rear edge. Stick it down with 3 strips of tape: at the front, in the middle and next to the rear edge.
1 Put the straw on the centre line, balloon in front and 20 mm sticking out 2 Stick it with 3 strips of tape: front, middle and back 3 Look from behind: it points straight back, not skewed or down Tip: Look at the car from behind: the straw must point straight backwards, not to one side or down at the floor.Check that the balloon doesn't rub
Half-inflate the balloon and look at it from the side: as the nozzle is only 24 mm above the floor, the inflated balloon doesn't fit underneath and rises up over the nose. It must not touch the front wheels or the floor. If it does, roll the 10 × 2 cm strip into a little roll about 2 cm high and tape it to the chassis, under the neck of the balloon, to lift it.
1 Half-inflate: the balloon doesn't touch the wheels or the floor 2 If it rubs on the wheel or the floor, it slows the car down 3 Lift the neck with a 2 cm cardboard roll Inflate and hold shut
Blow through the straw until the balloon is about 20 cm across (check with the 20 cm cardboard strip); it will sit raised above the car. Cover the end of the straw with your finger as soon as you stop blowing.
1 Blow through the straw until the balloon is about 20 cm 2 Cover the end of the straw with your finger when you stop blowing Tip: Each child blows into their own car (or uses a balloon pump through the straw).Let go and measure
Place the car on the start line, pointing down the track, and take your finger away without pushing. Mark where it stops with tape and measure the distance with the tape measure.
1 Place it at the start and take your finger away without pushing 2 Mark where it stops and measure the distance with the tape measure Check: The car travels in an almost straight line for 3 m or more on a smooth floor.Adjust and repeat
If it veers off, straighten the straw; if it stops early, check that the wheels turn freely. Repeat 3 times with the balloon inflated to the same size (measure the diameter with the 20 cm cardboard strip) and work out the average.
1 If it veers off, straighten the straw so it points straight 2 Spin each wheel with your finger: it must turn freely 3 Repeat 3 times with the balloon equally inflated and work out the average
Does it work? The test
On a smooth floor, mark a start line with tape. Inflate the balloon to 20 cm across (measure it with a 20 cm cardboard strip), let go and measure the distance. Repeat 3 times.
What should happen: The car sets off with a jolt, the balloon empties in about 2–3 s and the car travels 3–6 m on a smooth floor (less on carpet). It should go almost straight (less than 50 cm off course over 3 m).
If something goes wrong
- The car doesn't move or only goes a few centimetres — Wheels rubbing against the chassis or bent axles dragging in the straws. Solution: Check that each wheel spins on its own with a flick of your finger; move the bottle caps 2 mm away from the chassis and straighten the straws.
- It goes round in circles — The straw doesn't point straight backwards or the axles aren't parallel. Solution: Line the straw up with the centre line and measure 92 mm between the axles again on both sides.
- The nose lifts up or digs in — The nozzle is tilted downwards or upwards. Solution: Stick the straw flat on the chassis along its whole length; the jet must come out horizontally.
- The balloon goes down before you let go — A leak at the neck of the balloon. Solution: Wind the band round more times and cover with tape; check by blowing with the car in your hand.
- The balloon drags on the floor or slows the wheels — The balloon hangs down in front of the chassis. Solution: Lift the neck of the balloon with a cardboard roll or use a slightly smaller balloon.
- The wheels spin when it sets off — The car is too light on a very smooth floor. Solution: Put a thin rubber band round each rear bottle cap as a tyre.
Safety
- Balloons: under-8s always with an adult. An uninflated balloon or a piece of burst balloon can cause choking; pick up the bits straight away.
- Each child blows only into their own straw; don't share balloons inflated by mouth.
- Piercing bottle caps with a nail or drill is done by an adult, with the cap resting on a piece of wood.
- Hot glue burns: the adult applies it.
- Skewer points are sharp: cut them off before assembling.
- People with a latex allergy should use latex-free balloons.
The science behind it
For children
The inflated balloon is squeezing the air inside it, like when you squeeze a sponge. When you take your finger away, the air shoots out backwards through the straw, and as it pushes the air backwards, the air pushes the car forwards. It is the same as when you are on a scooter and throw a heavy ball: you move the other way. That is why the more air you keep in the balloon, the longer it pushes and the further the car goes.
For the adult
The stretched rubber of the balloon keeps the air at an overpressure of ≈ 2–5 kPa. When the nozzle is opened, the air comes out at a speed v ≈ √(2Δp/ρ) ≈ 60–90 m/s; the thrust is the momentum flow, F ≈ ṁ·v ≈ 2·Δp·A, which with a 6 mm straw (A ≈ 2.8·10⁻⁵ m²) gives ≈ 0.1–0.2 N. With a total mass of ≈ 40 g, the initial acceleration is several m/s². A 20 cm balloon holds ≈ 4 l and empties in ≈ 2–3 s; after that the car coasts on its inertia until friction stops it. That is why both the mass (a = F/m) and the losses matter so much: friction in the bearings, rolling resistance and the drag of the balloon itself. The nozzle must be lined up with the centre of mass and parallel to the floor: if the thrust does not pass through the centre of mass, it creates a torque that makes the car turn or pitch. This is Newton's third law and the principle of conservation of momentum, the same one used by rockets and jet aircraft.
- action and reaction: if you push something, it pushes you back with the same force in the opposite direction.
- propulsion: the force that makes a vehicle move forwards.
- nozzle: the tube the jet comes out of in a jet engine (here, the straw).
- friction: a force that slows things down when two surfaces rub together.
- inertia: the tendency of things to keep moving (or stay still) if nothing stops them.
By age
- 5–7 years: The adult prepares the chassis, bearings and fitted wheels. The child sticks on the straw, holds the balloon on with the rubber band (with help), blows and lets go. Focus on “the air goes backwards, the car goes forwards”.
- 8–10 years: They build the whole thing (piercing with an adult), measure distances and test two variables.
- 11–12 years: They time the runs and work out the average speed; they test three nozzles and draw a graph. Challenge: estimate the thrust by hanging the car from a thread like a pendulum and measuring how far it swings out.
In a group or in class
Pairs, one car per pair and 2 balloons per child. Beforehand: pierce the bottle caps, cut the skewers and straws, prepare a 6 m track with a tape measure stuck to the floor. 60-min session: 10 min demonstration, 30 min building, 20 min testing and a grand final race (three runs per car; the best average wins).
Challenges
- Make a light body from card without adding more than 20 g to the car.
- Fit two balloons with two parallel straws: does it go twice as far?
- Get the car to travel exactly 5 m (accuracy, not maximum distance).
- Design a three-wheeled car and compare its stability.