Compressed-air rocket launcher
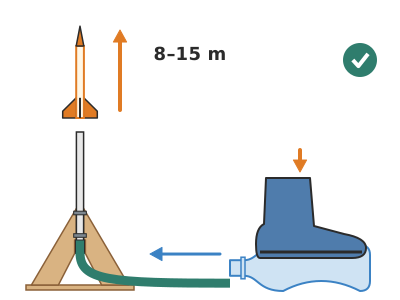
A 20.5 cm paper rocket that slides onto a guide tube connected by a hose to a 2-litre bottle: stamp on the bottle and the compressed air shoots it 8–15 m into the air.
What they will learn
- That air takes up space and that, when it is suddenly squashed, it pushes very hard (pressure = force / area).
- Action and reaction: the air pushes the rocket upwards while your foot pushes the bottle downwards.
- Why fins at the back and a little weight in the nose make a rocket fly straight (centre of mass ahead of the centre of pressure).
- How to measure heights with a stopwatch: h ≈ g·t²/8 from the total flight time.
Prepare beforehand
- Print the templates at 100 % and check the red 50 mm line in the header with a ruler.
- Cut the PVC tube to 270 mm and sand the burrs off the ends: a rough edge will tear the rocket.
- Warm the end of the hose for 1 minute in hot tap water and push 30 mm of the PVC tube in firmly. Test by blowing with the tip of the tube covered: no air should escape from the joint.
- Choose the spot: playground, park or beach with at least 10 × 10 m of clear space, with no cables, windows or cars nearby.
- Have a second spare bottle ready: after 20–30 stamps the bottle gets crumpled and loses power.
Materials and tools
- Plastic bottle (PET) — 1
1.5–2 L, water or fizzy drink bottle, smooth and undented, without the cap - Garden hose — 1 length of 80–100 cm
15 mm inside diameter (5/8 inch), outside diameter ≈ 20 mm - Rigid PVC tube — 1 length of 270 mm
rigid electrical conduit, Ø 16 mm outside (left over from building work) - Corrugated cardboard — 1 sheet of 30 × 40 cm
single-wall, 3–4 mm (shipping box), for the base and the brackets - Printer paper — 2 A4 sheets
80 gsm: one for the rocket body and another as a spacer when rolling - Card — 1 piece of 15 × 10 cm
160–200 gsm, for the nose cone and fins - Modelling clay — 3 g (a Ø 15 mm ball)
plug and nose ballast - Duct tape — ≈ 1 m
for airtight joints and to fix the tube to the brackets - Clear sticky tape — 1 roll
to close the body and the cone and to attach the fins - Poster paints or felt-tip pens — as you like
decorate the rocket BEFORE rolling it (wet paper wrinkles)
Tools
- Junior hacksaw or sturdy craft knife — cutting the PVC tube to 270 mm adult
- Craft knife, metal ruler and cutting mat — cutting the cardboard base and brackets adult
- Scissors — cutting out body, cone, fins and fin guide
- Hot glue gun — gluing the brackets to the base adult
- 10 m tape measure and stopwatch (phone) — measuring distances and flight times
Pieces and templates
- A · Launcher base ×1 — corrugated cardboard 3–4 mm
- B · Guide tube bracket ×3 — corrugated cardboard 3–4 mm
- C · Rocket body ×1 — paper 80 gsm
- D · Nose cone ×1 — card 160–200 gsm
- E · Fin ×3 — card 200 gsm or cereal-box card
- F · Fin positioning guide ×1 — paper
- G · Guide tube ×1 — rigid PVC tube Ø 16 mm
- H · Hose ×1 — garden hose, inside Ø 15 mm
Step by step
Prepare the bottle
Remove the cap and the label from a 1.5–2 L bottle. Check it has no cracks by squeezing it with your hands: it should spring back into shape by itself when you let go.
1 Remove the cap and the label from the bottle 2 Squeeze it with both hands 3 When released it should spring back into shape, with no cracks Fit the hose into the bottle
Wrap the free end of the hose with 2–3 turns of duct tape until it fits tightly into the bottle neck. Push it in 3 cm and cover the joint with 4 more turns of tape, half on the neck and half on the hose.
1 Wrap the end of the hose with 2–3 turns of duct tape 2 Push it firmly 3 cm into the neck 3 Cover the joint with 4 turns: half neck, half hose Check: Cover the tip of the guide tube with your thumb and gently stamp on the bottle: you should not hear or feel air escaping from any joint.Cut the base and the brackets adult
Stick templates A and B onto the cardboard with a glue stick. Cut the 240 × 240 mm base and the 3 brackets with a craft knife and ruler, including the 4 × 30 mm notch on the vertical edge. Score the tab fold of each bracket with an empty ballpoint pen.
1 Stick templates A and B (×3) onto the cardboard 2 Cut the 240 × 240 mm base with a craft knife and ruler 3 Cut the 3 brackets and score the tab fold Assemble the stand adult
Fold the tab of each bracket to 90° and hot-glue it onto its line on base A, with the vertical edge facing the centre and the notch at the bottom. The three vertical edges must end up 8 mm from the centre, leaving a space for the 16 mm tube; the notches make room for the hose, which is thicker.
1 Fold the tab of each bracket to 90° 2 Put hot glue on the 3 lines of the base, every 120° 3 Glue all 3 with the straight edge facing the centre; 16 mm gap Check: Put the tube between the three brackets: it should stand upright and touch all three above the notches.Fix the guide tube
Place tube G between the brackets with the hose end at the bottom, 70 mm off the ground: the joint sits level with the notches and the hose comes out through the gap marked on the base. Bind it to the brackets with two turns of duct tape: one 110 mm off the ground and another at 160 mm (both on the tube, above the joint with the hose).
1 Put tube G between the brackets, with the hose at the bottom 2 Bind it with duct tape at 110 and 160 mm off the ground 3 The tube stands upright and the hose is not kinked Check: The top end of the tube is 340 mm off the ground and the hose is not bent at a sharp angle.Decorate the body paper
Paint or draw on the printed template C (it is the rocket body itself). Use felt-tip pens or very little poster paint and leave it to dry for 10 minutes: wet paper wrinkles and then will not slide along the tube.
1 Draw on template C with felt-tip pens 2 Use felt-tip pen or very little poster paint: wet paper wrinkles 3 Leave to dry for 10 minutes before rolling Roll the body around the tube
Wrap the guide tube with a plain A4 sheet (the spacer) so the rocket is not too tight. Over it, roll piece C up tightly, starting from the marked edge, and close the seam along its length with a 160 mm strip of clear tape.
1 Wrap the tube with a plain sheet: that is the spacer 2 Roll piece C on top, nice and tight 3 Close with tape; without the spacer it should slide by itself Check: Remove the spacer and put the body back on the tube: it should slide on by itself, without dropping suddenly or getting stuck.Tip: Stick the starting edge to the spacer with a small piece of tape so it does not slip as you start rolling.Fit the modelling clay plug
Make a 3 g ball of modelling clay (Ø 15 mm), flatten it into a disc and push it 10 mm into one end of the body until it seals the hole completely. Cover that end with two strips of tape in a cross.
1 Make a 3 g ball and flatten it into a disc 2 Push it 10 mm into one end of the body 3 Seal that end with two strips of tape in a cross Check: Blow through the other end of the tube: no air should come out of the tip.Make the cone
Cut out sector D, roll it into a cone overlapping one edge up to the marked line and close it with tape on the outside. Fit it onto the end with the plug and secure it with 3 short strips of tape spaced around it.
1 Cut out sector D 2 Roll it overlapping up to the line and close it with tape 3 Fit it onto the plugged end and secure it with 3 strips Check: The base of the cone matches the body with no step; the rocket is about 205 mm long.Mark and attach the fins
Slide guide F onto the tail and mark three lines at 120°. Cut out the 3 fins E, fold their 6 mm tab and tape them onto each line, with the 45 mm root flush with the bottom edge of the body.
1 Slide guide F onto the tail and mark 3 lines at 120° 2 Cut out 3 fins E and fold their 6 mm tab 3 Stick them on the lines: from behind they form a Y Check: Look at the rocket from behind: the fins form a symmetrical Y and are straight, not twisted.Check the balance
Rest the rocket on one finger and find the point where it balances. It should be in the front half, about 110–115 mm from the tail (the rocket is 205 mm long). If it is closer to the tail, add 1 g of modelling clay to the nose.
1 Balance it on a finger: the point should be in the nose half 2 If it balances further back, add 1 g of modelling clay to the nose Tip: With the weight at the front and the fins at the back, the rocket flies like a dart: always nose first.Prepare the launch area adult
Place the launcher in a space of at least 10 × 10 m with nobody in front. Stretch out the hose and put the bottle 1 m from the tube. Mark a line in chalk at 2 m that nobody crosses except the person stamping.
1 Find a clear 10 × 10 m space, with nobody in front 2 Bottle 1 m from the tube; everyone behind the 2 m line Load the rocket
Before loading, reinflate the bottle by blowing hard through the tube or pulling its sides until it regains its shape. Then slide the rocket onto the guide tube until the plug touches the end of the tube.
1 Before loading, reinflate the bottle by pulling its sides 2 Slide the rocket onto the tube until the plug stops it 3 There should be a gap of about 2 cm above the brackets Check: The bottom edge of the rocket sits about 20 mm above the brackets.Count down and stamp
Count «3, 2, 1» out loud and stamp on the bottle hard and suddenly, with your foot flat in the middle. The rocket should shoot upwards 8 to 15 m.
1 Count «3, 2, 1» with your foot ready over the bottle 2 Stamp suddenly with your foot flat: the air fires the rocket Tip: A quick stamp works much better than a hard but slow one: what matters is how fast the air comes out.
Does it work? The test
Launch 3 times with the tube upright and time it from take-off until it hits the ground. Then tilt the launcher to 45° (prop up the base with a book) and measure the horizontal distance with the tape measure.
What should happen: With a 2 L bottle and a sharp stamp, the vertical flight lasts 2.5–3.5 s, which is equivalent to 8–15 m high (h ≈ 9.8 × t² / 8). Tilted at 45°, it lands 15–25 m away. If it does not get past 2–3 m, there is an air leak or the rocket is too loose.
If something goes wrong
- The rocket barely lifts 1–2 m — Air leak at a joint, or the rocket is loose on the tube. Solution: Cover the tip of the tube with your finger and stamp: find where it hisses and add duct tape. If the rocket wobbles on the tube, roll a new one without the spacer or with more turns.
- The rocket does not take off, it gets stuck — Body too tight or wrinkled by the paint. Solution: Roll another body with the spacer in place and decorate with felt-tip pen instead of poster paint. It should slide along the tube by itself.
- It corkscrews as it leaves or comes back sideways — Twisted fins or too little weight in the nose. Solution: Straighten the fins using guide F and add 1 g of modelling clay to the nose until the balance point is in the front half.
- The cone comes off in mid-air — Air gets through the plug and pushes the cone. Solution: Remake the plug with more modelling clay pressed in firmly and seal the tip with tape in a cross before fitting the cone.
- The hose comes out of the bottle when you stamp — Joint too loose. Solution: Add tape to the end of the hose until it fits tightly and cover the joint with 4–5 more turns.
- It flies less each time — The bottle is crumpled and does not regain its volume. Solution: Blow through the tube to reinflate it between launches or swap it for another bottle.
Safety
- Always launch outdoors, never towards people, animals, windows or cables. Nobody in front of the launcher or looking down into the tube.
- Whoever stamps on the bottle stays 1 m from the tube; everyone else stays behind the 2 m line.
- Do not put hard or metal tips on the rocket: the card and modelling clay nose is soft on purpose.
- If several children blow through the tube to reinflate the bottle, clean the mouthpiece with a tissue and alcohol between turns.
- Cutting the PVC and using the craft knife and hot glue are jobs for the adult.
The science behind it
For children
Air seems like nothing, but it takes up space. When you stamp on the bottle, you suddenly take its space away, and the squashed air looks for a way out. It only has one path: the hose and the tube. When it reaches the top, it finds the rocket blocking the exit and pushes it hard, like when you blow through a straw and the paper wrapper shoots off. The fins at the back act like the feathers on an arrow so it flies straight.
For the adult
When you stamp, the bottle's volume drops from ≈ 2 L to ≈ 1 L in about 0.1 s. The air cannot escape that quickly through the hose, so its pressure rises briefly (in the order of 0.2–0.5 bar above atmospheric). That pressure acts on the rocket's internal cross-section (Ø ≈ 16.5 mm, ≈ 2.1 cm²): F = p·A ≈ 4–10 N on a mass of ≈ 8 g, i.e. accelerations of hundreds of m/s² over the 16 cm of travel along the tube. The rocket leaves at 12–18 m/s and, ignoring air resistance, climbs about 8–15 m (h = v²/2g). The clearance between body and tube must be minimal: every leak reduces the effective pressure. Stability depends on the relative position of the centre of mass (moved forward by the modelling clay) and the aerodynamic centre of pressure (moved back by the fins): if the former is ahead of the latter, any deviation produces a torque that realigns the rocket with the airflow. Height from flight time: if it rises and falls freely, t_up = t/2 and h = g·t²/8 (this slightly overestimates, because drag shortens the descent).
- pressure: the force with which something pushes on each little bit of surface.
- compressed air: air squeezed into less space than it had; it pushes to get it back.
- airtight: closed so that no air or water can escape.
- centre of mass: the point where an object balances on a finger.
- stabiliser: a part (the fins) that keeps the rocket pointing forwards.
By age
- 5–7 years: The adult builds the whole launcher and rolls the body. The child decorates the paper, attaches the fins with the help of the guide and stamps on the bottle. Focus on «the air pushes».
- 8–10 years: They make the whole rocket and help with the launcher (taped joints, brackets). Let them find the air leak themselves by covering the tube and stamping.
- 11–12 years: Have them measure flight times, calculate heights and compare designs in a table. Challenge: mark the centre of mass and estimate the centre of pressure by cutting the rocket's silhouette out of cardboard and balancing it.
In a group or in class
One launcher for the whole class (or two, to avoid waiting) prepared by the adult before the session. Each child or pair makes their own rocket (1 sheet of paper, 1 piece of card, 3 g of modelling clay): 30 min in the classroom with the printed templates and the 16 mm tube as a former (have 3–4 pieces of tube for rolling). Then 30 min in the playground: queue behind the 2 m line, each child loads, counts down and stamps; one classmate times and another records. Have 2 spare bottles and duct tape.
Challenges
- Design a rocket that comes down by parachute (a 20 × 20 cm plastic bag folded inside a loose cone).
- Get the rocket to land inside a 1 m hoop placed 10 m away, adjusting only the launcher angle.
- Build a double launcher with a T-piece and two tubes: which rocket wins if they take off at the same time?
- Make a rocket 30 cm long: does it fly further or less far than the 20 cm one? Explain why.