Balloon rocket on a string
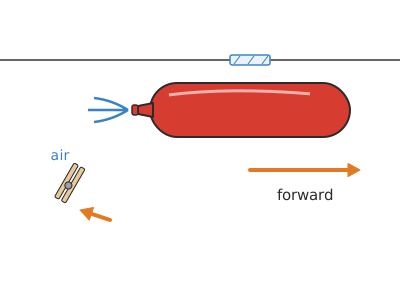
A long balloon taped under an 8 cm length of straw that runs along a 5 m smooth, taut string: when you let go of the neck, the air rushes out backwards and the balloon shoots forwards, covering the string in 2–3 seconds.
What they will learn
- Newton's third law: the balloon pushes the air backwards and the air pushes the balloon forwards.
- That the guide string stops the wild spinning of a loose balloon and turns all the thrust into forward motion.
- That friction (straw against string) and gravity (sloping string) slow the rocket down.
- To measure time and distance and work out the average speed (v = distance ÷ time).
- To run fair tests: always inflate the same amount (gauge) and change only one thing.
Prepare beforehand
- Print the gauges and the metre markers at 100 % and check the red 50 mm line in the header of each sheet.
- Find a corridor or a room with 5 m clear in a straight line and two firm anchor points at the same height (about 1–1.2 m).
- Blow up and let down each balloon once before the session: the latex softens and is easier to inflate afterwards.
- Have spare balloons: some will burst or lose their shape.
Materials and tools
- Long balloons — 3–5 buy
«long» or «sausage» balloons about 10 × 40 cm when inflated (not 5 cm modelling balloons, which are very hard to blow up) - Straw — 1–2
straight, plastic or paper, Ø 6–8 mm - Smooth string — 5 m (+ 1 m for the knots)
0.3–0.5 mm nylon fishing line or smooth kite string - Sticky tape — 1 roll
clear or masking tape, 19 mm - Clothes peg — 1
wooden or plastic, to close the neck while you tape - Two heavy chairs or two door handles — 2
about 4.5–5 m apart - Card — 1 A4 sheet
200–300 gsm, for the gauges and the distance markers
Tools
- Scissors — cutting the straw, the tape and the gauges
- Tape measure — measuring the track and the distance travelled
- Stopwatch (the one on a phone) — timing the run
- Balloon pump (optional) — inflating without getting tired and without sharing saliva
Pieces and templates
- A · Guide (length of straw) ×1 — straw Ø 6–8 mm
- B · Guide string ×1 — 0.3–0.5 mm fishing line
- C · «Full» gauge (Ø 110 mm) ×1 — card 200–300 gsm
- D · «Half» gauge (Ø 80 mm) ×1 — card 200–300 gsm
- E · Distance markers ×5 — card
Step by step
Cut the straw
Cut an 80 mm length of straw (A). If the straw is a bendy one, use the straight part.
1 Measure 80 mm from the straight end and mark the straw 2 Cut straight across at the mark with scissors 3 80 mm piece A, straight and not squashed Thread the string
Cut 6 m of fishing line (B) and push one end through the straw. Slide the straw to the middle of the line.
1 Cut 6 m of fishing line (B) 2 Push one end of the line through the straw 3 With the line sloping, the straw slides down on its own without catching Check: Hold the string at a slope: the straw should slide down on its own without catching.Tie the first end adult
Tie one end of the string to the back of a heavy chair (or to a door handle) 1–1.2 m above the floor, with two knots. This will be the start.
1 Tie the string to the chair back, 1–1.2 m above the floor 2 An adult wraps it once round the chair back and ties two knots in a row Tighten the track adult
Take the other end to the second chair, 4.5–5 m away, and tie it at the same height, pulling hard. Move the chair back a little to tighten it more if needed.
1 Take the string to the other chair and pull hard 2 Tie it at the same height; move the chair back if it needs tightening 3 In the middle the string sags 3–5 cm at most Check: In the middle the string should sag no more than 3–5 cm. If it sags more, the balloon slows down climbing the final slope.Mark the metres
Stick markers E on the floor under the string, one every metre from the start (1, 2, 3, 4 and 5 m).
1 Write 1, 2, 3, 4 and 5 m on the five E cards 2 Stick them on the floor under the string, one every metre from the start Blow up the balloon
Inflate a long balloon until it just fits through the 110 mm «full» gauge (C). Don't tie it: give the neck half a twist first, then close it with the clothes peg.
1 Inflate the long balloon (with a pump if it's hard) 2 Inflate until the thick part just fits through gauge C 3 Give the neck half a twist and close it with the peg Tip: If the children can't blow it up, use a balloon pump or have an adult inflate it.Tape the balloon under the straw
Move the straw to the start end. Place the balloon underneath, with its axis parallel to the string and the neck pointing towards the start. Stick on 2 strips of tape 12 cm long, across the balloon and 4 cm apart, wrapping over the straw and down the sides of the balloon.
1 Move the straw to the start and place the balloon underneath, parallel to the string 2 Stick on 2 strips of 12 cm across it, 4 cm apart 3 Look from behind: neck centred right under the string Check: Look from behind: the neck should be right under the string, in the centre, not twisted to one side.Countdown and release
One person holds the balloon, another gets the stopwatch ready. On three, take off the peg and let go of the balloon at the same time. Stop the stopwatch when it reaches the end or stops.
1 One holds the peg and another gets the stopwatch ready 2 Take off the peg: the air goes out backwards and the balloon goes forwards 3 Stop the stopwatch when it reaches the end or stops Check: The balloon should shoot off in a straight line without spinning round the string. If it spins, re-centre the neck.Measure and calculate
Write down the distance travelled (using the markers) and the time. Divide the distance by the time: if it travels 5 m in 2.5 s, the average speed is 2 m/s.
1 Write down the distance (using the markers) and the time 2 Divide the distance by the time: that's the average speed Repeat to compare
To reload, carefully peel off the tape on one side only, inflate again to the same gauge, close with the peg and stick it back down. Do 3 launches for each test and work out the average.
1 Carefully peel off one side of the strips only 2 Inflate again to the same gauge, close and stick back down 3 Do 3 launches per test and work out the average Tip: Put on fresh strips of tape every 2–3 launches; if they still don't stick well, change the balloon.
Does it work? The test
5 m track of fishing line pulled taut and level, long balloon inflated to the 110 mm gauge. Release from the 0 mark and time it.
What should happen: The balloon covers the 5 m in about 2–3 s (average speed 1.7–2.5 m/s) and reaches the end with some air still left. Inflated to the "medium" gauge (80 mm) it usually stops at 2–4 m. With rough wool yarn, it travels less than half the distance.
If something goes wrong
- The balloon spins round the string and ends up hanging — Balloon taped on top of the string or neck twisted. Solution: Tape the balloon under the straw with the neck centred right under the string.
- It stops halfway along the track — Rough string, slack string (uphill at the end) or balloon not inflated enough. Solution: Use fishing line, tighten it more and inflate to the «full» gauge.
- It swerves as it goes and hits the string — Balloon taped crooked in relation to the string. Solution: Line the balloon up parallel to the string before sticking on the strips.
- The balloon goes down before you release it — Neck not closed properly. Solution: Give the neck half a twist and close it with the clothes peg.
- The tape comes off the balloon — Balloon with dust or talc on it, or reused tape. Solution: Wipe the balloon with a dry cloth and use new strips every 2–3 launches.
- The balloon bursts while you inflate it — Over-inflation. Solution: Stop when it reaches the 110 mm gauge; long balloons burst at the end if forced.
Safety
- Balloons: choking hazard for children under 8 with uninflated balloons or pieces of burst balloons. An adult supervises them and picks up the pieces straight away.
- Check whether anyone in the group is allergic to latex; if so, use latex-free balloons.
- Make the string visible with coloured ribbons hanging from it: at neck height it is dangerous if someone runs across the room.
- Balloons are for individual use (each child has their own) or are inflated with a pump.
- Don't tie the string to doors that someone might suddenly open.
The science behind it
For children
The inflated balloon is squeezing the air inside, like when you squeeze a bottle of water. When you open the neck, the air shoots out backwards. And here's the magic: if the balloon pushes the air backwards, the air pushes the balloon forwards, just like when you're on roller skates and push against a wall: you roll backwards. The string is like a railway track: it doesn't let the balloon go crazy round the room and carries it straight to the finish.
For the adult
The stretched latex keeps the air inside at an overpressure of about 2–4 kPa. When the neck is opened, the air leaves through the cross-section of the neck (≈ 0.5 cm²) at high speed; the change in momentum of the air expelled backwards means, by conservation of momentum (Newton's third law), an equal and opposite force on the balloon: thrust ≈ 2·ΔP·A ≈ 0.2–0.4 N for 1–2 s. The balloon with the straw weighs ≈ 5 g plus the air, so the initial acceleration is very high and the speed is limited by aerodynamic drag (proportional to v²) and by the friction of the straw on the string. The guide string restricts the motion to one degree of freedom: without it, any misalignment between the line of thrust and the centre of mass produces a torque that makes the balloon spin chaotically. That is why the balloon should hang below the string (centre of mass underneath, a stable position) and the neck should be aligned. When the string is tilted, the component of the weight along the string (m·g·sin α) is subtracted from the thrust. A more inflated balloon carries more air at slightly higher pressure: more total impulse and a longer range. It is the same principle as real rockets, which do not «push against» the air but expel mass backwards.
- action and reaction: if you push something, that something pushes you back with the same force in the opposite direction.
- propulsion: moving forwards by pushing something out backwards (air, water, gases).
- friction: a force that slows things down when two things rub together (the straw and the string).
- average speed: the distance travelled divided by the time it takes.
- guide: a path (rail, string) that makes something move in a straight line.
By age
- 5–7 years: The adult ties the track and inflates. The child threads the straw, sticks on the strips and lets go. Focus on «the air goes backwards, the balloon goes forwards».
- 8–10 years: They set up the track in pairs, use the gauge and do the timing. They work out the speed with a calculator.
- 11–12 years: They make tables and graphs of distance against inflation and slope, and work out the average speed. Challenge: measure the mass of the balloon and estimate the thrust.
In a group or in class
Teams of 3 (inflater, launcher and timekeeper), with 2–3 parallel 5 m tracks 1 m apart in the gym or corridor for races. Per team: 3 balloons, 1 straw, 1 peg and tape. Beforehand: tighten the tracks and stick down the metre markers. 40-minute session: 5 min demonstration, 10 min setting up, 20 min races and experiments (each team tests one variable) and 5 min sharing results.
Challenges
- Win a race on two parallel strings against another team.
- Make a rocket that climbs a 2 m vertical string.
- Build a card fairing (nose cone and fins) weighing less than 3 g and see if it goes faster.
- Make the balloon come back: set up an out-and-back track with two balloons facing opposite ways.
- Work out the average speed of your best launch in km/h (multiply m/s by 3.6).