CD hovercraft
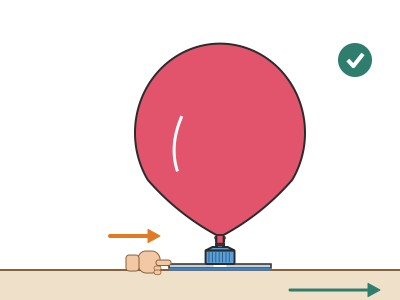
An old CD with a sports bottle cap glued to the centre and an inflated balloon on top: the air comes out under the disc, lifts it a fraction of a millimetre and lets it glide across the table with almost no friction for 5–15 seconds (20–40 with the restrictor patch).
What they will learn
- What friction is and how it slows down an object that is sliding.
- That a very thin layer of pressurised air can lift an object and almost get rid of friction: this is how hovercraft and air hockey work.
- That the stretched balloon pushes the air (pressure) and that through a small hole the air lasts longer.
- To measure distances and times to compare surfaces and balloon sizes.
Prepare beforehand
- Wash and dry the sports cap and check that the spout opens and closes properly and that, when closed, it does not let air through (blow from underneath).
- Clean the CD with a cloth: dust or grease stop the glue from sticking.
- Print centring guide A at 100 % and cut it out.
- Blow up and let down the balloon 2–3 times to stretch it: it will then be easier to inflate and fit.
- Find a test surface: a melamine table, glass or a smooth, clean floor at least 1.5 m long.
Materials and tools
- Old CD or DVD — 1
Ø 120 mm, 15 mm centre hole, flat and with no cracks - Sports bottle cap — 1
cap with an open-close (push-pull) spout from a water or sports drink bottle; base Ø 30–38 mm - Balloon — 2 (one spare)
party balloon, 25–30 cm in diameter when inflated (10–12 inches) - Glue sticks — 1
for a hot glue gun - Sticky tape — 1 piece, 3 × 3 cm
for the optional restrictor patch (piece B) - Paper — 1 sheet
to print centring guide A
Tools
- Hot glue gun — glue and seal the cap to the CD adult
- Scissors — cut out the centring guide (and the cap window) and the patch
- Permanent marker — mark the circle for the cap on the CD through the centring guide
- Awl or thick needle — make the 3 mm hole in the patch adult
- Tape measure — measure the distance travelled
Pieces and templates
- A · Cap centring guide ×1 — paper
- B · Restrictor patch (optional) ×1 — sticky tape or thin card
Step by step
Close the spout
Push the spout of the sports cap down until you hear a click: it is now closed. Blow from underneath the cap to check that no air gets through.
1 Push the spout down until you hear a click 2 Blow from below: with the spout closed no air should pass Prepare the CD
Clean the CD with a dry cloth and lay it with the printed side (the label side) facing up. Cut the circle for your cap (orange Ø 34 mm or grey Ø 38 mm) out of centring guide A, starting from the centre hole: this leaves a window. Put A on top of the CD with the edges lined up and trace round the edge of the window with a permanent marker. Remove the paper.
1 Clean the CD with a dry cloth 2 Cut the circle for your cap out of centring guide A 3 Put A on the CD and trace round the window with a marker Check: The CD has a circle marked round the hole, the same distance from the hole all the way round (about 9.5 mm with the Ø 34 one).Fit the patch (optional) adult
If you want long flights, the adult uses the awl to make a little 3 mm hole right in the centre of patch B. Then stick the patch over the centre hole of the CD, on the top, with the little hole in the centre, and press the edges down firmly.
1 The adult pierces the centre of patch B: a 3 mm hole 2 Stick the patch centred over the hole, on the top face 3 Press the edges down firmly: the little hole is in the centre Tip: Make the version without the patch first and then try it with one: that way you can compare.Glue on the cap adult
The adult runs a continuous bead of hot glue about 3 mm thick round the bottom edge of the cap (the open, threaded end) and lowers it onto the CD with its edge right on the circle marked with the marker. Press it down for 20 seconds.
1 The adult runs a continuous bead of glue round the cap's mouth 2 Lower it straight down right onto the marked circle 3 Press for 20 seconds: the glue forms a ring with no gaps Check: Look from the side: the glue forms a ring with no gaps between the cap and the CD.Seal the outside adult
Add a second thin bead of hot glue on the outside, along the join between the cap and the CD, all the way round. Leave it to cool for 10 minutes (30 min with neutral silicone sealant).
1 The adult runs another thin bead outside, all the way round 2 Leave it to cool for 10 minutes (30 with neutral sealant) 3 Check: upside down, cover the hole, blow, no air escapes Check: Blow through the open spout with the disc upside down, covering the hole with your finger: no air should come out at the join.Blow up the balloon
Blow up the balloon to about 20–25 cm across (not to the maximum: that way it is easier to handle). Twist the neck 2 turns and hold it with your fingers so the air does not escape.
1 Blow up the balloon to about 20–25 cm, not to the maximum 2 Twist the neck 2 turns and hold it with your fingers Fit the balloon
Do this in pairs. One person holds the disc and keeps the neck twisted so the air does not escape; the other stretches the mouth of the balloon with both hands and pulls it over the closed spout of the cap until it covers at least 1 cm. Now let go of the twist: the air is held in by the closed spout.
1 One holds the twist; the other stretches the balloon's mouth 2 Pull it over the closed spout: it must cover at least 1 cm 3 Let go of the twist: the closed spout holds the air in Tip: If the mouth of the balloon is hard to stretch, loosen it first by blowing it up and letting it down 2–3 times.Put it on the table
Put the hovercraft in the middle of a smooth, clean surface at least 1.5 m long. Hold the balloon at the top so that it stands upright.
1 Put it in the middle of a smooth table at least 1.5 m long 2 Hold the balloon at the top so that it stands upright Open the spout and push
Pull the spout upwards by gripping it through the base of the balloon (or by pinching the neck of the balloon and pulling). As soon as you hear the air coming out, give the disc a gentle push with one finger.
1 Pinch the balloon's neck and pull up: you hear the air 2 Give it a gentle push with one finger: it glides a long way Check: The disc glides straight and far, hardly slowing down, while the balloon goes down.Compare without air
When the balloon is empty, put the disc back on the start line and give it the same little push. Measure the distance it travels each time with the tape measure.
1 With the balloon empty, give it the same push from the start 2 Measure both distances with the tape measure and compare Check: Without air it stops within a few centimetres; with air it travels several times further.
Does it work? The test
On a smooth table, mark a start line. Push the disc with the same gentle tap (for example, by letting a pencil roll down a tilted book) with the balloon open and then with the balloon empty. Measure the distance and time how long it hovers.
What should happen: Without the patch: it hovers for 5–15 s and travels more than 1 m from a gentle tap; without air it stops within 5–15 cm. With the 3 mm patch: it hovers for 20–40 s, lower but just as free-moving.
If something goes wrong
- Air comes out but the disc does not hover — A leak between the cap and the CD, or a rough surface. Solution: Check the glue seal and go over it again; try on glass or melamine.
- The balloon deflates in less than 5 s — Too much airflow through the 15 mm hole (spout fully open or balloon not inflated enough). Solution: Fit patch B with its 3 mm hole, or open the spout only halfway.
- There is no way to fit the inflated balloon — New, stiff balloon or one that is too inflated. Solution: Stretch it by blowing it up 2–3 times beforehand, inflate it less and do it with two people.
- The disc tilts and rubs on one side — Off-centre cap or tilted balloon. Solution: Mark the circle on the CD with centring guide A and glue the cap exactly on the mark; hold the balloon upright when you let go. A smaller balloon tips over less.
- The cap comes unstuck — Superglue, or a dusty/greasy CD. Solution: Clean with alcohol and glue with hot glue or neutral silicone sealant.
- It always drifts to the same side — Table not level, or more air coming out on one side. Solution: Check that the table is flat (a marble should not roll on its own) and that the CD is not warped.
Safety
- Balloons: choking hazard for children under 8 if they put them in their mouths, or with pieces of burst balloon. Supervise and throw away broken pieces straight away.
- The hot glue gun burns (≈ 170 °C at the tip and in freshly applied glue): the adult uses it.
- If the CD is scratched or cracked, it can break and its edges cut: use an undamaged one.
- People with a latex allergy: use latex-free balloons.
The science behind it
For children
When you push a disc across the table, its tummy rubs against the table and that slows it down: that is friction. In our hovercraft, the balloon squeezes the air and pushes it down through the little hole. That air has nowhere to go, so it squeezes in between the disc and the table, lifting it up a tiny bit, so little that you cannot see it. Now the disc no longer touches the table: it rides on an invisible cushion of air, and that is why it glides such a long way from a gentle tap.
For the adult
The stretched balloon keeps the air at an overpressure of about 2–4 kPa. The whole assembly (CD 16 g + cap 4 g + balloon 3 g ≈ 23 g, weight ≈ 0.23 N) rests on an area of ≈ 110 cm² (Ø 120 mm minus the hole), so an average pressure of ≈ 20 Pa under the disc is enough to balance the weight: the disc rises until the gap with the table (tenths of a millimetre) lets the whole airflow escape at that pressure. As there is no solid-on-solid contact, dry friction (coefficient 0.2–0.4 for plastic on melamine) is replaced by the viscosity of air in a thin film, hundreds of times lower: the disc keeps almost all its speed (Newton's first law). How long it lasts depends on the airflow; the 3 mm patch reduces the opening area about 25 times compared with the 15 mm hole, makes the flight much longer and still leaves more than enough pressure to support the disc. On rough surfaces the air film escapes through the gaps and the pressure is not maintained. It is the same principle as air hockey, skirted hovercraft and the air bearings of precision machines.
- friction: a force that slows down two surfaces rubbing against each other.
- air cushion: a thin layer of pressurised air that separates the disc from the table.
- pressure: how hard the air pushes on each little bit of surface.
- hovercraft: a vehicle that moves along floating on a cushion of air.
- airflow: the amount of air that comes out each second.
By age
- 5–7 years: The adult glues the cap and fits the balloon; the child blows up the balloon (or helps), opens the spout and pushes. Game: «how far does it go with air and without air?», marking the spots with stickers.
- 8–10 years: They build it themselves except for the hot glue. Have them measure distances with and without air and try three surfaces.
- 11–12 years: Have them work out the pressure needed to lift the disc (weight / area) and design the patch that gives the longest flight while still hovering.
In a group or in class
Pairs, one disc per pair (ask families for old CDs and sports caps a week in advance). The adult glues all the caps with hot glue before the session or at a gluing station. 40-minute session: 10 min fitting the balloons, 20 min testing at 3 stations (smooth table, tiled floor, rough surface) and 10 min racing on a 2 m track made of tables pushed together. Have spare balloons (2 per pair).
Challenges
- Design a hovercraft that hovers for more than 60 seconds.
- Have a race: who goes furthest with a single push?
- Make a hovercraft from a Ø 22 cm plastic plate and two balloons: can it carry a 20 g load?
- Add a bent straw on one side so the air drives it along by itself, with no push (jet propulsion).