Paperclip suspended by a magnet
An L-shaped cardboard stand holds a neodymium magnet face down 20 cm above the base; a paperclip tied to the base with thread hangs in mid-air, 5–15 mm from the magnet, without touching it: the magnetic pull upwards and the tension of the thread downwards balance each other.
What they will learn
- That a magnet attracts steel from a distance, without touching it, and that this force grows enormously as it gets closer (a few millimetres change everything).
- What a balance of forces is: the paperclip stays still because the upward pull equals its weight plus the downward tension of the thread.
- That a magnetic field passes through paper, plastic, aluminium or wood, but is diverted or blocked by steel sheet (and by 1, 2 and 5 cent coins, which are copper-plated steel).
- How to adjust a measurement to the millimetre and measure the maximum gap with a ruler.
Prepare beforehand
- Print the templates at 100 % and check the red 50 mm line in the header with a ruler.
- Keep the neodymium magnet in its blister pack or stuck to a metal sheet until you need it; never in a pocket next to another magnet.
- Test the magnet first: bring it towards a paperclip lying on the table and measure the distance at which the paperclip jumps. If it jumps at less than 5 mm, the magnet is too weak for this project.
- Pre-cut the base and the post with a craft knife if the children are under 8.
- Have ready some strips of paper, aluminium foil, a 1 cent coin, a 10 cent coin and a tin lid for the experiments.
Materials and tools
- Neodymium magnet — 1 buy
disc Ø 15–20 mm × 5 mm, grade N35 or higher (attracts a paperclip from 15–25 mm) - Metal paperclip — 2–3
standard 28–33 mm steel paperclip (coloured plastic-coated ones also work) - Sewing thread — 1 piece, 30 cm long
thin cotton or polyester thread, dark-coloured so it shows up in photos - Thick corrugated cardboard — 1 sheet, 30 × 40 cm
single-wall, 3–4 mm (shipping box), flat and uncreased - Adhesive putty — 1 ball, 1 cm across
Blu-Tack or Pritt Multi-Tack type, to hold the thread adjustably - Sticky tape — 30 cm
clear or masking tape - PVA glue or glue sticks for a hot glue gun — a few drops / 1 stick
to glue the layers, post, arm and magnet
Tools
- Metal ruler and pencil — marking the pieces and measuring the gap
- Craft knife and cutting mat — cutting the thick cardboard adult
- Scissors — cutting out templates and thread
- Empty ballpoint pen — scoring the folds of the post
- Hot glue gun (optional) — quick gluing of the post and the magnet adult
Pieces and templates
- A · Base (2 layers) ×2 — corrugated cardboard 3–4 mm
- B · Triangular post ×1 — corrugated cardboard 3 mm
- C · Arm (2 layers) ×2 — corrugated cardboard 3 mm
- D · Post brackets ×2 — corrugated cardboard 3 mm
- E · Thread ×1 — sewing thread
Step by step
Test the magnet
Put a paperclip on the table and slowly lower the magnet towards it from above, with a ruler standing upright beside it. Note the height at which the paperclip jumps up to the magnet: with a Ø 20 × 5 mm neodymium magnet it usually jumps at 15–25 mm.
1 Slowly bring the magnet down over the paperclip, next to a ruler 2 Note the height at which the paperclip jumps: that's the range 3 If it jumps at less than 5 mm, find a stronger magnet Check: If it jumps at less than 5 mm, find a stronger magnet before carrying on.Tip: That number is your ‘range’: the paperclip will be able to float at slightly less than that distance.Cut and glue the base adult
Cut the two A pieces of 120 × 180 mm. Glue them one on top of the other with PVA glue, corrugations crossed, and put a few books on top for 10 minutes so they stay flat.
1 Cut two A pieces of 120 × 180 mm 2 Apply glue and stick the other A on top with the corrugations crossed 3 Put books on top for 10 minutes so it stays flat Check: Resting on the table, the base doesn't wobble at any corner.Fold the post
Cut piece B of 100 × 200 mm. Score the three folds (at 30, 60 and 90 mm) by running the empty ballpoint pen along the ruler, and fold them. Close a triangular prism by gluing the 10 mm tab inside face 1.
1 Cut B and mark folds at 30, 60 and 90 mm 2 Score each fold with the ruler and an empty ballpoint pen 3 Glue the tab inside face 1: a 30 mm triangle Check: Seen from above it is a triangle with 30 mm sides and it doesn't twist when you squeeze it.Glue the post to the base adult
Put PVA or hot glue on the bottom of the prism and stick it onto the triangular footprint on piece A, with face 1 facing the FRONT. Reinforce it with the two D brackets, one at the front and one at the back. At the back there are only 17 mm between the apex of the post and the edge of the base: before gluing it, trim the back bracket along the cutting line at 15 mm so it doesn't stick out.
1 Glue on the footprint and the prism on top, face 1 at the front 2 Reinforce with one D bracket at the front and one at the back 3 Check with a set square that the post is vertical Check: Using a set square, the post is vertical in both directions.Prepare the arm
Cut the two C pieces of 30 × 170 mm, glue them together along the 130 mm section (without gluing the flaps) and mark the fold at 130 mm. Fold both 40 mm flaps down at 90°.
1 Cut two C pieces and glue them only along the 130 mm section 2 Fold both 40 mm flaps down at 90° Fit the arm adult
Rest the section marked ‘on post’ on top of the prism, with the arm pointing forwards and the 104 mm line exactly above the front face. Glue that part with PVA or hot glue, open the two flaps into a V and glue each one onto a rear face of the post.
1 Lower the arm: the 104 mm mark over the front face 2 Glue the top section and the flaps onto the rear faces 3 The arm is horizontal: the marble doesn't roll Check: The arm is horizontal: a marble placed on it doesn't roll. The tip of the arm is 104 mm in front of the front face of the post (the centre of the magnet, 92 mm).Glue on the magnet adult
Put a drop of hot glue or glue on the cross marked under the tip of the arm (12 mm from the end) and stick the magnet on flat. Add a cross of tape over it so it can never fall off.
1 Put a drop of hot glue on the cross, 12 mm from the tip 2 Stick on the magnet and hold it with a cross of tape 3 From the base to the underside of the magnet: about 195 mm Check: Measure from the base to the underside of the magnet: about 195 mm.Tip: If it is a neodymium magnet, keep paperclips and scissors away while it dries: it attracts them and gets pulled off.Tie the thread to the paperclip
Cut 300 mm of thread and tie it to one of the end loops of the paperclip with two knots, one after the other. Trim the loose end 5 mm from the knot.
1 Cut 300 mm of sewing thread 2 Tie it to the paperclip's loop with two knots and trim the end to 5 mm 3 Hang it from the thread: the paperclip hangs vertically Check: Hang the paperclip from the thread: it should hang vertically, in line with the thread.Put the putty on the base
Roll a 1 cm ball of adhesive putty and press it flat onto the anchor cross on the base, directly under the magnet (45 mm from the front edge, centred).
1 Roll a 1 cm ball of putty and press it flat 2 Stick it on the cross: 45 mm from the front edge, centred 3 The putty sits directly under the magnet Check: Look from above: the putty is directly below the magnet. If not, the paperclip will float at an angle.Stick the paperclip to the magnet
Hold the free end of the thread and bring the paperclip up to the magnet until it sticks to it. Let the thread hang straight down to the putty.
1 Hold the end of the thread and raise the paperclip to the magnet 2 Let the thread hang straight down to the putty Adjust the gap
Tuck the thread under the putty and pull it down, millimetre by millimetre, until the paperclip comes away from the magnet and floats 3–5 mm below it. Press the putty with your finger to fix the thread.
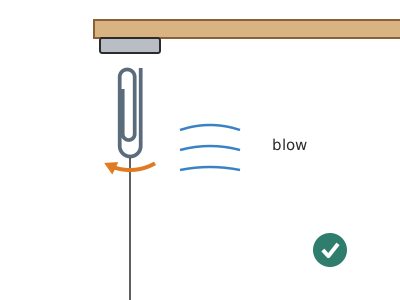
1 Tuck the thread under the putty and pull millimetre by millimetre 2 Stop when the paperclip comes away and floats at 3–5 mm 3 Blow gently: it swings but returns to its place Check: Blow gently: the paperclip swings but returns to its place without sticking or falling.Tip: If the paperclip falls when you pull, you've pulled too far: let out a little thread and bring it closer again.Find the maximum gap
Increase the gap 1 mm at a time until the paperclip falls. Go back to the last gap at which it floated and fix it for good with a piece of tape over the thread, next to the putty.
1 Increase the gap 1 mm at a time until the paperclip falls 2 Go back to the last gap that floated and fix the thread with tape 3 Measure the gap and write it down: usually 8 to 15 mm Check: Measure the gap with a ruler and write it down: with a Ø 20 mm N35 neodymium magnet, between 8 and 15 mm.Do the paper test
Slide a 3 cm wide strip of paper through the gap between the paperclip and the magnet, without touching either of them. Repeat with plastic, aluminium foil and a tin lid.
1 Slide a strip of paper through the gap without touching anything: it keeps floating 2 Plastic and aluminium don't break it; the steel lid does Check: With paper, plastic and aluminium the paperclip keeps floating; with the steel lid it falls.
Does it work? The test
With the gap adjusted, leave the stand undisturbed on the table for 5 minutes, then pass paper, aluminium, a 10 cent coin and a 1 cent coin through the gap.
What should happen: The paperclip floats still 8–15 mm from the magnet (Ø 20 × 5 mm neodymium) for hours. Paper, plastic, aluminium and the 10 cent coin don't affect it; the 1 cent coin and the tin lid (steel) divert the field and the paperclip falls or jumps towards them.
If something goes wrong
- The paperclip sticks to the magnet and there's no way to separate it with a gap — Gap too small: at 1–2 mm the pull is enormous. Solution: Pull the thread firmly until it is 5 mm away, then adjust upwards little by little, not the other way round.
- The paperclip falls as soon as you let go — Gap larger than the magnet's range, or a weak magnet (ferrite, fridge magnet). Solution: Shorten the gap by 2 mm or switch to a Ø 15–20 mm neodymium magnet.
- The paperclip floats at an angle and drifts towards the post — The putty isn't directly below the magnet or there is steel nearby (table screws, scissors). Solution: Move the putty until the thread is vertical and move metal objects away.
- The gap changes by itself over time — The arm sags or the thread slips under the putty. Solution: Use the two-layer arm with corrugations running lengthways and secure the thread with tape over the putty.
- The magnet comes off the arm — The magnet attracts the paperclip and tape alone gives way under the load. Solution: Glue it with hot glue or all-purpose glue and add the cross of tape.
- The paperclip turns and ends up sideways — The thread is tied to the middle of the paperclip. Solution: Tie it to one of the end loops so the paperclip hangs in line with the thread.
Safety
- Neodymium magnets pinch the skin hard if two snap together: handle them one at a time and never between your fingers.
- If a child swallows two magnets (or a magnet and a piece of steel), they attract each other inside the intestine and can perforate it: go to A&E immediately. Keep out of reach of children under 3.
- Keep the magnet more than 10 cm away from mobile phones, bank cards, mechanical watches and pacemakers.
- The craft knife is used by an adult with a metal ruler and cutting mat.
- Hot glue burns: the adult applies it, the child points to where it goes.
The science behind it
For children
The magnet has invisible arms that pull the paperclip upwards, even though it doesn't touch it. The thread is like a lead pulling downwards. When both pull equally hard, like two equally strong children playing tug of war, the paperclip stays still in the middle. Those invisible arms go through paper as if it weren't there, but a sheet of iron ‘eats’ them and the paperclip falls.
For the adult
The magnet creates a magnetic field that temporarily magnetises the steel of the paperclip (a ferromagnetic material): its domains line up and an opposite pole appears facing the magnet, hence the attraction. The force drops very quickly with distance (roughly with the 4th power of the distance for a dipole facing a soft material at distances greater than the size of the magnet), which is why a few millimetres make the difference between sticking and falling. At equilibrium, magnetic F = weight of the paperclip (≈ 0.5 g → 0.005 N) + tension of the thread. It is a stable equilibrium only thanks to the thread: if the paperclip rises, the pull increases, but the thread holds it back; if it drops, the pull decreases and so does the tension. Without the thread there is no stable static levitation with permanent magnets (Earnshaw's theorem). Non-ferromagnetic materials (paper, plastic, aluminium, copper, the ‘Nordic gold’ alloy of 10, 20 and 50 cent coins) are practically transparent to the field; steel (tin lids, 1, 2 and 5 cent coins, which are copper-coated steel) channels the field lines through itself and ‘shields’ the paperclip.
- magnetic field: the area around a magnet where its forces can be felt.
- ferromagnetic: a material, such as iron or steel, that a magnet attracts and that can be magnetised.
- equilibrium: a situation in which the forces cancel out and the object stays still.
- tension: the force with which a stretched thread or string pulls.
- shielding: blocking or diverting a field with a material that absorbs it.
By age
- 5–7 years: The adult builds the stand and glues on the magnet. The child ties the paperclip (with help on the knot), brings it up to the magnet and pulls the thread until it floats. Star game: passing scraps of paper through the gap ‘without breaking the magic’.
- 8–10 years: They build everything, with help only with the craft knife. Have them measure the maximum gap and make the materials table, with a prediction before each test.
- 11–12 years: Have them compare magnets, draw a graph of gap against number of paperclips and explain with a force diagram why the equilibrium is stable only thanks to the thread.
In a group or in class
Pairs, one stand per pair (≈ €1.50 for the magnet). Before the session: pre-cut bases, posts and arms, and have one magnet per pair in its blister pack. 45-minute session: 5 min demonstration, 20 min building, 20 min materials station (a box with paper, aluminium, coins, tin lids) and a maximum-gap contest. Collect and count the magnets at the end.
Challenges
- Make the paperclip float with the thread at a 30° angle by moving the putty forwards.
- Build a ‘floating paperclip chain’: three paperclips in a chain without touching the magnet.
- Make a paperclip float in the middle of a cardboard figure (a rocket, a balloon) using invisible fishing line.
- Find 5 objects at home that make the paperclip fall and 5 that don't, and explain what they have in common.