Electromagnet with a switch
A 10 cm iron nail wrapped with 100 turns of enamelled copper wire becomes a magnet when you press a cardboard push button connected to a 4.5 V battery: it picks up between 5 and 15 paperclips, and when you let go of the button the paperclips drop.
What they will learn
- That an electric current creates a magnetic field around it, and that winding the wire into coils concentrates it.
- That an iron core multiplies that field hundreds of times (the iron's magnetic domains line up).
- That the strength of an electromagnet depends on the turns and the current (ampere-turns) and can be measured by counting paperclips.
- That an electromagnet switches on and off, unlike a permanent magnet, and that steel can stay slightly magnetised.
- That a wire with no resistance draws a lot of current and gets hot: that is why we use a push button and short tests.
Prepare beforehand
- Check with a fridge magnet that the nail is steel: if the magnet does not stick, find another one.
- Print the templates at 100 % and check that base A measures 90 mm.
- Cut 3 m of wire per electromagnet and wind it onto a cardboard tube so it does not get tangled.
- Use a new flat battery: with a flat one the electromagnet barely picks up 1–2 paperclips.
- Put 30 loose paperclips (not hooked together) on a plate for the tests.
Materials and tools
- Enamelled copper wire — 3 m (4.5 m more if you also make the 50- and 150-turn coils for the experiment) buy
Ø 0.5 mm (AWG 24), reddish or clear enamel - Large steel nail — 1
100 mm × 4–5 mm, plain or galvanised (a fridge magnet sticks to it) - 4.5 V flat battery — 1 buy
3LR12 alkaline, with both contact strips - Small metal paperclips — 30
28–33 mm, not plastic-coated, all the same (≈ 0.5 g each) - Sticky tape — 40 cm
packing tape or electrical tape - Kitchen aluminium foil — 1 piece of 10 × 10 cm
for the push-button contacts - Corrugated cardboard — 1 piece of 20 × 15 cm
3 mm, from a delivery box - Fine sandpaper — 1 piece of 5 × 5 cm
150–240 grit - Fridge magnet — 1
only to check that the nail is steel
Tools
- Wire cutters or old scissors — cut the wire
- Ruler — measure the wire ends, the coil and the push-button pieces
- Scissors — cut the cardboard pieces and the foil
- Glue stick or PVA glue — glue the push-button layers together
- Felt-tip pen — mark the winding area on the nail
Pieces and templates
- A · Push-button base ×1 — corrugated cardboard 3 mm
- B · Push-button lever ×1 — corrugated cardboard 3 mm
- C · Spacers ×3 — corrugated cardboard 3 mm
- D · Foil contacts ×2 — aluminium foil folded into 4 layers
- E · Winding guide ×1 — paper
- F · Coil wire ×1 — enamelled copper wire Ø 0.5 mm
Step by step
Check the nail
Hold a fridge magnet near the 100 mm nail. If it sticks, the nail will work. Place the nail next to guide E and mark the winding area with a felt-tip pen: from 25 to 55 mm from the head.
1 Hold a magnet near the nail: if it sticks, it is steel and will work 2 Put guide E alongside and mark from 25 to 55 mm from the head 3 Check that you have two marks 30 mm apart Check: The magnet sticks firmly and you have two marks 30 mm apart.Fix the start of the wire
Leave 20 cm of wire free and tape that point to the nail next to the first mark with a small 2 cm piece of tape. That will be end 1.
1 Leave 20 cm of wire free next to the first mark 2 Tape that point to the nail with 2 cm of tape First layer of 50 turns
Wind the wire tightly, turn next to turn, always in the same direction, from the first mark to the second. Count out loud: you should get about 50 turns in the 30 mm.
1 Wind tightly, always in the same direction, towards the second mark 2 Draw a line on a piece of paper every 10 turns 3 Reach the second mark with about 50 turns Tip: Draw a line on a piece of paper every 10 turns so you do not lose count.Second layer of 50 turns
Without cutting or changing the winding direction, wind back over the first layer from the second mark to the first, another 50 turns. That way both ends finish on the same side.
1 Wind back over the top towards the first mark, in the same direction 2 Both ends come out on the same side, next to the head 3 Never change the winding direction halfway Check: All 100 turns go in the same direction: if you reverse the direction halfway, one layer cancels out the other.Secure the coil
Cut the wire leaving 20 cm for end 2. Wrap the coil with one turn of sticky tape so it does not unravel, leaving both ends sticking out.
1 Cut the wire leaving 20 cm for end 2 2 Wrap the coil with one turn of tape Sand the ends adult
Sand the last 2 cm of each end all the way round, twisting the wire between your fingers inside the folded sandpaper, until the copper shines and no reddish colour is left.
1 Sand the last 2 cm by twisting the wire inside the sandpaper 2 Both ends must shine all the way round Check: Scratch it with your fingernail: shiny copper leaves no trace of varnish.Cut out the push-button pieces
Cut out base A (90 × 60 mm), lever B (85 × 20 mm), the 3 spacers C (20 × 20 mm) and two 60 × 32 mm rectangles of foil. Fold each piece of foil twice to get the 30 × 16 mm contacts D.
1 Cut out base A, lever B and three spacers C 2 Fold each 60 × 32 mm piece of foil twice: you get D, 30 × 16 Fit the lower contact
Cut a 25 cm jumper of enamelled wire and sand 2 cm at each end. Slide one end under a contact D so that 1 cm of copper sits under the foil, and tape the contact onto its area of base A along the edges only, leaving the centre of the foil exposed.
1 Cut a 25 cm jumper and sand 2 cm at each end 2 Put 1 cm of copper under contact D, on its area of the base 3 Tape it along the edges only: the centre stays exposed Check: The copper is trapped between the foil and the cardboard, not loose.Fit the lever
Glue the 3 spacers C one on top of another at the left end of the base, between its two lines (5 mm from the edge). Place the second contact D under lever B (from 50 to 80 mm, its marked line) with end 1 of the coil underneath, just like before. Glue the «GLUE» area of the lever onto the spacers, with its end neatly lined up with the end of the spacers.
1 Glue the 3 spacers C one on top of another on the left of the base 2 Put the other D under lever B with end 1 underneath 3 Glue the GLUE area onto C: when pressed, the foils touch Check: Without pressing, the two pieces of foil sit one directly above the other, about 9 mm apart; when you press with a finger, they touch.Connect the battery adult
Wrap the other end of the jumper 3 times around the short strip (+) of the flat battery and hold it in place with tape. Wrap end 2 of the coil around the long strip (−) and secure it the same way. Now the circuit only closes when you press the button.
1 Wrap the jumper 3 times around the short strip (+) 2 Wrap end 2 around the long strip (−) and tape it 3 The circuit only closes when you press the button Pick up paperclips
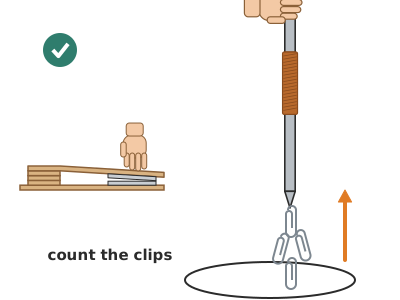
With one hand, hold the nail by its head and bring the tip close to the plate of paperclips. With the other, press the button and lift the nail slowly. Count the paperclips hanging from it.
1 Press the button and touch the paperclips with the tip of the nail 2 Lift the nail slowly and count the hanging paperclips Check: With the button pressed it picks up several paperclips; without pressing, it hardly attracts any.Let go and watch
With the paperclips hanging over the plate, let go of the button. The paperclips drop. If 1 or 2 stay stuck, that is the magnetism the steel keeps: give the nail a little tap with your finger.
1 Let go of the button: the paperclips drop onto the plate 2 If a paperclip stays stuck, give the nail a little tap Short tests
Do not keep the button pressed for more than 10 seconds at a time, and rest for 30 seconds between tests. Touch the battery and the coil every few tests: they should be no more than lukewarm.
1 Press for no more than 10 seconds at a time 2 Rest for 30 seconds between tests 3 Touch the battery every few tests: if it is hot, rest for 5 min Check: If the coil or the battery is hot, rest for 5 minutes before carrying on.
Does it work? The test
With a new flat battery, press the button, touch the plate of paperclips with the tip of the nail, lift it 10 cm and count the paperclips hanging from it. Repeat 3 times and work out the average.
What should happen: With 100 turns and 4.5 V it usually picks up between 5 and 15 paperclips (2–8 g), some hanging from others. When you let go of the button, almost all drop in less than 1 s; with a hard steel nail, 1–2 may stay stuck.
If something goes wrong
- It does not pick up any paperclips — No current is flowing: enamel not removed, copper loose under the foil or a flat battery. Solution: Sand the ends again, tighten the joints with more tape and try a new battery. Check that the two pieces of foil touch when you press.
- It picks up very few paperclips (1–2) — Too few turns, a 9 V or flat battery, or turns in opposite directions cancelling each other out. Solution: Use the 4.5 V flat battery, check that all the turns go in the same direction and add another layer of 50 turns.
- It attracts paperclips even when you are not pressing — The contacts touch on their own (the lever has drooped) or the nail has become magnetised. Solution: Add another spacer C. If the nail is magnetised, tap it against the table a couple of times or use a different nail.
- The battery and the coil get very hot — Circuit closed for too long: almost a short circuit of 2–4 A. Solution: Tests of 10 s at most and 30 s rests. If it still heats up quickly, add more turns (more wire = slightly more resistance).
- The paperclips do not drop when you let go — Remanence: the steel of the nail (especially if it is hard or is a screw) stays slightly magnetised. Solution: This is normal and can be studied. Try a softer soft-iron nail or tap the nail to demagnetise it.
- It works on and off — Loose contact on the battery strips or in the push button. Solution: Wrap the copper 3 times around the battery strip and press the contacts down with tape along the edges only.
Safety
- Never use mains electricity or car or mobile phone batteries: only small 1.5 to 9 V batteries (the recommended one is the 4.5 V flat battery; the 9 V one works worse and gets hot).
- Wire connected almost as a short circuit gets hot: press the button for 10 seconds at most, and take breaks. If anything feels hot to the touch, disconnect the battery.
- The wire ends and the tip of the nail are sharp: always point them downwards and keep the nail in a box.
- Paperclips and tacks are small parts: keep them out of reach of children under 3.
- When you finish, disconnect one wire from the battery so it does not run down or get hot inside a box.
The science behind it
For children
When electricity flows through a wire, an invisible, very weak magnetic force appears around the wire. If we wind the wire round many times, all those forces add up, like when lots of children pull on the same rope. The iron nail is full of tiny magnets all jumbled up; the coil makes them all face the same way and the nail becomes a strong magnet. When you let go of the button, the electricity stops, the tiny magnets get jumbled up again and the paperclips drop.
For the adult
A current I in a solenoid of N turns and length ℓ creates a field H = N·I/ℓ inside it (Ampère's law). With N = 100, ℓ = 30 mm and I ≈ 2–3 A, H ≈ 7–10 kA/m: in air that would be only ≈ 10 mT. The ferromagnetic steel core has a relative permeability of hundreds to thousands: its magnetic domains align with the field and the flux density in the core rises to 0.5–1.5 T, close to saturation. The force on the paperclips is proportional to B² and to the field gradient, which is why it is greatest at the tip. What matters is the product N·I (ampere-turns): doubling the turns or the current increases the force, until the iron saturates. The resistance of 2 m of 0.5 mm copper is only ≈ 0.17 Ω, so the current is limited by the battery's internal resistance (≈ 0.5–1 Ω in a flat battery; ≈ 2 Ω in a 9 V one, which also has little capacity): almost all the energy is dissipated as heat, hence the push button and the short tests. When the current is cut, the steel keeps a remanent magnetisation that depends on its magnetic hardness (coercivity): soft iron loses almost all of it; hard steels and hardened screws stay magnetised. Reversing the battery reverses the poles (right-hand rule).
- electromagnet: a magnet that works only while current flows through its coil.
- core: a piece of iron inside the coil that multiplies the magnetism.
- turn: each of the loops of wire.
- pole: each end of a magnet, where its force is strongest (north and south).
- remanence: magnetism that stays in the iron when current is no longer flowing.
By age
- 5–7 years: The adult winds or helps to wind, sands and connects. The child builds the push button with tape and foil, presses it and counts paperclips. Message: «I press = magnet; I let go = no magnet».
- 8–10 years: They wind the 100 turns counting out loud, build the push button and do the 50 versus 100 turns experiment. The adult checks the connections to the battery.
- 11–12 years: They make three coils, measure and draw the graph. Challenge: work out the ampere-turns assuming 2 A and explain why the 9 V battery works worse than the flat 4.5 V one.
In a group or in class
Pairs, one electromagnet per pair; flat batteries can be shared between two pairs. Beforehand: cut 3 m of wire per pair, check the nails with a magnet and pre-cut the push-button pieces. 50-minute session: 5 min demonstration, 25 min building, 20 min lifting contest with a shared table on the board (turns, battery, paperclips). Have 3–4 spare batteries and an adult checking that nobody leaves the button pressed.
Challenges
- Build a mini cardboard crane that picks paperclips up from a pile and drops them into a box 15 cm away.
- Manage to pick up 20 paperclips with the same battery by changing only the number of turns or the core.
- Make a horseshoe electromagnet (two coils on a bent bolt or on two nails joined at the head with a metal plate) and compare.
- Separate steel paperclips from copper staples or plastic buttons mixed together: your electromagnet as a scrap sorter.