Brushless battery-and-magnet motor
A heart of bare copper wire resting on the + terminal of an AA battery, with a neodymium magnet under the − terminal, spins on its own at several turns per second: the simplest electric motor there is.
What they will learn
- That an electric current inside a magnetic field feels a force (the Lorentz force), and that this is the basis of every motor.
- That the circuit must be closed: battery (+) → wire → magnet (conductor) → battery (−).
- That the direction of rotation depends on the direction of the current and on which way the magnet faces (turning the magnet over reverses the spin).
- That a short circuit lets a lot of current through and turns it into heat: that is why it gets hot and has to be done in short bursts.
- That balance and symmetry reduce friction and let a small force move a piece.
Prepare beforehand
- Check that the magnet is nickel-plated neodymium (shiny silver): that coating conducts electricity. Black or matt grey magnets (ferrite) do not conduct and will not work.
- Print template A at 100 % and glue it onto card. Check that the heart is 48 mm wide.
- Cut 30 cm of wire and straighten it by running it between your fingers. If it is enamelled, sand 1 cm at each end and 5 mm in the centre.
- Keep the magnet away from mobile phones, cards, watches and other magnets; if you have several, separate them with a piece of cardboard.
- Explain the safety rule beforehand: lift the heart off as soon as the battery gets warm, and never for more than 15 s at a time.
Materials and tools
- New alkaline AA battery — 1 (2 is better)
1.5 V, alkaline; NOT rechargeable NiMH or lithium (they give too much current and get hotter) - Neodymium disc magnet — 1 buy
Ø 18–20 mm × 3–5 mm, nickel-plated (shiny silver), N35 or higher - Bare copper wire — 30 cm (buy 1 m for trials) buy
Ø 0.8–1.2 mm, with no varnish or plastic coating - Card — 1 piece, 8 × 10 cm
for the bending template (A) - Fine sandpaper — 1 piece, 3 × 3 cm
180–240 grit, to clean the ends of the wire
Tools
- Needle-nose pliers — bend the heart and the supporting «V»
- Wire cutters — cut 30 cm of wire and trim the ends adult
- Felt-tip pen — mark the centre of the wire (15 cm)
- Stopwatch — time 10–15 s bursts and count turns
Pieces and templates
- A · Heart bending template ×1 — card
- B · Bare copper wire ×1 — copper wire Ø 1 mm
Step by step
Check the battery and the magnet
Use a new alkaline AA battery (1.5 V) and a silver neodymium magnet of Ø 18–20 mm. Bring the magnet towards the − terminal (the flat end) and let it jump and stick, centred, under the battery.
1 Use a new AA battery and a silver Ø 18–20 mm magnet 2 Bring the magnet to the − terminal, holding it firmly 3 The magnet must stick out 2–3 mm round the battery Check: The magnet sticks out 2–3 mm all the way round the battery. If it is narrower than the battery, it will not work.Tip: Hold the magnet firmly as you bring it closer: it jumps and can pinch you.Stand the battery up
Stand the battery upright on the table, resting on the magnet, with the + terminal (the little button) at the top. If the table has metal parts, put it on a piece of cardboard so the magnet does not slide.
1 Stand the battery on the magnet with the + at the top 2 On a table with metal, put it on a piece of cardboard Cut and mark the wire adult
Cut 30 cm of 1 mm bare copper wire and straighten it. Mark the centre, at 15 cm, with a felt-tip pen. If the wire is enamelled, sand 1 cm at each end and 5 mm in the centre well until it shines.
1 The adult cuts 30 cm of wire with the wire cutters 2 Mark the centre, at 15 cm, with a felt-tip pen 3 If enamelled, sand 1 cm at each end and 5 mm in the centre Make the support V
With the needle-nose pliers, grip the wire right on the centre mark and make a small downward point, about 3 mm deep. Then bring both arms up, close together: they start almost vertical from the point, like the brown line on template A. That point (the V) is the only thing that will touch the + terminal.
1 Grip the centre with the pliers and bring both arms up 2 Put the V on the red dot of template A Check: Put the V on the red dot of the template: the point faces down and the two arms rise together, almost vertical at first, following the start of the brown line.Bend the lobes
Following template A, curve each arm up and outwards to form the two lobes of the heart (their highest point is 22 mm above the V) and bring them down until they are vertical, 24 mm from the centre.
1 Curve both arms at once following the brown line 2 Lobes 22 mm above the V; arms vertical 24 mm from centre Tip: Bend both sides at the same time, one with each hand, comparing them: symmetry is the most important thing.Bend the sides and the ends adult
Take each side straight down 46 mm, parallel to the battery. When you reach the height of the magnet, curve the ends inwards until they are 11 mm from the centre (1 mm outside the edge of the magnet). The adult trims off whatever is left over at each end with the wire cutters.
1 Take the sides down 46 mm and curve the ends inwards 2 Trim what is left over at each end with the cutters 3 It must match the brown line and be the same on both sides Check: Put the heart on the template: it matches the brown line all the way along and both sides are the same.Check the balance
Rest the V on the point of a pencil held upright. The heart should hang straight, without leaning to one side. If it leans, close the side that drops a little or open the other one 1–2 mm.
1 If it leans, close the side that drops by 1–2 mm 2 On the pencil point, both ends at the same height Check: Balanced on the pencil, both ends are at the same height.Fit the heart
Rest the V in the centre of the battery's + terminal. The two lower ends must be at the height of the magnet, only just brushing its sides (if they press, they brake; if they do not touch, there is no circuit).
1 Lower the heart and rest the V in the centre of the + terminal 2 The ends only just brush the sides of the magnet 3 Look from above: centred, not touching the battery body Check: Look from above: the heart is centred and the ends do not touch the body of the battery.Let go and watch
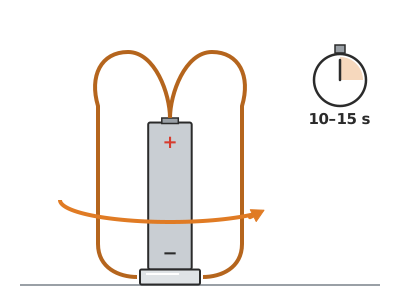
Let go of the heart gently. Within 1–2 seconds it will start spinning round the battery, faster and faster, up to several turns per second. Let it spin for 10–15 seconds at most and lift it off.
1 Let go of the heart gently 2 It spins faster and faster: lift it off after 10–15 s Tip: If it jerks instead of spinning, one end is touching more than the other: open it by 0.5 mm.Let it cool between bursts adult
After each 10–15 s burst, lift off the heart and wait 30 seconds. Touch the battery: if it is more than lukewarm, wait longer. That way the battery lasts much longer and nobody gets burnt.
1 Lift off the heart and wait 30 seconds 2 Touch the battery: if it is more than lukewarm, wait longer Reverse the spin
Take off the heart, pull the magnet away, turn it over and stick it back under the battery. Fit the heart again: now it spins the other way.
1 Pull the magnet off, turn it over and stick it back 2 When refitted, the heart spins the opposite way Check: Write down the direction (clockwise or anticlockwise) before and after.Store everything separately
When you finish, always separate the wire and the magnet from the battery. Keep the magnet in a small box, away from other magnets and small children, and the battery in its packaging.
1 Separate the wire and the magnet from the battery 2 Keep the magnet in a small box and the battery in its pack
Does it work? The test
With a new alkaline battery, a Ø 20 mm magnet and the heart from the template, let go of the wire and count the turns over 10 s.
What should happen: It starts within 1–2 s and reaches 3–10 turns per second. The battery feels lukewarm after 15–20 s. With the magnet turned over it spins the other way.
If something goes wrong
- It does not spin or even jerk — There is no circuit: varnished wire, a ferrite (black) magnet or the ends not touching the magnet. Solution: Sand the ends and the centre, use a nickel-plated neodymium magnet and move the ends in until they brush the magnet.
- It jerks and stops — The ends press too hard on the magnet or the heart is unbalanced. Solution: Open the ends 0.5–1 mm and check the balance on the point of a pencil.
- The heart falls off the battery — The V is not centred or is not V-shaped. Solution: Remake the V exactly in the centre of the wire, pointing down, and rest it in the centre of the + button.
- It spins very slowly — Flat or hot battery, or a weak magnet. Solution: Let it cool, change to a new battery or use a thicker magnet (5 mm).
- The ends stick to the magnet — The wire is not copper (it is copper-plated iron or steel). Solution: Test it with the magnet: real copper does not stick. Change the wire.
- The battery gets very hot straight away — Rechargeable or lithium battery, or ends making continuous, tight contact. Solution: Use an alkaline battery, ends that only brush, and 10 s bursts.
Safety
- The circuit is a short circuit: the battery and the wire get hot within 15–20 s. Bursts of 10–15 s with 30 s rests. Never leave it set up unattended or store it with the wire in place.
- Use only alkaline AA batteries. Never rechargeable or lithium batteries or 9 V batteries: they give more current and can get hot enough to burn or leak.
- Neodymium magnets pinch the skin and break into splinters if they crash into each other. Bring them together slowly and hold them firmly.
- If a child swallows two magnets (or a magnet and a piece of iron), they can join together through the intestine: this is a medical emergency. Keep magnets away from children under 6.
- Keep the magnet away from mobile phones, cards, watches, computers and pacemakers (at least 15 cm).
- The cut ends of the wire are sharp: bend them inwards or round them off with sandpaper.
The science behind it
For children
The battery pushes electricity through the copper wire, which goes down from the button at the top to the magnet at the bottom. The magnet is surrounded by an invisible force, the magnetic field. When electricity passes through the wire right next to the magnet, the magnet gives it a little sideways push, always in the same direction. Because the wire rests on a single point, like a spinning top, that push makes it spin round and round. If you turn the magnet over, the push goes the other way and the heart spins backwards.
For the adult
This is a homopolar (or Faraday) motor: it needs no commutator because the current never changes direction relative to the field. The current leaves the + terminal (1.5 V), runs down both arms of the wire, enters the nickel-plated magnet through its sides, crosses it radially towards the centre and returns to the − terminal. Next to the magnet, the magnetic field has strong axial and radial components (≈ 0.1–0.3 T at the edge of an N35 disc); on the sections of current that are not parallel to B the Lorentz force F = I·L × B acts, perpendicular to both, that is, tangentially: it produces a torque about the axis of the battery. Because the circuit has almost no resistance (24 cm of 1 mm wire ≈ 5 mΩ), the current is limited by the internal resistance of the alkaline battery (≈ 0.15–0.3 Ω): 2–5 A, dissipating 2–5 W as heat (which is why it gets hot and the battery runs down after a few minutes of total use). With I ≈ 3 A, B ≈ 0.2 T and ≈ 1 cm of effective length per side, F ≈ 6 mN, enough for a ≈ 2 g wire resting on a point with minimal friction. Symmetry matters because the V support is an unstable pivot: any imbalance increases friction at the ends. Turning the magnet over reverses B and with it the direction of the torque.
- magnetic field: the area around a magnet where its force acts.
- Lorentz force: the push that an electric current receives inside a magnetic field.
- closed circuit: an unbroken path along which electricity leaves the battery and comes back to it.
- short circuit: a circuit with nothing to hold back the current; a lot flows and it produces heat.
- pivot: the point of support on which a piece turns.
By age
- 5–7 years: Not recommended as their own build (neodymium magnet and heat). The adult builds it and the child watches and predicts which way it will spin when the magnet is turned over.
- 8–10 years: The adult cuts the wire and keeps an eye on the magnet (at 8, they also bend the heart); from 9, the child bends it on the template, balances it and tests it in 10 s bursts.
- 11–12 years: Independent build. Challenge: draw the path of the current and the direction of the force (left-hand rule) and design their own wire shape.
In a group or in class
Pairs, one kit per pair: 1 alkaline AA battery (+1 spare for every 4 pairs), 1 Ø 20 mm magnet, 30 cm of wire and the template. Before the session: cut the wire, sand it if enamelled and check the magnets. 50-minute session: 10 min demonstration and rules (10 s bursts, magnets kept apart), 30 min bending and adjusting, 10 min competition for the most turns in 10 s. Count the magnets as you collect them at the end.
Challenges
- Design a wire shape that spins at more than 10 turns per second.
- Make a figure (star, dancer, spiral) that keeps spinning steadily.
- Build two motors with the magnet facing different ways and make them spin in opposite directions at the same time.
- Look into the «homopolar train»: a battery with magnets on both ends inside a coil of bare wire.