Battery and magnet train
An AAA battery with a neodymium magnet on each end goes into a coil of bare copper wire and shoots out the other side: the magnets close the circuit through the turns of wire, the coil becomes an electromagnet right around the “train” and pushes it along.
What they will learn
- That an electric current flowing through a coil creates a magnetic field (it is an electromagnet).
- That the circuit closes through the magnets and only through the turns between them: the electromagnet “travels” with the train.
- That the direction of the poles decides everything: like poles facing outwards, the train moves forwards; one the wrong way round, it stays still; the train turned round, it goes backwards.
- To measure a speed (distance ÷ time) and to link the number of turns per centimetre to the force.
Prepare beforehand
- Check that the wire is bare: scratch it with your fingernail or sandpaper; if a reddish varnish comes off or the colour changes, it is enamelled and won't work.
- Print the spacing ruler and the channel at 100 % (check the red 50 mm line in the header).
- Mark the magnets before the session (step 5) and keep them apart on a strip of cardboard.
- Have a new AAA battery and a spare ready: with a flat battery the train barely moves.
- Wind a test coil yourself before doing it with the children, so you know the spacing that works with your wire.
Materials and tools
- Bare copper wire — 3 m (5 m is better) buy
Ø 0.8–1 mm (AWG 18–20), no varnish or enamel, clean and shiny - Neodymium magnets — 2 (or 4 if they are thin) buy
discs Ø 12–12.7 mm × 6–10 mm, N35 or higher, nickel-plated (they conduct electricity) - AAA alkaline battery — 1 (+1 spare)
1.5 V, new alkaline (Ø 10.5 × 44.5 mm). Do not use lithium or rechargeable batteries (they give even more current and get hotter) - AA battery (only as a former) — 1
Ø 14.5 mm: the coil is wound around it - Thin card or card — 1 strip of 25 × 6 cm
for the channel that keeps the coil straight - Green scouring pad or fine sandpaper — 1 piece
for cleaning the wire if it has gone dark - Sticky tape — 20 cm
to hold the ends of the coil to the channel
Tools
- Needle-nose pliers and wire cutters — cutting the wire and bending the ends adult
- Ruler — measuring the spacing of the turns and the length of the tunnel
- Stopwatch (mobile phone) — measuring the speed
- Permanent marker — marking the faces of the magnets
Pieces and templates
- A · Spacing ruler (2.5 mm per turn) ×1 — paper or card
- B · Coil support channel ×1 — card (200 gsm) or thin card
- C · Coil wire ×1 — bare copper wire Ø 0.8–1 mm
Step by step
Clean the wire
Unwind 3 m of bare copper wire and rub the scouring pad or sandpaper along it if it is dark. It should end up shiny, the colour of a new copper coin.
1 Unwind 3 m of bare copper wire 2 Rub along it with the scouring pad until it shines 3 Scratch one spot with your fingernail: no layer should come off Check: Scratch one spot with your fingernail: no layer of varnish should come off.Wind the coil
Hold 3 cm of wire against the AA battery (the former) with your thumb and wind the rest around it, each turn right next to the last, pulling so it stays tight. You'll get about 60 turns in 5–6 cm, more than the length of the battery (5 cm): when the turns reach the other end, slide the ones already made towards that side so they come off the battery, and carry on winding on the free part.
1 Hold 3 cm of wire against the AA battery with your thumb 2 Turn the battery and guide the wire, each turn next to the last 3 About 60 turns side by side take up about 6 cm Tip: Turn the battery with one hand and guide the wire with the other, as if you were winding thread onto a reel. A thick felt-tip pen of Ø 14–15 mm, longer than the battery, saves you having to slide the turns along.Remove the former adult
Slide the AA battery out of the coil, twisting it slightly the opposite way to the winding so it comes out without bending the turns out of shape. Trim both ends with pliers, leaving 1 cm straight.
1 Slide the battery out, twisting it against the winding 2 Trim both ends with pliers, leaving 1 cm straight 3 Look inside: a round tunnel about 16 mm across, not squashed Check: Look inside the tunnel: it is round, about 16 mm across, with no squashed turns.Stretch the turns
Gently pull both ends until the coil is about 15 cm long. Lay it next to spacing ruler A and adjust it with your fingers until there is one turn every 2.5 mm.
1 Gently pull both ends until it is about 15 cm long 2 One turn for each line on ruler A: 2.5 mm spacing 3 Against the light, you can see a gap between every two turns Check: Hold the coil up to the light: you can see a gap between every two turns. No turn touches its neighbour.Mark the magnets adult
Put the two magnets together (they will snap together on their own, forming a cylinder). With the marker, draw a dot on the two faces on the outside, top and bottom. Separate them by sliding them sideways, never by pulling.
1 Put the two magnets together and draw a dot on each outer face 2 Separate them by sliding them sideways, never by pulling Tip: The two faces with a dot are opposite poles: that way you'll know how to fit them in the next step.Assemble the train adult
Put one magnet on the + terminal of the AAA battery with the dot facing OUTWARDS. Put the other one on the − terminal with the dot facing INWARDS (touching the battery). They hold on by themselves to the steel of the battery: do not use glue.
1 On the + terminal, a magnet with the dot facing outwards 2 On the − terminal, the other magnet with the dot facing inwards 3 With a loose magnet, both ends attract (or repel) the same way Check: Bring the train close to a classmate's train or to a loose magnet: both ends of the train behave the same way (both attract or both repel the same magnet).Prepare the channel
Cut out piece B, score the two folds at 18 and 38 mm and fold it into a U. Put the stretched coil in the bottom of the channel and hold each end down with a small piece of tape.
1 Cut out B and score the folds at 18 and 38 mm 2 Fold both walls up: a U with a 20 mm base 3 Put the coil in the bottom and hold each end with tape Check: The coil lies straight, with no bends, and the channel sits flat on the table.Check the spacing
Without the new battery, fit the magnets onto a flat AAA battery (it holds the magnets and fits just like the new one) and pass it through the tunnel to check that the 57 mm assembly goes from end to end without catching on any turn. If you don't have a flat one, skip this test and watch the spacing on the first run.
1 Pass the magnets on a flat battery through the tunnel 2 It should come out the other side without catching 3 If it gets stuck, reshape the bent turn with your fingers Check: If it gets stuck, take the train out and squeeze the turn that is bulging inwards from the outside with two fingers until it is round again.First run adult
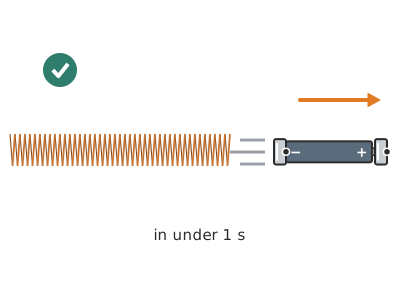
Put the train with the new battery into one end of the tunnel, pushing it with a wooden pencil until both magnets are inside the coil. Let go: it should shoot out of the other end in less than 1 second.
1 Push the train with a pencil until both magnets are inside 2 Let go: it shoots out of the other end 3 Does it come out backwards? Turn the whole train round Check: If it comes out backwards (the way it went in), turn the whole train round and try again through the same end.If it doesn't move adult
Take the train out and turn ONE of the two magnets round. If it still doesn't go, swap the battery for a new one and check again with the ruler that no turns are touching.
1 Take the train out and turn ONE of the two magnets round 2 If it still doesn't go, swap the battery for a new one 3 Check with ruler A that no turn touches another Tip: Direction is everything. With the two like poles facing outwards, the two forces add together.Always take the train out adult
After each trip, take the train out of the coil and separate one magnet from the battery. Let it cool for 1 minute after every 5 trips and touch the battery: if it is hot, wait.
1 Take the train out of the coil after each trip 2 Separate one magnet from the battery by sliding it sideways 3 Every 5 trips, let it cool for 1 minute and touch the battery
Does it work? The test
With a new AAA battery, time 5 trips through the 15 cm tunnel (from when you let go until it comes out) and work out the speed = 0.15 m ÷ time.
What should happen: The train crosses the 15 cm in 0.3–1 s (0.15–0.5 m/s) and is thrown a few centimetres out. If the turns are too close together or the battery is flat, it goes slowly or stops inside.
If something goes wrong
- The train goes in and stays still — The magnets are in the attracting position (different poles facing outwards): the two forces cancel out. Solution: Turn one of the magnets round. Check with the marked dot: one with the dot outwards and the other with the dot inwards.
- It comes out backwards — The direction of the push depends on which way the train is facing (the orientation of the magnets) and on the direction of the winding, not on which end it goes in. Solution: Turn the whole train round and put it back in through the same end (or, without turning it, put it in through the other end).
- Nothing happens whichever way round — Enamelled or oxidised wire, turns touching each other, or a flat battery. Solution: Sand a section: if varnish comes off, change the wire. Separate the turns with the spacing ruler and use a new battery.
- It gets stuck halfway through the tunnel — A squashed turn or a tunnel too narrow for the magnets. Solution: Take the train out and reshape the turn by squeezing it from the outside with two fingers; if the problem is all along, wind it again on a 15–16 mm former.
- It goes very slowly — Spacing too wide (few turns per cm) or weak magnets. Solution: Compress the coil to 2 mm spacing or use thicker magnets (Ø 12 × 10 mm).
- The battery gets very hot — It is short-circuited through the wire while the train is inside. Solution: Take the train out after each trip; rest between rounds; never leave the train sitting inside.
Safety
- Neodymium magnets: they pinch hard and shatter into splinters if they crash into each other. Separate them by sliding, not pulling. If a child swallows two, go to A&E immediately.
- The battery works as a short circuit (1–3 A) and heats up: never leave the train inside the coil, take it out after each trip and do not use lithium, rechargeable or 9 V batteries.
- The cut ends of the wire are sharp: bend them into a small hook with pliers and always point them away from your eyes.
- Keep the magnets away from mobile phones, bank cards, pacemakers and computers.
- Hot or swollen battery: remove it and take it to a battery recycling bin.
The science behind it
For children
When the train goes into the tunnel, the magnets touch the wire and electricity from the battery runs through the copper turns that are right between them. Those turns become an invisible magnet that pushes one magnet and pulls the other, both in the same direction. As the train moves, the bit of wire acting as a magnet moves with it: the train always carries its own push around it, like a surfer travelling with their wave.
For the adult
Nickel-plated neodymium magnets are conductors and, being wider than the battery, they are the only thing touching the coil. The current leaves the + terminal, passes through the front magnet, runs through the turns between the two magnets and returns through the rear magnet to the − terminal. That section of coil behaves like a short solenoid that generates an axial field B ≈ μ₀·n·I (with n ≈ 400 turns/m and I ≈ 2 A, about 1 mT). The magnets, with like poles facing outwards, sit at the ends of that solenoid, where the field is not uniform: one is repelled and the other attracted, and both forces point in the same direction. If one magnet is reversed, the forces oppose each other and cancel out. Since the active solenoid is always the section between the magnets, it moves with the train: the force is continuous. The resistance of the circuit is very low (a few tens of mΩ in the copper plus the battery's internal resistance, ≈ 0.3–0.5 Ω), so the battery works almost as a short circuit: it delivers 1–3 A and runs down in a few minutes. If the turns touch, the current takes the straight path and stops flowing round the turns. Although people often talk about “induction”, it isn't the key point here: the push is the force of an electromagnet on permanent magnets (although the motion does induce currents that slightly brake the train).
- solenoid: a long coil of wire that behaves like a magnet when current flows through it.
- electromagnet: a magnet that only works while electric current is flowing.
- pole: each of the two ends of a magnet (north and south).
- short circuit: a very easy path for the current: a lot flows, and the battery heats up and runs down quickly.
- conductor: a material electricity flows through easily, like copper or the nickel on the magnets.
By age
- 5–7 years: Not recommended except as a demonstration: the adult builds and assembles the train; the children release it into the tunnel and count how long it takes. Magnets always in the adult's hands.
- 8–10 years: They wind, stretch and prepare the channel; the adult fits the magnets onto the battery. Let them discover for themselves what happens when they turn a magnet or the whole train round.
- 11–12 years: They assemble everything under supervision, measure speeds, compare turn spacings and explain with a drawing why the circuit only goes through the turns between the magnets.
In a group or in class
Teams of 3, one train per team (≈ €3–4 in magnets and wire). Beforehand: cut the wire into 3 m lengths, mark the magnets and assemble the trains (only the adult handles them), print spacing rulers and channels. 50-minute session: 10 min demonstration, 20 min coils, 20 min timed races. Have 4–5 spare AAA batteries and a box for hot batteries.
Challenges
- Make a 50 cm tunnel with 10 m of wire and measure whether the train keeps its speed.
- Bend the long coil into a circle 30 cm across so the train goes round and round (it needs about 20 m).
- Design a very light card carriage that the train can push as it comes out.
- Build a station: a ramp at the tunnel exit that slows the train down without it falling off.