Coil and battery motor
A 15-turn coil of enamelled copper wire that spins by itself at hundreds of revolutions per minute above a neodymium magnet, powered by an AA battery through two paperclips. It is the simplest electric motor possible: the end of the wire itself, half sanded, acts as the switch.
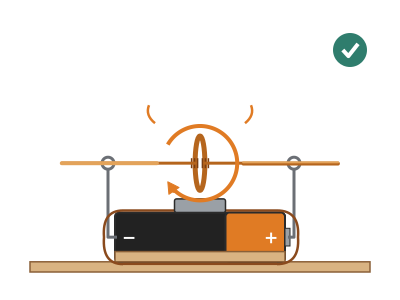
What they will learn
- That an electric current flowing through a wire inside a magnetic field feels a force (the Lorentz force), and that a coil behaves like a magnet.
- Why a motor needs a commutator: if the current is not cut off for half a turn, the coil stops still, pointing at the magnet.
- That turning the magnet (or the battery) over reverses the direction of rotation.
- That balance and friction matter as much as electricity in a real machine.
- That a short circuit drains and heats the battery, which is why it is only used in short bursts.
Prepare beforehand
- Print the templates at 100 % and check with the ruler that template C is 110 mm long.
- Check the paperclips are bare metal: rub one with sandpaper; if plastic comes off, they will not work.
- Have a new battery and a spare: with flat batteries the coil will not start.
- If the children are under 9, cut the wire (90 cm) yourself and bend the paperclips using the jig before the session.
- Have a mobile phone with slow motion to hand to count the turns in the test.
Materials and tools
- Enamelled copper wire — 90 cm (+ 2 m spare for the experiments) buy
Ø 0.5–0.6 mm (AWG 22–24), polyurethane enamel (reddish or clear) - Neodymium disc magnet — 1 (2–3 is better for the experiments) buy
Ø 12–20 mm × 3–5 mm, N35 or stronger - AA battery — 1 (plus a spare)
new 1.5 V alkaline - Large metal paperclips — 2
50 mm, galvanised steel, NOT plastic-coated - Rubber band — 1
office type, that goes lengthwise round the battery and stays tight (≈ Ø 40 mm unstretched) - Sticky tape — 20 cm
parcel tape or electrical tape - Fine sandpaper — 1 piece, 5 × 5 cm
150–240 grit - Corrugated cardboard — 1 piece, 10 × 7 cm
3 mm, from a delivery box - Black permanent marker — 1
fine tip
Tools
- Needle-nose pliers — bend the paperclips and straighten the ends of the coil adult
- Wire cutters or old scissors — cut the copper wire
- Ruler — measure the wire, the ends and the height
- Clothes peg or small ball of modelling clay — hold the coil upright while you sand the half end
- Scissors — cut the cardboard base and the templates
Pieces and templates
- A · Base ×1 — 3 mm corrugated cardboard
- B · Battery chocks ×2 — 3 mm corrugated cardboard
- C · Coil checking template ×1 — paper
- D · Jig for bending the paperclips ×1 — paper
- E · Coil wire ×1 — enamelled copper wire Ø 0.5–0.6 mm
Step by step
Make the base
Cut out base A (100 × 50 mm) and the two chocks B (50 × 8 mm). Glue each chock with PVA glue or double-sided tape just outside the marked lines, leaving a 15 mm channel between them.
1 Cut out base A and the two chocks B 2 Glue each chock outside its line: you get a 15 mm channel 3 The battery lies in the channel and does not roll when pushed Check: The AA battery fits in the channel lying down and does not roll when you push it sideways.Cut the wire
Measure and cut 90 cm of enamelled wire. Run it between two fingers a couple of times to straighten it without making any sharp bends.
1 Measure 90 cm of wire and cut it with the wire cutters 2 Run it between two fingers to straighten it, with no sharp bends Wind 15 turns
Leave 5 cm free at the start and wind the wire tightly round the AA battery, 15 turns in a row, each next to the last. You will have about 15 cm left over at the end.
1 Leave 5 cm free and hold it against the battery with your thumb 2 Wind tightly, each turn touching the one before 3 Count 15 turns: you have about 15 cm left at the end Tip: Hold the start against the battery with your thumb so it does not come loose while you wind.Take the coil off and tie it
Slide the coil off the battery. With the short end, wrap 3 tight turns round the bundle of wires and leave the end sticking straight out. Do the same with the long end on the exact opposite side of the coil.
1 Slide the coil off the battery without unwinding it 2 Wrap the end 3 times tightly round the bundle 3 Tie the other end exactly opposite: two ends in line Check: The coil does not come undone when you shake it, and the two ends stick out on opposite sides.Trim and line up the ends adult
Cut the two ends so each is 35 mm long from the edge of the coil. Lay the coil on template C and straighten the ends with the pliers until both lie on the centre line.
1 Cut each end 35 mm from the edge of the coil 2 On template C, straighten the ends onto the centre line 3 Spin it between two fingers: it turns like a wheel, no wobble Check: If you spin the coil holding the ends between two fingers, it turns like a wheel without wobbling.Sand one end all the way round
Sand one of the ends all the way round along its last 30 mm (from the mark to the tip), turning it between the folded sandpaper. It should be shiny copper colour, with no reddish traces left.
1 Check the last 30 mm you are going to sand on the template 2 Wrap it in sandpaper and turn it until the copper shows 3 It shines evenly all the way round, with no reddish traces Check: Look at the end in the light: it shines evenly all the way round.Sand half of the other end with the coil upright adult
Stand the coil upright (like a wheel), held with a clothes peg or modelling clay, with the ends horizontal. Sand ONLY the top half of the other end, along its last 30 mm, moving the sandpaper in one direction only. The bottom half must keep its enamel.
1 Stand the coil upright in modelling clay, ends horizontal 2 Sand only the top half, always in the same direction 3 Check: strip of copper on top and enamel underneath Check: Looking at the end from the side, you see a strip of copper on top and enamel underneath.Tip: If the sandpaper slips, sand the whole end and then colour the bottom half with permanent marker, with the coil in the same position: the ink insulates too.Bend the paperclips adult
Straighten each paperclip and bend it over jig D: a 16 mm foot, a 22 mm upright section (from the bend to the centre of the eye) and, at the top, a closed Ø 3 mm eye (wind it round a nail or the tip of a pencil).
1 Straighten the paperclip and bend it over the drawing on jig D 2 Wind the tip round a pencil to close the eye 3 Two identical paperclips: eyes at the same height Check: The two paperclips are identical: put them side by side and the eyes are at the same height.Fix the paperclips to the terminals
Rest the foot of one paperclip on the + terminal and the foot of the other on the − terminal: the bend right at the centre of the terminal and the foot lying flat, pointing backwards (both the same way), with the upright section and the eye pointing up. Put the rubber band lengthwise round the battery, over both feet, to press them against the metal, and reinforce with tape on the outside.
1 Rest a paperclip on each terminal, eyes pointing up 2 Put the band lengthwise over the feet and add tape on the outside 3 Metal on metal: tape never under the paperclip Check: The metal of the paperclip touches the metal of the terminal (the tape never goes underneath). Looking at the battery from above, the two upright sections are on the battery's centre line and the eyes face each other at the same height.Place the battery and the magnet
Put the battery in the channel on the base with the paperclips pointing up. Place the neodymium magnet on the middle of the battery: it will stick to the steel casing by itself.
1 Put the battery in the channel on the base, paperclips pointing up 2 Rest the magnet on the middle of the battery: it sticks by itself Adjust the height
Put the ends of the coil through the eyes. The coil should pass 1 to 3 mm above the magnet when you turn it by hand. If it rubs, raise the eyes a little; if it is more than 5 mm away, lower them or put a second magnet on top of the first.
1 Put both ends of the coil through the eyes 2 Turned by hand, the coil passes 1–3 mm above the magnet 3 Spin it with your finger: it makes 3 turns by itself without touching the magnet Check: Spin the coil with your finger: it makes at least 3 turns by itself without touching the magnet.Start the motor
Give the coil a gentle little push with your finger. If it does not keep spinning, push it the other way. Once it starts, it speeds up in 1–2 seconds and spins by itself.
1 Give the coil a gentle little push with your finger 2 In 1–2 s it speeds up and spins by itself; if not, push the other way Tip: If it only rocks back and forth, turn the half-sanded end 180° in the eye or sand it again with the coil upright (step 7).Fine-tuning adult
If the coil jumps out of the eyes or vibrates a lot, straighten the ends on template C and close the eyes slightly with the pliers. A well-balanced coil spins faster and more quietly.
1 If it jumps or vibrates, the ends are bent 2 Straighten the ends again on template C 3 Close the eyes slightly with the pliers so it does not jump Switch off when you finish
Take the coil out of the eyes after each test (1–2 minutes at a time at most). Touch the battery: if it is warm, let it rest for 5 minutes.
1 Take the coil out of the eyes after 1–2 minutes at most 2 Touch the battery: if it is warm, let it rest for 5 minutes Check: Without the coil no current flows and the battery stops heating up.
Does it work? The test
With a new battery, start the coil and film it for 10 seconds in slow motion on a mobile phone. First stick a small piece of coloured tape on the edge of the coil so you can count the turns.
What should happen: The coil spins by itself, continuously, usually at 5 to 20 turns per second (300–1200 rpm), always in the same direction. If you turn the magnet over, it spins the other way.
If something goes wrong
- Nothing happens, even with a push — No current: enamel not removed, plastic-coated paperclips or tape between the paperclip and the terminal. Solution: Sand the contact areas again, use bare metal paperclips and check the foot of the paperclip touches the terminal directly. Try a new battery.
- It rocks back and forth but does not go round — The half end was sanded with the coil lying flat: current flows when the coil is already facing the magnet. Solution: Turn the half-sanded end half a turn inside the eye or sand it again with the coil upright (sand it all and colour the other half with marker).
- It turns a few times and always stops in the same position — Unbalanced coil: the heavy side always ends up at the bottom. Solution: Straighten the ends on template C so they are on the same axis and pass through the centre of the coil; tighten any loose turns.
- The battery gets very hot — Both ends are sanded all the way round: there is a permanent short circuit. Solution: Remove the coil, let the battery cool and colour half of one end with permanent marker.
- The coil jumps out of the paperclips — Eyes too open or an off-centre coil that vibrates. Solution: Close the eyes to Ø 2–3 mm and balance the coil: straighten the ends over template C until both are on the same line, so that it spins without vibrating.
- It turns very slowly or struggles to start — Magnet too far away or weak, flat battery or friction in the eyes. Solution: Bring the coil to 1–2 mm from the magnet or stack 2 magnets; change the battery; clean the eyes with sandpaper.
Safety
- Neodymium magnets are dangerous if swallowed (they can join together through the intestine): keep them out of reach of children under 6 and pets; count the magnets when you put them away.
- Keep neodymium magnets away from mobile phones, cards, pacemakers and watches. Slide them apart to separate them: if they snap together they can pinch fingers or shatter into splinters.
- The circuit is almost a short circuit: the battery, paperclips and wire get hot. 1–2 minutes at a time at most, and remove the coil when you finish. Never use lithium coin cells or mobile phone batteries.
- The ends of the wire and the paperclips are sharp: cut them with pliers pointing at the table and wear glasses if you cut close to your face.
- Wash your hands after sanding off the enamel.
The science behind it
For children
When electricity runs through a coiled wire, the wire turns into a magnet, like an invisible wheel-shaped magnet. The magnet underneath pushes and pulls that wheel and makes it spin. But if the electricity stayed on all the time, the wheel would stop facing the magnet, like a compass pointing north. That is why we only sand half of one end: the electricity switches on for half a turn and off for the other half, and during that half turn the wheel keeps spinning by itself thanks to its push, like a swing you push only at just the right moment.
For the adult
A loop carrying a current I has a magnetic moment μ = N·I·A, perpendicular to its plane (here N = 15, A ≈ 2 cm²). In the magnet's field B (≈ 0.1–0.3 T at 2 mm from a neodymium disc) it experiences a torque τ = μ × B that tends to align μ with B, i.e. to leave the coil lying flat. The coil rotates about the axis formed by its ends, which lies in its plane; the torque is greatest when the coil is upright (μ horizontal) and zero when it is lying flat. If the current flowed all the time, the coil would oscillate about the equilibrium. The half-sanded end acts as a commutator: there is only contact during the half turn in which the torque pushes in the direction of rotation (centred on the vertical coil), and it is cut off for the other half, which the coil completes by inertia. That is why you have to sand with the coil upright: if it is sanded lying flat, the contact is centred on the equilibrium position and the torque averages out to zero. Commercial motors solve the same problem with a segmented commutator and brushes that reverse the current instead of cutting it off. The coil's resistance is small (90 cm of 0.5 mm copper ≈ 0.08 Ω), so the current is limited by the battery's internal resistance and the contacts: 2–4 A in the pulses, which heats the battery and drains it in minutes. Turning the magnet over reverses B and with it the direction of the torque.
- coil: wire wound into turns which, with current flowing, behaves like a magnet.
- enamel: a thin layer of varnish that insulates the wire so the current does not jump between turns.
- commutator: the part of the motor that cuts off or reverses the current at just the right moment in each turn.
- magnetic field: the area around a magnet where its forces can be felt.
- inertia: the tendency of a spinning object to keep spinning.
By age
- 5–7 years: Too delicate for them to do alone. The adult prepares the sanded coil and the paperclips; the child places the magnet, puts the coil in, starts it and tries turning the magnet over. Focus on “electricity turns the wire into a magnet”.
- 8–10 years: They make the coil, sand the full end and fit the paperclips using the jig. The adult supervises the half end and bending the eyes. Let them discover for themselves what happens if the coil is bent.
- 11–12 years: Complete assembly on their own. Challenge: measure turns per second with slow motion, make a table of coil turns against speed, and explain with a drawing why you have to sand with the coil upright.
In a group or in class
Pairs, one motor per pair (≈ €2 in wire and magnet per motor; the magnets can be reused). Beforehand: cut 90 cm of wire per pair, prepare 2 paperclips per pair and have 10 spare batteries. 60-minute session: 10 min demonstration with a motor that already works, 35 min building, 15 min testing and the reversed magnet experiment. Have a “repair station” with pliers, sandpaper and template C where an adult helps balance coils. Collect and count the magnets at the end.
Challenges
- Make a motor that works with the coil wound round a thick felt-tip pen (Ø 20 mm). Do you need more turns or fewer?
- Build a motor that spins for 1 minute non-stop without stopping or jumping.
- Stick a 2 × 1 cm paper flag on the coil: does it still spin? How much weight can it carry before it stops?
- Design a stand that lets the battery stand upright and the coil spin horizontally above the magnet.