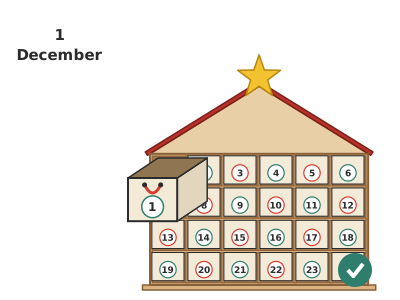
Advent calendar with 24 little drawers
A house-shaped cardboard cabinet, 29 × 30 cm, with 24 little drawers numbered 1 to 24 that open by pulling a loop. The frame goes together without glue by slotting shelves and dividers into each other through cross slots, and each drawer is a folded card tray that fits its compartment with about 2 mm of clearance. It takes 3 sessions and you fill it with small surprises for every day of December.
What they will learn
- What clearance is: a drawer has to be a little smaller than its compartment (here ≈ 2 mm) so it slides in and out without jamming or wobbling, and why the template is 3 mm smaller and not 2 (the thickness of the card counts too).
- How a halving joint works: two pieces with slots half their depth cross each other and end up flush, and a grid of crossings is much stiffer than separate pieces.
- Measuring and repeating accurately: 30 slots at fixed distances (every 48 mm and every 43 mm) and why a 1 mm error repeated 5 times already adds up to 5 mm.
- How a box comes out of a flat template: base, 4 walls, tabs and a reinforcement, with 9 folds.
- Numbers and the calendar: 24 = 4 × 6, how many days are left until Christmas and how to arrange the numbers in a grid.
Prepare beforehand
- Print the templates for drawer C, divider D, side L, roof R, star K and labels E at 100 % («actual size»), and check with the ruler that the 50 mm square measures 50 mm. Pieces F, M, B and Z are bigger than A4: draw them with a ruler following their dimensions.
- Find a large shipping box with flat, uncrushed cardboard and cut out its 2 large faces (≈ 50 × 40 cm). Look at the «Layout on 2 sheets» diagram to see where each piece goes.
- Measure the thickness of the cardboard with the ruler (3 or 4 mm): you will decide the slot width in step 1.
- Gather 12 A4 sheets of card or 6–7 empty cereal boxes, opened out flat.
- Plan the sessions: session 1, the frame (steps 1–9, ≈ 80 min); session 2, the first 12 drawers (steps 10–14, ≈ 70 min); session 3, the other 12, the numbers and the filling (steps 10–16, ≈ 70 min). If 1 December is getting close, you only need the frame and the first 6 drawers: the rest can be made in time, one or two each afternoon.
- For groups: cut all the cardboard pieces and their slots yourself beforehand, and make one master drawer template in card for every 2 children.
Materials and tools
- Corrugated cardboard — 2 sheets of ≈ 50 × 40 cm (or 4 pieces of 40 × 30 cm)
single-wall, 3 mm, flat and not crushed: the 2 large faces of a shipping box. The 16 pieces add up to ≈ 0.29 m² (see the layout diagram) - Card for the drawers — 12 A4 sheets (2 drawers per sheet) or 2 large sheets of 50 × 65 cm (12 per sheet)
200–250 gsm: folds cleanly and takes the pull of the loop - Yellow card — 1 piece of 14 × 7 cm
200 gsm, for the 2 stars K - White paper — 1 A4 sheet
to print the 24 number labels - Gift ribbon, wool or string — ≈ 2.5 m (24 pieces of 10 cm)
3–6 mm wide, leftovers from wrapping presents - PVA glue — ≈ 60 ml
school or wood glue: for the frame, the roof, the base and the drawer tabs - Glue stick — 1
to stick on the templates and the labels - Masking tape — ≈ 1.5 m
19–25 mm, to hold the joints while the glue dries - Felt-tip pens, coloured pencils or poster paint — a few
red, green and gold work well for Christmas - Small surprises — 24
that fit in 40 × 35 × 55 mm: a wrapped chocolate, a sticker, a note with a plan («today we choose dinner»), a jigsaw piece
Tools
- Craft knife with metal ruler and cutting mat — cutting the 16 cardboard pieces and the 30 slots adult
- 30 cm ruler and set square — drawing the large pieces and the slots square
- Pencil and rubber — drawing the pieces and the 24 drawer templates
- Scissors — cutting out the drawers, the stars and the labels
- Empty ballpoint pen — scoring the 9 folds of each drawer
- Awl or very sharp pencil — piercing the 2 pull holes of 3 mm in each drawer (over a rubber or modelling clay) adult
- Clothes pegs — holding the drawer tabs while the glue dries
Pieces and templates
- F · House-shaped back ×1 — corrugated cardboard 3 mm
- M · Top and bottom of the frame ×2 — corrugated cardboard 3 mm
- L · Side of the frame ×2 — corrugated cardboard 3 mm
- B · Shelf (with 5 slots) ×3 — corrugated cardboard 3 mm
- D · Divider (with 3 slots) ×5 — corrugated cardboard 3 mm
- R · Roof (2 slopes) ×2 — corrugated cardboard 3 mm
- Z · Base ×1 — corrugated cardboard 3 mm
- K · Star on top ×2 — yellow card 200 gsm
- C · Drawer (template for 24) ×24 — card 200–250 gsm
- E · Number labels ×1 — paper
Step by step
Measure the cardboard and decide the slots
Hold the ruler against the edge of the sheet and measure its thickness. If it is 3 mm, the slots will be 4 mm (1 mm of play). If it is 4 mm, make the slots 5 mm, cut the sides L to 167 mm and trim 1 mm off each end of the shelves B and the dividers D.
1 Measure the cardboard thickness at the edge, in 3 places 2 Choose the slot width: 1 mm more than the cardboard Check: You have written on a piece of paper: cardboard thickness, slot width and whether any piece needs shortening.Tip: Measure in 3 different places: cardboard gets squashed at the edges and measures less there.Draw the pieces on the 2 sheets
Follow the «Layout on 2 sheets» diagram. On sheet 1 draw the back F (291 × 265 mm with the 90 mm gable), the 2 pieces M of 291 × 60 mm, the 5 dividers D and 1 side L. On sheet 2, the base Z of 311 × 140 mm, the 3 shelves B of 284 × 60 mm, the 2 roof pieces R of 175 × 66 mm and the other side L. Use the set square at every corner.
1 Draw the back F with a ruler and set square 2 Follow the layout: each piece in its place on the sheet Check: Measure the diagonals of the back F (rectangular part): if both are the same (≈ 340 mm), it is square.Tip: For the divider D you can stick on its printed template with a glue stick; the large pieces are drawn with a ruler, always measuring from the same corner.Cut the 16 cardboard pieces adult
With the craft knife and the metal ruler, cut along the drawn lines in 2 or 3 gentle passes, without pressing hard on the first. Cut the 16 pieces: F, 2 M, 2 L, 3 B, 5 D, 2 R and Z. The gable of F is cut as two straight lines that meet at the top, 145.5 mm from each side.
1 Cut 60 mm strips with a craft knife and metal ruler 2 Also cut the roof R and the base Z: 16 pieces in total Check: The 3 shelves stacked on top of each other match: same length (284 mm) and same width (60 mm).Tip: First cut the 60 mm strips in one long pass and then cut them into pieces: they all come out the same width.Mark the 30 slots
On each shelf B mark 5 slots of 4 × 31 mm coming in from the back edge, with their centres at 46, 94, 142, 190 and 238 mm from the left end. On each divider D mark 3 slots of 4 × 31 mm coming in from the front edge, with their centres at 41, 84 and 127 mm from the top. Measure everything from the same end, not from one slot to the next.
1 On each shelf, measure the 5 slots from the left end 2 On each divider, 3 slots from the front edge Check: The middle slot of each shelf is exactly in the centre (142 mm from each end).Tip: Write «FRONT» in pencil on the edge without slots of each shelf: that way you won't get confused when assembling.Cut the slots adult
For each slot, make the 2 long 31 mm cuts from the edge with the craft knife, guided by the ruler. Then cut across the 4 mm end and remove the little piece. Cut the first shelf carefully and use it as a template to mark the other two on top.
1 Make the 2 long 31 mm cuts and then the end 2 Push the little piece out with the tip of the pencil 3 Use the first shelf as a template to mark the others Check: Each slot is 31 mm long and lets the edge of another piece of cardboard through without forcing.Tip: If the little piece won't come out, push it out from the edge with the tip of the pencil: don't pull it or you will tear off the paper layer.Test a crossing
Take a shelf B and a divider D. Cross the two slots: the divider's facing up and the shelf's facing down, and push all the way in. They should form a cross, with the front edges flush.
1 Take a shelf and a divider and find their slots 2 Slot them all the way in: the edges end up flush Check: Run your finger along the front edge: there is no step between the shelf and the divider.Tip: If it is very tight, run a pencil through the slot to open it a little. If it is quite loose, don't worry: the frame will hold it.Glue the frame onto the back
Lay the back F flat with the lines facing up. Run a line of glue along the edge of each frame piece and glue them on edge onto F: the top M under the gable, the bottom M at the bottom and the 2 sides L between them, also glued to M at their ends. Hold each corner from the outside with masking tape.
1 Lay the back F flat and put glue where the frame goes 2 Glue the frame on edge and hold the corners with tape Check: The inside of the frame measures 285 mm wide and 169 mm high, and the 4 corners are right angles.Tip: Put a shelf and a divider inside, unglued, while the glue dries: they act as a set square and the opening ends up exactly the right size.Assemble the grid of 24 compartments
With the frame lying flat, stand the 5 dividers D on the back, slots facing up, following the lines on F. Then lower the 3 shelves B from above, slots facing down, slotting each one into the 5 dividers at once. Push until they touch the back.
1 Stand the 5 dividers on their lines 2 Lower each shelf with the slots facing down 3 Now you have 24 equal compartments of 45 × 40 mm Check: You can see 4 rows of 6 equal compartments, about 45 × 40 mm. Put a finger in each compartment: it reaches the back, at 60 mm.Tip: Slot in the middle shelf first: it holds the dividers upright and the other two go in easily.Add the roof, the star and the base
Glue the 2 roof pieces R onto the sloping sides of the gable with glue and masking tape, so they also rest on the top M. Glue the 2 stars K back to back with the card strip in between and glue the strip to the ridge. Glue the cabinet onto the back strip of the base Z, 10 mm from each side. Leave to dry for 30 minutes.
1 Glue the 2 roof pieces onto the sloping sides 2 Glue the 2 stars with the strip in between and glue it on top 3 Glue the cabinet at the back of the base and leave to dry for 30 minutes Check: The cabinet stands upright on the base and doesn't rock if you push the tip of the roof.Tip: This is the end of session 1. If you want to paint the cabinet, do it now with thick poster paint and little water: it will dry while you make the drawers.Make the master template and draw the drawers
Stick the printed template for drawer C onto card with a glue stick and cut it out: this is the master template. Place it on the card or the cereal-box card (printed side up) and draw round it in pencil. 2 fit on an A4 sheet if you turn it, and 2 on each large face of a cereal box. Draw 12 per session.
1 Stick the printed template onto card and cut it out 2 Draw round the master template: 2 per box face Check: Each outline measures 116 × 167 mm, the same as the template.Tip: Prick the 4 ends of each fold line on the master template with the pencil: that way you can mark them on each drawer.Cut out the drawers and score the folds
Cut out each drawer with scissors along the pencil line, including the 4 corner tabs. Hold the ruler along each fold line and go over it firmly with the empty ballpoint pen: there are 9 folds (4 for the base, 4 for the tabs and 1 for the reinforcement).
1 Cut out the drawer along the line, with the 4 tabs 2 Go over each fold with the empty ballpoint pen and the ruler Check: When you fold, each fold comes out straight and without creases.Tip: If 2 or 3 of you are working, make a production line: one cuts out, another scores the folds and another glues. It takes half the time.Fold and glue the drawer
Raise the 4 walls towards the scored side. Fold the 4 tabs inwards, put glue on them and stick them to the inside of the sides. Fold the reinforcement inwards over the front, put glue on it and press it down. Hold with 2 clothes pegs for 2 minutes.
1 Put glue on the 4 tabs and on the reinforcement 2 Raise the walls, glue the tabs and reinforcement, and hold with pegs 3 Straight walls and closed corners: it measures ≈ 43 mm wide Check: The drawer has 4 straight 37 mm walls and closed corners. It measures ≈ 43 mm wide on the outside.Tip: Use only a little glue: one drop spread with your finger. If you use a lot, the card goes wavy and the drawer gets fatter.Test the drawer in its compartment
Put the first drawer into a compartment with the front facing you and push it all the way in; then pull it out. It should go in and out without forcing and sit 2 mm back from the edge of the frame. Also try the corner compartments, which are the tightest.
1 Put the drawer into a compartment and push it all the way in 2 A 1 cent coin fits on edge in the top gap Check: There is a gap of about 2 mm in width and height: a 1 cent coin fits on edge in the gap.Tip: If it rubs, run your finger over the tabs to flatten them and check there is no excess glue. If it still rubs, trim 1 mm off the sides of the master template.Add the pull adult
Pierce the 2 holes marked on the front, 6 mm from the top edge, through the front and the reinforcement. Thread a 10 cm piece of ribbon through the 2 holes from the outside in and tie a knot at each end, on the inside. A loop of ≈ 2 cm is left on the outside.
1 Pierce the 2 holes in the front, over a rubber 2 Thread the ribbon through the holes and tie a knot at each end 3 Pull the loop: the drawer comes out in one piece Check: Pull the loop: the drawer comes out in one piece and the front doesn't tear.Tip: Pierce over a rubber or a ball of modelling clay so you don't scratch the table. An 8-year-old can do it with a sharp pencil.Add the numbers
Colour the 24 labels E, cut them out and stick one on each front with a glue stick, below the loop. Decide the order: in rows from 1 to 24 (easier for the little ones) or mixed up (more fun to search). Draw a plan on a piece of paper with the position of each number.
1 Colour the 24 labels and cut them out 2 Stick each number on the front, below the loop 3 Decide the order and write it down on a plan Check: You have 24 drawers with numbers from 1 to 24, with none repeated or missing.Tip: If you mix them up, make sure no two consecutive numbers are next to each other: it is a good grid challenge.Fill and place the drawers adult
An adult puts a small surprise in each drawer (one that fits in 40 × 35 × 55 mm and weighs less than 30 g) and puts them in their compartments following the plan. Put the calendar on a table or a shelf, away from radiators. Every day in December, open the drawer with that day's number.
1 An adult puts a small surprise in each drawer 2 Each day, open the drawer with that day's number Check: The 24 drawers are in place, all the fronts are at the same depth and the calendar doesn't tilt when you open a top one.Tip: If the children built it, the adult fills the drawers at night: that way the surprise is still a surprise.
Does it work? The test
With all 24 drawers full, open and close 5 drawers in the top row, 5 in the bottom row and the 4 corner ones by pulling the loop with one hand, without holding the cabinet.
What should happen: Each drawer comes out with a gentle pull and goes back in when pushed with one finger, without catching. The cabinet doesn't move when you open the top drawers thanks to the base (it is estimated that you would need to pull with more than 3 N to tip it over, and pulling out a full drawer takes less than 0.2 N).
If something goes wrong
- The shelves won't go into the dividers — Narrow slots (cardboard thicker than expected) or a slot in the wrong place. Solution: Widen the slots by running the edge of a pencil through them or trimming 0.5 mm off each side. If a slot is out of place, compare it with the shelf you cut first and cut it again 1–2 mm to the side.
- A drawer won't go in or gets stuck halfway — The drawer has got fatter because of the glue or the tabs, or that compartment has ended up narrow because a divider is crooked. Solution: Flatten the tabs and let them dry well. If the compartment is the narrow one, straighten the divider by pushing it back to its line on F and put a drop of glue on its back edge.
- The drawers wobble and twist when you open them — Too much clearance: the drawer is small or the cardboard is 3 mm and the template was printed scaled down. Solution: Check that the 50 mm ruler on the template measures 50 mm. If the compartments are large, glue a 10 × 50 mm strip of card under the drawer: it raises it 0.4 mm and guides it.
- The drawer front tears when you pull the loop — The reinforcement wasn't glued or the holes are too close to the edge. Solution: Glue the reinforcement and pierce the holes 6 mm from the edge, through both layers. If it has already torn, glue a 30 × 20 mm square of card on the inside and pierce again.
- The cabinet tips forward when you open a top drawer — The base is missing, or the cabinet is glued to the front edge of the base instead of the back. Solution: Glue the cabinet on the back strip of the base Z, so that it sticks out 77 mm at the front. You can also hang it on a nail through the hole in the gable.
- The frame isn't rectangular (it looks like a diamond) — The frame glue dried with the frame out of square. Solution: Before it dries, measure the 2 diagonals of the opening: they should be equal (≈ 331 mm). Push the corner of the long diagonal until they match. With the grid inside, the frame stays straight on its own.
- The cereal-box drawers look ugly on the outside — The grey side of the card is facing out. Solution: Only the front is visible: cover it with wrapping paper or coloured card of 43 × 38 mm before sticking on the label.
Safety
- Only an adult uses the craft knife, with a metal ruler and cutting mat, always cutting away from the hand that holds the piece. There are lots of cuts in session 1: take breaks.
- The awl is also used by an adult (or an older child under supervision, with a sharp pencil and over a rubber).
- If there are children under 3 at home, don't put in small surprises that could be swallowed (beads, toy parts, coins) and put away the pieces of ribbon.
- If you put in food, make sure it is wrapped, and check the allergies of whoever will open the drawers (nuts, milk).
- Don't put candles or naked flames nearby: it is all cardboard and paper. If you want to light it up, use a battery-powered LED string light.
The science behind it
For children
A drawer has to be a tiny bit smaller than its compartment, like your foot in a shoe: if the shoe is exactly as big as your foot, it won't go on; if it is much, much bigger, it comes off when you walk. That spare space is called clearance, and in our calendar it is 2 millimetres, the thickness of a coin. The shelves and dividers cross like when you interlace the fingers of both hands: each one has a cut halfway and so they hug each other and can't bend. That is why the grid holds without a single drop of glue. And 24 drawers are 4 rows of 6: one for each day from 1 December to Christmas Eve.
For the adult
Clearance and tolerances. The nominal compartment is 45 × 40 mm (a pitch of 48 mm between dividers and 43 mm between shelves, minus 3 mm of cardboard). The drawer is drawn with a 42 × 58 mm base and 37 mm walls, measured at the fold lines; 200–250 gsm card is 0.3–0.4 mm thick and each fold adds roughly its thickness, so on the outside it ends up ≈ 42.8 × 37.6 mm. Nominal clearance: ≈ 2.2 mm in width and ≈ 2.4 mm in height. The deviations have to be added up: a 4 mm slot with 3 mm cardboard gives the divider ±0.5 mm of play, and marking each slot with an error of ±0.5 mm adds the same again; in the worst case the compartment drops to ≈ 44 mm and the drawer still goes in with ≈ 1.2 mm. That is why all dimensions are measured from the same end (baseline dimensioning): if you measure from one slot to the next, the errors add up and with 5 slots of ±0.5 mm the last one can be 2.5 mm out (tolerance stack-up). With 4 mm cardboard the compartment drops to 44 × 39 mm and the clearance to ≈ 1.2–1.4 mm: it still works, just tighter. Halving joint: each piece has 31 mm slots, a little more than half the 60 mm depth (31 + 31 = 62 > 60), so they go all the way in and the edges end up flush. Stiffness: a 3 × 60 mm cardboard plate is about 400 times stiffer in bending on edge than lying flat, because the moment of inertia grows with the cube of the depth (I = b·h³/12: on edge, 3 · 60³ / 12 = 54,000 mm⁴; flat, 60 · 3³ / 12 = 135 mm⁴). On its own, a shelf tips over or buckles towards its weak side; in the grid, each crossing braces it sideways every 48 mm, so the free span that could buckle is short and the load always acts on edge. The 4-piece frame on its own is a mechanism: it can deform into a parallelogram by rotating at the corners. The glued back acts as a shear diaphragm (the same role as a plywood panel on the back of a bookcase) and makes it rigid; equal diagonals (≈ 331 mm in the 285 × 169 opening) confirm that it is rectangular. Tipping: the full cabinet weighs about 0.5 kg (≈ 0.25 kg of cardboard and card and 24 surprises of ≈ 10 g), with its centre of gravity ≈ 32 mm from the front. When you pull a drawer in the top row (≈ 155 mm high) it pivots about the front edge of its support: without the base ≈ 4.9 N × 0.032 m / 0.155 m ≈ 1 N would be enough; with the base, which moves the support 77 mm forward, it takes ≈ 4.9 × 0.109 / 0.155 ≈ 3.4 N (estimates). Pulling out a full drawer only has to overcome friction: with 15–30 g and a card–cardboard coefficient of ≈ 0.3–0.5, between 0.05 and 0.15 N. Material: the 16 cardboard pieces add up to ≈ 0.29 m², which come out of 2 sheets of 50 × 40 cm (0.40 m², ≈ 72 % used); each drawer takes up a 116 × 167 mm rectangle (0.019 m²) and 2 fit on an A4 sheet turned (2 × 116 = 232 mm ≤ 297 and 167 ≤ 210), so 24 drawers = 12 sheets. Calendar: Advent is the 4 weeks before Christmas and begins on the fourth Sunday before 25 December (between 27 November and 3 December); 24-door calendars, popular in Germany since the early 20th century, simplify this by counting from 1 to 24 December. 24 has 8 divisors (1, 2, 3, 4, 6, 8, 12, 24), which is why it allows grids of 4 × 6, 3 × 8 or 2 × 12.
- clearance: space left between a piece and its opening so it goes in and out without jamming.
- tolerance: how far a measurement can be out without the piece stopping working.
- halving joint: a joint between two pieces that cross each other, each with a cut half its width.
- stiffness: how hard it is to bend or deform something; a plate on edge is much stiffer than lying flat.
- template: an actual-size drawing that you trace to make lots of identical pieces.
- Advent: the four weeks before Christmas; the calendar counts the days from 1 to 24 December.
By age
- 5–7 years: The adult draws and cuts all the cardboard pieces and the slots, and prepares the master template. The child assembles the grid (they love seeing the shelves slot together), draws round the template, cuts along straight lines, folds and glues with help, colours the numbers and puts them in order from 1 to 24. Make 4–6 drawers each afternoon.
- 8–10 years: They do all the steps except the craft-knife cuts and, if they are young, the pull holes. Let them measure and mark the slots themselves with the ruler from the same end, check the clearance with a coin and do the experiment with the 3 test drawers.
- 11–12 years: Let them work out the measurements: the pitch between slots, the clearance and how many sheets of card are needed. Challenge: redesign the calendar as 3 × 8 or in the shape of a tree (rows of 1, 2, 3, 4, 6 and 8), recalculating the pieces, or make a big drawer for the 24th.
In a group or in class
In a class of 20–25, one calendar for the whole group (each child makes their own drawer and number) or one per team of 4–5 children (5–6 drawers per child). Beforehand: the adult cuts all the cardboard pieces and their slots and prepares 1 master drawer template per pair; print 12 A4 sheets of drawers per calendar if the printer takes card (it saves drawing them). Session 1 (50 min): demonstration of the halving joint, assembly of the grid and the roof in teams. Session 2 (50 min): drawers on a production line (draw, cut out, score, glue) and a clearance test of each drawer in its compartment. Session 3 (40 min): pulls, numbers and a draw for the order. Families fill the drawers at home, or the teacher puts a card with a challenge or a riddle for the day in each one.
Challenges
- Design a double drawer for the 24th: it takes up 2 compartments in a row. Work out its width (2 compartments + 1 divider − clearance) and remove the part of the divider that is in the way.
- Make the tree version: 6 rows of 1, 2, 3, 4, 6 and 8 drawers (24 in total). Work out the length of each shelf and where its slots go.
- Light up the little house: stick a battery-powered LED string light behind the roof, with the battery holder hidden inside an empty drawer.
- Turn the calendar into a storage unit for the rest of the year: keep paperclips, rubber bands, buttons or Lego pieces sorted by colour in the drawers.
- Measure the clearance of the 24 compartments with a calliper or with coins and draw a map: which are the tightest? Do they match the dividers that ended up crooked?