Coloured water thermometer
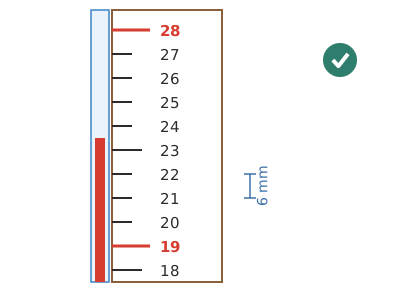
A small bottle filled to the brim with water, alcohol and food colouring, with a straw coming out through the cap: as it warms up, the liquid expands and rises up the straw by about 6 mm per degree. With a scale calibrated at two points you can read the temperature to within ±1–2 °C.
What they will learn
- That liquids expand when they warm up and contract when they cool down, and that some (alcohol) expand much more than others (water).
- That a narrow tube «amplifies» a tiny change in volume (0.14 ml per degree) until it becomes visible millimetres.
- How to calibrate an instrument with two reference points and a simple proportion (linear scale).
- That a thermometer takes time to «reach the temperature» and that in the sun it measures its own heating, not the air's.
Prepare beforehand
- Print scale B at 100 % and check with a ruler that there are 150 mm from the 0 mark to the 150 mark.
- Remove the label from the bottle (warm water) so you can see the liquid clearly.
- Leave the water and the alcohol in the same room for 1 hour so they are at room temperature.
- Make the hole in the cap before the session if the children are young.
- Find a spot in the shade and away from radiators to leave the thermometer.
Materials and tools
- Small plastic bottle with a screw cap — 1
330 ml (water or fizzy drink), smooth and clear, standard 28–30 mm cap - Clear straw — 1 (+1 spare)
straight, outer Ø 6 mm (inner ≈ 5.5 mm), at least 210 mm long - First-aid alcohol — 165 ml
96° ethyl or 70 % isopropyl (from the chemist's) - Tap water — 165 ml + 2 l for the calibration bath
at room temperature - Food colouring — 4–5 drops
red or blue, liquid - Modelling clay — 1 ball of Ø 20 mm
soft, not dried out - Paper and card for the scale — 1 A4 sheet + 1 strip of card 30 × 170 mm
printer paper; thin cereal-box card - Clear sticky tape — 30 cm
to fix the scale to the straw - Reference thermometer — 1
any one from home: room, kitchen or digital fever thermometer (the last one measures water between 32 and 42 °C)
Tools
- Awl or 3 mm nail — make the first hole in the centre of the cap adult
- Pointed scissors — widen the hole by twisting them up to 6 mm and cut out the scale adult
- Funnel and measuring jug — measure 165 + 165 ml and fill the bottle
- Dropper or needle-free syringe — adjust the liquid level in the straw
- 3–5 l pan or bowl — water bath for calibrating
- Ruler — measure heights on the straw
- Glue stick — glue paper scale B onto card support A
Pieces and templates
- A · Scale support ×1 — thin card (cereal box)
- B · Millimetre scale ×1 — paper
- C · Cap hole centring guide ×1 — paper
- D · Straw ×1 — clear straw Ø 6 mm
Step by step
Mark the centre of the cap
Cut out centring guide C, put it on top of the cap and mark the centre with a felt-tip pen. Also check that the straw is at least 210 mm long and draw a line 60 mm from one end.
1 Put circle C on the cap and mark the centre 2 Draw a line on the straw 60 mm from one end Make a hole in the cap adult
Rest the cap on a board and pierce it at the mark with an awl or a 3 mm nail. Push in the point of some scissors and twist them until the hole is 6 mm across: the straw must go in tightly, with no play.
1 Pierce the centre with a 3 mm awl on a board 2 Twist the scissor point until the hole is 6 mm 3 Check the straw doesn't fall out with the cap upside down Check: Hold the cap upside down with the straw in it: the straw must not fall out.Tip: Try the straw every half turn: it is better for it to fit tightly than loosely.Push the straw through and seal it
Push the straw through the hole from outside up to the 60 mm line (that part stays inside the bottle). Wrap a Ø 20 mm ring of modelling clay round the straw and press it firmly against the cap and the straw.
1 Push the straw in from above until the line touches the cap 2 Wrap clay round the straw and press it against the cap 3 Blow with the bottom blocked: no air should leak through the clay Check: Blow gently through the straw while blocking the bottom end with your finger: no air should come out through the clay.Prepare the liquid adult
In a jug, mix 165 ml of water and 165 ml of first-aid alcohol. Add 4–5 drops of food colouring and stir. The mixture should be a strong colour so you can see it clearly inside the straw.
1 Mix 165 ml of water and 165 ml of alcohol in the jug 2 Add 4–5 drops of food colouring and stir 3 It should be a strong colour; keep it away from any flame Tip: Do it in a well-ventilated place away from flames: alcohol is flammable.Fill the bottle to the brim
Using the funnel, fill the 330 ml bottle until the liquid touches the rim of the neck. Tap the bottle gently with your finger so the bubbles rise and top it up to the brim again.
1 Fill the bottle using the funnel 2 Tap it so the bubbles rise, then top it up 3 The liquid should form a small dome at the neck Check: Looking from the side, the liquid should form a small «dome» at the neck.Screw the cap on slowly
Put on the cap with the straw and screw it on very slowly over a plate. The excess liquid rises up the straw. Tighten the cap fully; if the liquid starts to overflow at the top, stop, take a little out with the dropper and carry on.
1 Screw on the cap very slowly over a plate 2 The excess liquid rises up the straw 3 If a bubble is left under the cap, top up and repeat Check: There must be no air bubble under the cap (look from below). If there is one, unscrew, top up and repeat.Set the starting level
With the liquid at room temperature, leave the level about 50–60 mm above the cap. If it is higher, take liquid out of the top of the straw with the dropper; if it is lower, add drops through the straw.
1 If it is too high, take liquid out of the top with the dropper 2 Leave the level between 50 and 60 mm above the cap Tip: At 50–60 mm you will have room to measure from ≈ 10 °C up to ≈ 35 °C with the 150 mm of straw.Fit the scale
Glue scale B onto card support A with a glue stick, with the bottom edge of B (the 0) exactly on the fold of A. Fold the 10 mm tab backwards, put it on the cap behind the straw and fix the strip to the straw with two pieces of tape (at the top and halfway up).
1 Glue scale B onto A with the 0 on the fold 2 Fold the 10 mm tab backwards 3 Put the tab on the cap and fix the strip with two bits of tape Check: The 0 of the scale (the fold) must be exactly level with the top edge of the cap, with no gap.First calibration point: the room
Leave the thermometer in the shade for 45 minutes, next to a household thermometer, without touching the bottle. Mark the height of the liquid on the scale with a line and write the temperature from the reference thermometer next to it (for example, 19 °C).
1 Leave it 45 min in the shade next to the household thermometer 2 Draw a line at the liquid level and write the temperature 3 To read it, hold it by the cap, never by the bottle Tip: Don't grip the bottle to read it: the warmth of your hand and the squeeze make the liquid rise. Hold it by the cap.Second point: the warm bath
Fill a pan with water 8–10 °C warmer than the room (about 28–30 °C, lukewarm to the touch). Put the bottle in up to the shoulder, wait 20 minutes, stirring now and then, and measure the water with the reference thermometer. Mark the new height and write that temperature.
1 Fill a pan with water 8–10 °C warmer than the room 2 Put the bottle in up to the shoulder and wait 20 minutes 3 Mark the new height and write the water temperature Check: The liquid should have risen about 5–7 mm for every degree of difference. If it rose less than 2 mm per degree, there is air inside or the mixture has too little alcohol.Share out the degrees
Measure the distance between the two marks with the ruler and divide it by the temperature difference: that gives you the millimetres per degree (≈ 6). Draw a line for each degree between the marks and carry on with the same spacing upwards and downwards.
1 Measure the distance between the marks and divide by the degrees 2 Draw a line every 6 mm and number each degree Tip: Example: 19 °C at 54 mm and 28 °C at 108 mm → 54 mm / 9 °C = 6 mm per degree.Check your thermometer
The next day, leave your thermometer and the reference one together somewhere else in the house for 45 minutes and compare the two readings. If they differ by more than 2 °C, repeat the calibration.
1 The next day, leave them together 45 min somewhere else 2 Compare the readings: if they differ by over 2 °C, recalibrate
Does it work? The test
Place the calibrated thermometer next to a reference one in a room, in the shade, and read it every 30 minutes for a morning. Then take it to a cooler place (hallway, shady balcony) and wait 45 minutes.
What should happen: The readings match the reference thermometer to within ±1–2 °C. A 3 °C change in the room moves the liquid about 18 mm. If you hold the bottle in your hand for 1 minute, the liquid rises several millimetres (and falls when you let go).
If something goes wrong
- The liquid doesn't rise up the straw when you screw on the cap — The bottle wasn't filled to the brim or air is escaping through the modelling clay. Solution: Top it up until it forms a dome at the neck and press the clay firmly against the cap and the straw again.
- The level goes up and down a lot when you touch the bottle — There is an air bubble inside (air expands 15 times more than the liquid) or you are squeezing the bottle. Solution: Unscrew, top up to the brim with no bubbles and read the bottle without touching it.
- It hardly moves with heat — Water only (it expands almost the same as the bottle) or a very wide straw. Solution: Use the 1:1 mixture with alcohol and a straw of Ø 6 mm or thinner.
- The level slowly drops over several days — The alcohol evaporates through the open end of the straw. Solution: Cover the end of the straw with a small piece of cling film pricked with a pin (it lets air through but slows evaporation).
- The liquid overflows at the top — Starting level too high or the thermometer has been left in the sun. Solution: Take out 1–2 ml with the dropper and calibrate again. Don't leave it in direct sunlight.
- The liquid disappears inside the cap — It is colder than the lowest temperature on the scale. Solution: Add drops through the straw to raise the level and recalibrate, or use the thermometer indoors only.
Safety
- Alcohol is flammable: an adult should mix it, away from flames, candles and lit hobs. Keep the thermometer away from radiators and heaters.
- Alcohol is poisonous if swallowed: label the bottle «DO NOT DRINK» and keep it out of reach of young children.
- Only an adult uses the awl or the nail, with the cap resting on a board, never held in the hand.
- When you have finished, pour the mixture down the drain with plenty of water; don't reuse it for drinking or cooking.
- If you use the thermometer outdoors in winter, the alcohol mixture doesn't freeze until ≈ −20 °C, but water on its own does: at 0 °C it can burst the bottle.
The science behind it
For children
When something warms up, its tiny particles move faster and push against each other, so they need a little more room. The liquid in the bottle grows a tiny bit when it warms up, but as the bottle is full, the only free space is the straw: the liquid climbs up it. When it cools down, the particles calm down, take up less room and the liquid goes down. Alcohol is more «fidgety» than water, which is why the thermometer moves more with alcohol.
For the adult
As the temperature rises, thermal agitation increases the average distance between molecules and the liquid expands according to ΔV = β·V·ΔT. At 20 °C, β(water) ≈ 2.1 × 10⁻⁴ °C⁻¹ and β(ethanol) ≈ 1.1 × 10⁻³ °C⁻¹; a 1:1 mixture is around 6–7 × 10⁻⁴ °C⁻¹. The container expands too: PET has a volumetric coefficient ≈ 2 × 10⁻⁴ °C⁻¹, practically the same as water, which is why a water thermometer in a plastic bottle hardly moves. With the mixture, the apparent expansion is ≈ 4 × 10⁻⁴ °C⁻¹; in 330 ml that means ≈ 0.14 ml per degree, which in a straw with a 5.5 mm internal diameter (23.8 mm²) gives ≈ 6 mm/°C. It is the same principle as the alcohol thermometer: large bulb + narrow capillary. The scale is linear because β varies little between 10 and 35 °C; it is calibrated with two fixed points (in real thermometers, 0 °C and 100 °C). The time constant is long (≈ 15 min in water, > 30 min in air) because of the thermal mass of 330 g of liquid. If air is left trapped, the instrument becomes a gas thermoscope (β of air ≈ 3.4 × 10⁻³ °C⁻¹), much more sensitive but also sensitive to atmospheric pressure, like Galileo's thermoscope (1593).
- expansion: a material getting bigger when it warms up.
- contraction: getting smaller when it cools down.
- calibrate: compare an instrument with a trusted one to put the right numbers on its scale.
- capillary: a very narrow tube; in it, a small change in volume shows up as a big rise.
- thermal equilibrium: when two things in contact reach the same temperature and stop changing.
By age
- 5–7 years: The adult makes the hole in the cap, mixes the alcohol and fills the bottle. The child puts on the modelling clay, screws on the cap slowly while watching the liquid rise and draws the lines on the scale. Use only the words «colder/warmer», without degrees.
- 8–10 years: They do all the steps except the awl and the alcohol. Have them work out the millimetres per degree with a simple proportion and read the thermometer every hour.
- 11–12 years: Have them compare water, mixture and alcohol only, measure the sensitivity of each in mm/°C and calculate the apparent expansion coefficient (ΔV = cross-section × rise). Challenge: estimate the error of their thermometer against the reference one.
In a group or in class
Teams of 3, one thermometer per team (identical 330 ml bottles). Beforehand, the adult prepares 2 l of coloured water-alcohol mixture in a large labelled bottle and makes the holes in all the caps. Session 1 (45 min): building and first calibration point, leaving the thermometers together on a table with a reference thermometer. Session 2 (30 min): shared warm bath in a large bowl with a thermometer, and sharing out the degrees. Afterwards, each team puts its thermometer in a different place in the school (classroom, corridor, window, playground in the shade) and the readings are compared.
Challenges
- Make the most sensitive thermometer in the class: what would you change (bigger bottle, thinner straw, more alcohol)? Measure its mm/°C.
- Build a «weather box» from white card with slits to measure the outdoor temperature without the sun shining on it.
- Use a small glass bottle and compare its sensitivity with the plastic bottle. Why does it change?
- Make a scale in degrees Fahrenheit next to the Celsius one (°F = °C × 1.8 + 32).