Equatorial sundial
A cardboard equatorial sundial: a 16 cm disc tilted to match your latitude, with a rod through it pointing at the Pole Star. Its shadow shows solar time on a printed dial, all year round and from the very first day.
What they will learn
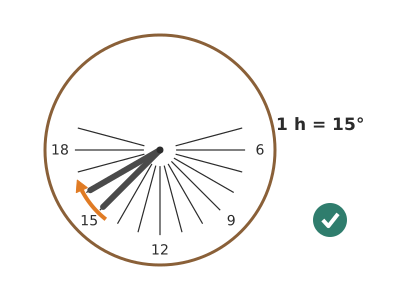
- That the Sun appears to move 15° every hour (360° in 24 h) because the Earth spins.
- That the axis of a sundial must point at the celestial pole (the Pole Star), tilted by as many degrees as the local latitude.
- Why solar time doesn't match the time on a mobile phone: time zones, summer time and longitude.
- That in spring and summer the sun passes above the celestial equator and in autumn and winter below it (which is why there are two faces).
Prepare beforehand
- Print the pieces at 100 % and check that the disc measures 160 mm across.
- Look up your latitude and longitude (on a map or your phone): mainland Spain and the Balearics, 36–44° N; Canary Islands, 28° N (use the Canary Islands supports).
- Work out the time of solar noon in your town with the rule in step 11 and write it down.
- Choose a level spot that gets sun from 10:00 to 18:00 and where the sundial won't be moved (or mark the position of the base on the ground with tape).
- Check the forecast: you need a clear day for the test.
Materials and tools
- Stiff corrugated cardboard — 1 sheet of 40 × 40 cm (or two of 40 × 20 cm)
3–4 mm, flat: two base layers of 200 × 180 mm, a Ø 160 mm disc, two 90 × 107 mm supports and a 140 × 10 mm stop - Straight wooden rod — 1 of 165 mm
Ø 5 mm (DIY dowel or a straight chopstick) - Modelling clay — 2 balls of Ø 15 mm
to hold the rod perpendicular to the disc - Printed A4 sheet — 2 A4 sheets
summer and winter faces (pieces B and C), ideally on 160 gsm paper - Glue stick and PVA glue — 1 of each
stick for the paper; PVA or hot glue for the supports - Clear packing tape — 50 cm
to protect the dials from damp - Felt-tip pen or chalk — 1
to decorate and mark shadows in the experiments
Tools
- Craft knife, metal ruler and cutting mat — cutting the supports and base adult
- Scissors — cutting out the disc and the paper dials
- Awl or pencil — making the 5 mm centre hole adult
- Set square — checking that the rod is at 90° to the disc
- Compass or compass app on a mobile phone — pointing the base north
Pieces and templates
- A · Sundial disc ×1 — corrugated cardboard 3–4 mm
- B · Summer face (upper dial) ×1 — paper 80–160 gsm
- C · Winter face (lower dial) ×1 — paper 80–160 gsm
- D · Triangular support (40° latitude) ×2 — corrugated cardboard 3–4 mm
- E · Base ×1 — corrugated cardboard 3–4 mm (2 layers glued together)
- F · Stop ×1 — corrugated cardboard 3–4 mm
- G · Gnomon ×1 — wooden rod Ø 5 mm
Step by step
Cut out the pieces adult
Stick the templates onto the cardboard with a glue stick and cut out disc A (Ø 160 mm), the two D supports, base E (two layers of 200 × 180 mm with the corrugations crossed) and the 140 × 10 mm stop F.
1 Stick the templates onto the cardboard with a glue stick 2 Cut with a craft knife, holding the metal ruler on the piece 3 Check: A, two Ds, two layers of E and strip F Glue on the two dials
Cut out dials B (summer) and C (winter). Glue B on one face of the disc and C on the other, centred over the hole and with the 12 o'clock line of both towards the SAME edge of the disc.
1 Cut out the two dials along their circle 2 Put glue on A and place B centred, with 12 at the bottom 3 Flip it sideways and glue C with 12 on the same edge Check: Hold the disc up to the light: the centres and the 12 o'clock lines of both faces line up.Protect them adult
Cover both faces with clear packing tape or sticky-back plastic so the dew doesn't wrinkle the paper. Reopen the 5 mm centre hole with the awl.
1 Cover each face with strips of clear tape, with no bubbles 2 Reopen the centre hole with the awl 3 Both faces are covered and the hole is open Fit the gnomon
Mark rod G 100 mm from one end. Push it through the hole from the winter face until the mark is right at the summer face: 100 mm above and about 60 mm below. Fix it with a ball of modelling clay on each face.
1 Mark rod G 100 mm from one end 2 Push it in from face C until the mark reaches face B 3 Fix it with modelling clay on both faces and check the 90° Check: Rest the set square on the disc: the rod is at 90° in two different directions.Assemble the base adult
Glue the two layers of base E together. Glue stop F on the marked line and the two D supports standing up on their lines (50 mm either side of the centre), with the pointed corner touching the stop and the vertical side towards the SOUTH.
1 Glue the two layers of E with the corrugations crossed 2 Glue F on the stop line and the two Ds upright, 50 mm from the centre 3 Point at the stop (north) and straight side towards the SOUTH Check: The two supports are parallel and their sloping sides are at the same height.Rest the disc on the supports adult
Rest the disc on the sloping sides of the supports, with the 12 o'clock edge touching the stop and the summer face upwards. The lower part of the rod passes between the two supports without touching them. Glue the disc to the supports with PVA or hot glue.
1 Rest the disc on the sloping sides with face B on top 2 With the 12 o'clock edge on the stop, glue the disc to the supports 3 The upper rod rises towards the north; the lower one, to the south Check: The upper rod points north and rises 40° above the horizon; the lower one points south.Take the sundial into the sun
Place the base on a level, sunny surface (check with a marble or a spirit level that it isn't tilted). The edge of the base marked NORTH must face north.
1 Put it on a level, sunny surface 2 Check with a marble that it isn't tilted Point it north adult
With the compass, turn the base until its north-south line matches the needle. In mainland Spain and the Balearics the magnetic declination is 2° at most and you can ignore it; in the Canary Islands it is around 5–6° (and drops by about 0.2° each year): there the north-south line should sit about 5–6° to the right (east) of the needle, or use the shadow method in the tip. Keep phones, keys and metal tables at least 30 cm away from the compass.
1 Keep phones, keys and metal at least 30 cm from the compass 2 Turn the base until its N-S line matches the needle 3 The N-S line and the needle are lined up Tip: No compass: at your town's solar noon (step 11), turn the base until the shadow falls exactly on the 12 o'clock line.Read solar time
See which line the rod's shadow falls on. From March to September read the top face (summer); from September to March, the bottom one (winter), crouching down to look under the disc.
1 From March to September, read the shadow on the top face 2 From September to March, crouch down and look at the bottom face 3 The shadow moves on one line every hour Check: The shadow falls on the dial and moves one line (15°) every hour.Mark the position
Once it is lined up properly, mark round the base on the ground with masking tape or chalk so you can take the sundial away and put it back in the same place without lining it up again.
1 Stick masking tape at the four corners of the base 2 Put it back inside the marks without lining it up again Convert to clock time adult
Clock time ≈ solar time + 1 h (winter) or + 2 h (summer, from late March to late October) + 4 min for each degree of longitude west of Greenwich (subtract 4 min per degree east). Madrid (3.7° W): add 1 h 15 min in winter or 2 h 15 min in summer.
1 Add 1 h in winter or 2 h in summer 2 Add 4 min for each degree west of Greenwich 3 In Madrid in summer: 12 solar time is 14:15 Tip: The Canary Islands are in a different time zone: add 1 h 2 min in winter and 2 h 2 min in summer (15.5° W, UTC+0/UTC+1 zone).Check against your phone
Every hour for one afternoon, write down the solar time on the sundial, convert it and compare it with your phone. The difference should be 16 minutes at most (this is the ‘equation of time’, which changes from day to day).
1 Every hour, read the shadow and look at the time on the phone 2 Write down and compare: the difference should be 16 minutes at most
Does it work? The test
On a clear day, with the sundial lined up, note on every hour (by the phone) which line the shadow falls on.
What should happen: The shadow moves on exactly one line (15°) per hour. In Madrid in summer time, at 14:15 the shadow falls on 12; at 17:15 on 15. The difference from the phone, after applying the correction in step 11, is at most ±16 minutes depending on the date.
If something goes wrong
- The shadow doesn't fall on the top face — It is between late September and March: the sun is below the plane of the disc. Solution: Read the winter face, under the disc. Near the equinoxes the shadow is hardly visible on either face: wait a couple of weeks.
- It shows a very different time from the phone (more than 30 min) — You haven't applied the summer/winter time and longitude correction, or the base isn't pointing north. Solution: Apply the rule in step 11. Line the base up again with the compass away from metal objects, or with the shadow at solar noon.
- The shadow doesn't follow the lines: it runs ahead in the morning and behind in the afternoon (or the other way round) — The rod isn't perpendicular to the disc or the disc isn't tilted at 50°. Solution: Check the rod with the set square and the supports with a protractor. Make sure the base is level.
- The disc warps or the paper wrinkles — Damp or dew. Solution: Cover it with clear tape and bring it in at night. Use foam board if it will be outside for many days.
- The rod moves — Hole too big or modelling clay softening in the sun. Solution: Use hot glue instead of modelling clay, or wrap tape round the rod until it fits tightly.
Safety
- Never look directly at the sun, nor through anything; to check the shadow, look only at the disc.
- The craft knife is used by an adult, with a metal ruler and cutting mat.
- The rod sticks out 10 cm: put the sundial where nobody can fall on it or suddenly bend down onto it (protect the tip with a ball of modelling clay).
- In the summer sun, wear a cap and sun cream and have water during long observations.
The science behind it
For children
The Sun doesn't really move: it's the Earth that spins like a top, and that's why we see the Sun cross the sky from one side to the other. It turns all the way round every 24 hours, so every hour it moves on by the same little bit, like the slices of a pizza cut into 24 pieces. Our rod points to the same place as the Earth's axis, towards the Pole Star, and its shadow turns around it like a clock hand, moving on one slice every hour.
For the adult
The Earth's rotation makes the Sun trace a circle in the sky each day around the polar axis at 15°/h (360°/24 h). In an equatorial sundial the gnomon is parallel to that axis (tilted above the horizon at an angle equal to the latitude φ and pointing to true north) and the dial is parallel to the celestial equator (tilted at 90° − φ). So the gnomon's shadow turns exactly 15° per hour and the lines are equally spaced, unlike a horizontal sundial, where tan(angle) = sin φ · tan(15°·h). The solar declination varies from +23.4° (June solstice) to −23.4° (December): from March to September the Sun lights the north-upper face and from September to March the lower one; at the equinoxes it strikes edge-on. The sundial shows local apparent solar time. To convert to clock time: + time zone (UTC+1 in winter, UTC+2 with summer time on the mainland) − longitude/15 (in hours, positive to the east) − equation of time (−14 min in mid-February, +16 min in early November, a consequence of the eccentricity of the orbit and the tilt of the axis). The simple method (vertical gnomon, marks made on one day) produces a sundial that is only accurate on dates close to the calibration dates, because with a vertical gnomon the direction of the shadow at a given hour depends on the declination. An error of ±4° in latitude produces errors of only a few minutes in the middle hours of the day.
- gnomon: the rod of the sundial that casts the shadow.
- solar time: the time shown by the Sun: at 12 it is at its highest, due south.
- latitude: how far you are from the equator, in degrees (Madrid, 40°).
- Earth's axis: imaginary line the Earth spins around; it points at the Pole Star.
- time zone: area of the world that uses the same clock time.
By age
- 5–7 years: The adult cuts and assembles the sundial; the child glues on the dials, puts on the modelling clay and reads the solar time in the afternoon. ‘The shadow turns like a clock hand’ is enough.
- 8–10 years: They build everything except the craft-knife cuts, line it up with a compass and compare with the phone by adding the hours of difference.
- 11–12 years: They work out their own longitude correction, build supports for their exact latitude with a protractor and record the equation of time over several months.
In a group or in class
Teams of 3, one sundial per team. Beforehand: print the dials, pre-cut the discs and supports, get compasses ready (or a single one with which the teacher chalks a north-south line in the playground). 60-minute session: 10 min explanation with a torch and a ball, 35 min assembly, 15 min in the playground lining the sundials up on the line. Read the time at break and at home time.
Challenges
- Build a horizontal sundial, calculating the angles with tan(angle) = sin(latitude) · tan(15° · hours).
- Add a small correction table for each month on the edge of the base.
- Make a human sundial in the playground: you are the gnomon.
- Make a folding pocket sundial with a small built-in compass.