Two-sided spinning disc that merges pictures
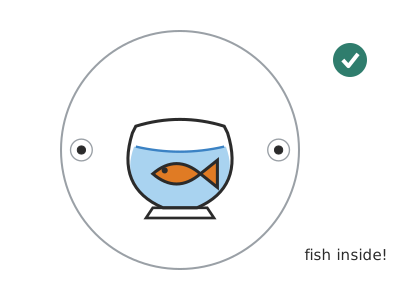
A 7 cm disc with a drawing on each side (fish and fishbowl, bird and cage) and a string on each edge: when you spin it fast, your eye blends the two pictures and the fish appears inside the fishbowl.
What they will learn
- That the eye and brain don't see continuously: an image "stays" for about 1/15–1/20 of a second and blends with the next one.
- That if two images alternate more than about 15–20 times per second, we see them at the same time (image fusion), which is the basis of cinema and cartoons.
- To think about how a drawing is oriented when it turns: why the second drawing must be upside down compared with the first.
- To design two drawings that complete each other (shared position, size and centre).
Prepare beforehand
- Print the template sheet at 100 % on card (without "fit to page") and check with a ruler that each disc measures 70 mm.
- Cut the 30 cm strings in advance: 2 per thaumatrope.
- For 5–6-year-olds, cut out the card cores and make the holes yourself beforehand.
- Have a finished thaumatrope ready to show the effect before you start.
Materials and tools
- White card — 1 A4 sheet
180–220 gsm, to print the templates (pieces A–D and F) - Thin card — 1 piece, 15 × 8 cm
from a cereal or biscuit box (≈ 0.5 mm), for the stiff cores (piece E) - Strong string — 4 pieces of 30 cm (2 per thaumatrope)
kitchen string, thin twine or thin wool - Glue stick — 1
to stick the drawings to the core without it warping - Coloured pencils or felt-tip pens — as needed
dark, thick lines (thin lines are hard to see when spinning) - Hole reinforcers or sticky tape — 4
stationery reinforcement rings or 1 cm bits of tape
Tools
- Scissors — cutting out the discs
- Awl, thick needle or sharp pencil — making the 2–3 mm holes (with modelling clay or an eraser underneath) adult
- Compass (optional) — drawing blank 70 mm discs to invent your own drawings
Pieces and templates
- A · Disc A: the fishbowl (front face) ×1 — card 200 gsm
- B · Disc B: the fish (back face of A) ×1 — card 200 gsm
- C · Disc C: the cage (front face) ×1 — card 200 gsm
- D · Disc D: the bird (back face of C) ×1 — card 200 gsm
- E · Stiff core ×2 — thin card (cereal box)
- F · Blank discs for inventing ×2 — card 200 gsm
- G · Strings ×4 — kitchen string or thin twine
Step by step
Cut out the discs
Cut along the line around discs A and B (fishbowl and fish) or C and D (cage and bird), 70 mm in diameter. Cut slowly, turning the card rather than the scissors, so they come out nice and round.
1 Print the discs on card and cut them out along the line 2 Turn the card slowly, not the scissors 3 Up to the light, one on top of the other: edges and dots match Check: Hold one disc over the other up to the light: the edges and the hole dots line up.Cut out the card core
Place a cut-out disc on the cereal-box card, trace round the outline and prick the two hole dots with the pencil tip so they are marked on the card. Cut it out (E) and join the two dots with the ruler on both sides: that is the axis line.
1 Put a disc on the card and trace the outline 2 Cut out the card circle: this is core E 3 With the ruler, mark the axis line on both sides Colour the drawings
Go over the drawings with a medium-tip black felt-tip pen and colour them in: the fishbowl with light blue water, the fish orange, the bird yellow or blue. Leave the backgrounds white and don't fill in the cage bars.
1 Go over the drawing with a medium-tip black felt-tip pen 2 Colour boldly: light blue water, orange fish, yellow bird 3 Don't fill in the bars: the bird must show between them Tip: Strong colours and thick lines: everything looks paler when it spins.Glue on the front face
Spread glue stick over one side of core E and stick disc A (fishbowl) on top with the drawing facing out, lining up the disc's axis line with the one on the card.
1 Spread glue over one whole side of core E 2 Put A on top with the drawing facing out 3 Line up A's axis line with the one on the card Glue on the back face upside down
Turn the disc over as if turning a page (sideways, not top to bottom). Turn disc B (fish) so its TOP arrow points the opposite way to A's: after flipping it sideways, it points down. Spread glue on it and stick it to the other side of the core, lining up the axis line.
1 Turn the disc over like a page: the card side is showing 2 Turn B half a turn (arrow down) and glue it on the back 3 Flip it over the axis: both drawings are the right way up Check: Hold the disc by the two marked dots and flip it like a coin over that line: both drawings should look the right way up.Press and dry
Put the disc between two sheets of paper under a heavy book for 5 minutes so it stays flat and well stuck. Meanwhile, repeat the steps with C, D and the second core for the bird and the cage.
1 Put it between two sheets under a heavy book 2 Wait 5 minutes; meanwhile, make the cage and the bird Reinforce and make the holes adult
Stick a hole reinforcer or a 1 cm bit of tape on each side over the hole dots. Rest the disc on modelling clay and make the two holes, 6 mm from the edge, with an awl or thick needle (2–3 mm).
1 Stick a reinforcer over each dot, on both sides 2 The adult makes the two holes over modelling clay 3 Both holes on the axis line, opposite each other Check: Both holes sit on the axis line, opposite each other.Add the strings
Thread a 30 cm string through each hole, bring the two ends together and knot them: you get a loop of about 15 cm on each side of the disc.
1 Thread a 30 cm string through each hole 2 Bring the two ends together and knot: a 15 cm loop on each side Tip: If you use rubber bands, pass the band through the hole and then through itself (a lark's head knot).Wind up the disc
Hold one loop in each hand, with the disc hanging in the middle and the strings a little slack. Swing the disc round like a skipping rope around the line of the strings about 20–30 times, until the strings are well twisted.
1 Hold one loop in each hand, with the strings a little slack 2 Swing it like a skipping rope 20–30 times to twist Make it spin
Pull both loops outwards at the same time: the strings unwind and the disc spins very fast. Ease off a little when it stops and pull again: it winds up the other way and spins again, like a button whirligig.
1 Pull both loops outwards at once: the disc spins 2 When it stops, ease off a little and pull again 3 Spinning fast, the fish appears inside the fishbowl Check: When it spins fast, the fish appears inside the fishbowl (or the bird inside the cage), the right way up, not upside down.
Does it work? The test
Spin the thaumatrope using the wind-and-pull method, at eye level and about 40 cm away, in good light (daylight is best).
What should happen: Once the disc goes faster than about 8–10 turns per second, you see a single picture with the fish inside the fishbowl (or the bird in the cage), slightly see-through. As it slows down, the two pictures separate and flicker.
If something goes wrong
- The bird comes out upside down — The two faces were glued the same way up. Solution: Peel off the back face (or glue on a new disc) turned 180° relative to the front.
- The bird appears outside the cage — The drawings weren't centred or were glued out of line with the axis. Solution: Use the templates, line up the axis lines with those on the core and check against the light before it dries.
- You can see both pictures flickering — It is spinning too slowly. Solution: Wind more turns (30) and pull harder, or use rubber bands. You need more than 8–10 turns per second.
- The disc twists or wobbles — Warped disc or holes that aren't on the same diameter. Solution: Use the card core and press it under a book. Make the holes exactly on the axis line.
- The hole tears — Hole too close to the edge or not reinforced. Solution: Add sticky reinforcers and make the holes 6 mm from the edge, no less.
- The drawings look very faint — Thin lines or pale colours. Solution: Go over them with a thick black felt-tip pen and strong colours; test in good light.
Safety
- Only an adult uses the awl or needle, with the disc resting on modelling clay or an eraser, never on a hand.
- Don't spin the thaumatrope near other children's faces; the disc spins fast and the strings can whip.
- Don't wind the strings around fingers or necks.
- If anyone is sensitive to flickering light (photosensitivity), they shouldn't watch the spinning disc up close for a long time.
The science behind it
For children
Your eyes are like a camera taking photos all the time, but each photo stays in your head for a moment before it fades. When the disc spins really fast, you see the bird, then the cage, then the bird... so quickly that the photo of the bird hasn't faded yet when the cage arrives. Your brain puts them together and you see the bird inside the cage! Cartoons work the same way: lots of drawings one after another, really fast.
For the adult
The retina and visual system integrate light over time: a brief stimulus is perceived for about 50–100 ms. If two images alternate at a frequency above the fusion threshold (for images of moderate brightness, around 15–20 alternations per second to fuse without obvious flicker; flicker of bright light is perceived up to 50–60 Hz), the brain perceives them superimposed. In the thaumatrope, each full turn shows each face once; at 10 turns per second each image appears 10 times per second, just enough for them to fuse, with some flicker. The classic term "persistence of vision" is a simplification: today it is attributed to the temporal integration of the visual system and, for the apparent motion of cinema, to the beta phenomenon. The inverted orientation of the second drawing is geometry: when the disc turns 180° about a horizontal axis, the back face is flipped vertically, so it has to be glued upside down to appear the right way up. The thaumatrope was popularised in London in 1825 (John Ayrton Paris) and is a forerunner of the phenakistiscope, the zoetrope and cinema.
- thaumatrope: optical toy made of a disc with two drawings that blend when it spins (from the Greek for "wonder turner").
- persistence of vision: the eye and brain keep "seeing" an image for an instant after it disappears.
- frame: each of the still images that make up a film.
- spin axis: imaginary line that something turns around (here, the line between the two holes).
- animation: illusion of movement created with lots of images one after another.
By age
- 5–7 years: The adult cuts out the core, makes the holes and ties the strings. The child colours the drawings, glues them (with help turning the second one) and spins it. Focus on "your eyes put the two photos together".
- 8–10 years: They do everything except making the holes. They invent their own pair of drawings with the blank discs and explain why the second one goes upside down.
- 11–12 years: They measure the turns per second with slow motion and look for the fusion threshold. Challenge: a three-position thaumatrope with strings on two different axes, or an 8-drawing phenakistiscope.
In a group or in class
Individual, at tables of 4–6 children. Per child: 1 template sheet printed on card, 1 pre-cut card core, 2 strings of 30 cm. Per table: 2 glue sticks, felt-tip pens and colours. The adult goes round the tables making holes with an awl and modelling clay. 45-min session: 5 min demonstration, 30 min building (fast ones make a second with their own drawing), 10 min "gallery" swapping thaumatropes.
Challenges
- Design a pair that tells a joke: for example, a serious face and a smiling mouth.
- Make a thaumatrope with three images that combine, using strings on two different axes.
- Build a phenakistiscope: a disc with 8 drawings of a movement, which you watch spinning in front of a mirror.
- Make a 20-page flipbook with a bouncing ball.
- Get your thaumatrope to spin faster than 15 turns per second and check it by filming it.