Little shadow theatre
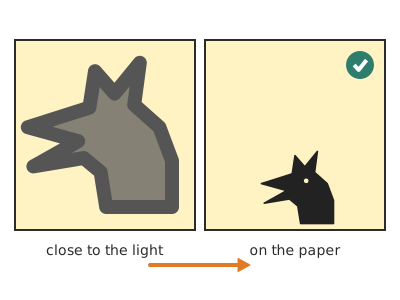
A shadow theatre made from a large box: a 30 × 18 cm window covered with tracing paper acts as the screen, the phone torch lights it from behind, and black card silhouettes (characters on sticks and a fixed set) become sharp shadows that grow as you move them away from the screen.
What they will learn
- That light travels in a straight line: the shadow is the gap an opaque object leaves in the beam of light, and it copies its outline, not its colours or the drawings on it.
- That the size of the shadow depends on the distances: with the light 60 cm from the screen, a figure pressed against the paper casts a shadow of its own size, and at 20 cm the shadow grows 1.5 times.
- That a small light source (the phone LED) gives sharp shadows and a large one (torch with a reflector, lamp) gives blurred edges (penumbra).
- That materials can be opaque (card), translucent (tracing paper) or transparent (plastic), and what each one is for in the theatre.
- To tell a story with a beginning, middle and end using only outlines.
Prepare beforehand
- Print the silhouette templates at 100 % (without «fit to page») and check with a ruler that the red line in the header measures 50 mm.
- Find a room you can darken (blinds down) and a table big enough for the box and, 30 cm behind it, the stack of books with the phone.
- If the children are young, cut the window, the back and the inner frame of the box yourself beforehand.
- Charge the phone: the torch uses up battery and the show stops if it dies halfway through.
- Have a tape measure ready for the distance experiment.
Materials and tools
- Large cardboard box — 1
one face of at least 40 × 30 cm and 25–35 cm deep (small removal box, a box for 5 reams of A4 paper or a small appliance box) - Tracing paper — 1 A3 sheet (420 × 297 mm)
90 g/m², or 2 A4 sheets joined with tape on the back - Black card — 2 A4 sheets
180–300 g/m², opaque (hold it up to the light: no light should come through) - Wooden skewers — 7
Ø 3 mm, 25–30 cm long; cut off the sharp point - Split pin — 1
for the joint of the moving arm - Sticky tape — 1 roll
packing tape or masking tape (for the box) and thin clear tape (for the silhouettes) - PVA glue or glue stick — a little
to glue the printed template onto the card and to fix the inner frame - Phone with a torch — 1
the flash LED is small and gives sharp shadows - Books or a box — to build a stack about 15 cm high
to rest the phone at the height of the centre of the screen
Tools
- Craft knife and metal ruler — cutting the window, the back of the box and the inner frame adult
- Cutting mat or old cardboard — protecting the table when using the craft knife
- Scissors — cutting out the silhouettes
- Small pointed scissors or a fine craft knife — inner holes (eye, windows, castle door) adult
- Pencil, ruler and tape measure — marking the window and measuring light distances
- Awl or sharp pencil — making the hole for the moving arm's joint adult
Pieces and templates
- A · Box front with window ×1 — corrugated cardboard from the box itself
- B · Inner frame (holds the screen) ×1 — corrugated cardboard 3 mm (from the cut-out back panel)
- C · Screen ×1 — tracing paper 90 g (A3)
- D · Dragon ×1 — black card 200–300 gsm
- E · Knight ×1 — black card 200–300 gsm
- F · Princess ×1 — black card 200–300 gsm
- G · Tree (fixed set) ×1 — black card 200–300 gsm
- H · Castle (fixed set) ×1 — black card 200–300 gsm
- I · Character with moving arm: body ×1 — black card 200–300 gsm
- J · Character with moving arm: arm ×1 — black card 200–300 gsm
- K · Control sticks ×7 — wooden skewer Ø 3 mm
Step by step
Choose the face and mark the window
Choose the largest, smoothest face of the box as the front. With a ruler and pencil, mark a 300 × 180 mm rectangle leaving 50 mm on each side, 40 mm at the top and 80 mm at the bottom.
1 Choose the largest, smoothest face of the box: it will be front A 2 Draw 300 × 180 mm: 50 at the sides, 40 at the top and 80 at the bottom 3 Check: the bottom margin (80) is twice the top one Check: Measure the four margins: the bottom one (80 mm) must be twice the top one.Cut the window adult
An adult cuts the window with a craft knife and metal ruler on a cutting mat. Cut the long sides first and then the short ones, running the blade 2–3 times without pressing hard.
1 Cut the long sides first (1 and 2) and then the short ones (3 and 4) 2 An adult runs the craft knife 2 or 3 times along the metal ruler 3 The window is open, with straight edges Tip: Put a piece of old cardboard inside the box, behind the face you are cutting, so you don't slit the back face.Remove the back of the box adult
Cut out the whole face opposite the window (the back one), leaving a 20 mm rim all the way round so the box doesn't lose its shape. Keep the piece of cardboard that comes out: you will make frame B from it.
1 An adult cuts out the back face, leaving a 20 mm rim 2 Take the cardboard out and keep it: frame B will come from it 3 From behind you see the whole window and both hands fit in Check: From behind the box you should see the whole window and be able to put both hands in at once.Cut the inner frame adult
On the cardboard you removed, draw a 340 × 220 mm rectangle and, inside it, a centred 300 × 180 mm one (20 mm frame). An adult cuts both with a craft knife.
1 Draw 340 × 220 mm and, centred inside, 300 × 180 mm 2 An adult cuts both rectangles with a craft knife and ruler 3 Frame B: a hollow rectangle with a 20 mm border Fit the screen
Cut the tracing paper to 330 × 210 mm. From inside the box, place it over the window with a 15 mm overlap on each side and stick it with four pieces of tape at the corners, pulling slightly to make it taut.
1 Cut the tracing paper to 330 × 210 mm 2 From inside, stick tape on each corner, pulling outwards 3 From the front, the paper has no creases or bulges Check: Looking at the window from the front, the paper should have no creases or bulges.Fix the screen with the frame
Put PVA glue on one face of frame B and press it from inside onto the paper, lining up the openings. Hold it in place with pegs or books for 10 minutes. This way the paper is trapped and taut even if it is baking paper.
1 Put PVA glue all round the edge of one face of frame B 2 Press it from inside onto the paper, with the openings lined up 3 Hold it with books or pegs and wait 10 minutes Tip: If you are in a hurry, fix the frame with 8 strips of duct tape instead of glue.Prepare the silhouettes adult
Glue the printed sheet onto the black card with a glue stick (drawing facing you) and cut out the 7 pieces (D–J: 6 silhouettes plus the moving arm) along the cutting line. An adult cuts out the inner holes: the dragon's eye and the castle windows.
1 Glue the printed sheet onto the black card, drawing facing you 2 Cut out each silhouette right on the line 3 An adult cuts the holes: castle windows and dragon's eye Tip: The side with the printed paper will be the back: the audience only sees the shadow.Add the sticks
Cut 7 wooden skewers to 250 mm and remove their points. Tape one to the dragon, one to the knight and one to the princess with 2 strips of tape on the printed side, along the «stick» line: the top end of the stick at the top end of the line, so it doesn't poke out above the figure. About 15 cm should stick out below; cut off the rest (the sticks end up 20–23 cm; the dragon's, about 20 cm).
1 Cut 7 sticks of 250 mm and remove the sharp points 2 Tape the stick to the printed side with 2 strips; 15 cm below 3 Shake it by the stick: it must not turn or wobble Check: Hold the figure by the stick and shake it: it must not turn or wobble. If it turns, add a third strip of tape.Assemble the moving arm adult
Make a hole in the shoulder of the body (I) and in the round end of the arm (J) with an awl. Join them with the split pin, with the arm behind, and open the legs without pressing them flat. Tape one stick to the body and another to the hand of the arm, as in step 8: not going past the top end of the «stick» line, and with both reaching about 15 cm below the feet.
1 An adult makes holes in the shoulder of I and the round tip of J 2 Join them with the split pin, arm behind, not too tight 3 Tape one stick to the body and one to the hand: the arm turns freely Check: When you move the arm stick, the arm should turn freely at the shoulder without the body moving.Fix the set
Inside the box, fix tree G on the left side of the screen and castle H on the right, as seen by the audience (from inside, where you are, the tree is on your right and the castle on your left), with their bases touching the bottom edge of the window. Use 2 small pieces of rolled-up tape behind each one.
1 Make 2 little rolls of tape, sticky side out, and put them on the back 2 From inside, tree on your right and castle on your left 3 From the front: the tree on the left and the castle on the right Position the light
Put the box at the edge of the table with the screen facing the audience. Build a stack of books 30 cm behind the box (about 60 cm from the screen) and rest the phone on it with the torch on, 17 cm high, pointing at the centre of the screen.
1 Phone on books, 30 cm behind the box and 17 cm high 2 In the dark, the whole screen is lit and even 3 If you see a circle of light with dark edges, move the phone back Check: With the room dark, the whole screen should be lit and fairly even. If you see a circle of light with dark edges, move the phone a little further away.Rehearse the shadows
Switch off the room light. Hold each character by its stick with your hand below the bottom edge of the window and press the figure against the paper. Then move it 5, 10 and 20 cm away and watch the shadow grow.
1 With your hand below the window, press the figure against the paper 2 Move it 5, 10 and 20 cm from the paper: the shadow grows 3 Pressed on: sharp and its own size. At 20 cm, 1.5 times bigger Check: Pressed against the paper, the shadow should have sharp edges and be the same size as the figure. Your hands must not show on the screen.Put on the play
Write a 3-scene story (introduction, problem and ending) of 2–3 minutes with the children. One works the characters from behind, another narrates or does the voices, and the audience sits 1–2 m from the screen.
1 Write a 3-scene story together: introduction, problem and ending 2 One works from behind, another narrates; the audience at 1–2 m 3 Bring the dragon in close to the light and move it up to the paper Tip: To make the dragon «arrive» dramatically, start with it close to the light (huge, blurred shadow) and bring it towards the paper until it is sharp.
Does it work? The test
With the room dark and the phone 60 cm from the screen, hold the knight pressed against the paper and then 20 cm from the paper. From the front, measure the height of the shadow with a ruler.
What should happen: Pressed against the paper, the shadow is the same size as the figure (13 cm) and has sharp edges. At 20 cm from the paper it measures about 19–20 cm (1.5 times bigger) and the edges are still fairly sharp with the phone LED; with a large torch with a reflector they are visibly blurred (1 cm of penumbra).
If something goes wrong
- The shadows are blurred even though the figure touches the paper — Large light source (torch with a reflector, lamp with a shade) or light too close. Solution: Use the phone flash, move it 60 cm or more from the screen and switch off the other lights.
- Hands or arms show on the screen — The light is too low or the hands rise above the bottom edge of the window. Solution: Raise the light to the height of the centre of the window (about 17 cm) and keep your hands close to the table, below the 80 mm frame.
- The screen looks dark in the corners — The phone's beam is narrow and too close. Solution: Move the phone 10–20 cm further away or put a sheet of tracing paper in front of the flash as a diffuser (the shadows soften a little).
- The audience sees little contrast — There is light in the room or the screen is made of thick paper. Solution: Lower the blinds and use tracing paper or baking paper, which lets more light through than an 80 gsm A4 sheet.
- The silhouette looks grey or has patches of light — The card is not opaque. Solution: Glue two layers together or use cereal-box card. Any colour will do as long as it doesn't let light through.
- The moving arm doesn't turn or falls off — The split pin is too tight or too loose. Solution: Open the legs without flattening them. If it comes out, put a 10 mm card washer on the back.
Safety
- The craft knife is always used by an adult, with a metal ruler and cutting mat, cutting away from the hand that is holding.
- Remove the sharp points from the wooden skewers before giving them to children; no sword fights with them.
- Do not use candles or halogen or incandescent lamps inside the box: cardboard and paper burn. The phone LED doesn't get hot.
- With the room dark, keep the way clear and leave a hallway light on so nobody trips over cables or the box.
- Split pins are small parts: keep them out of reach of children under 3.
The science behind it
For children
Light always travels in a straight line, like an arrow. When a card character gets in the way, the light can't go through it and a dark gap with the same shape is left on the paper: the shadow. If you press the character against the paper, the shadow is just as big and very sharp. If you bring it closer to the light, it blocks more rays and the shadow grows, like when you put your hand in front of a torch and it turns into a giant.
For the adult
Light travels in a straight line in a uniform medium; an opaque object intercepts the rays and its shadow on the screen is the central projection of its outline from the source. With the source at a distance L from the screen and the figure at a distance d from the paper, the magnification is M = L / (L − d): with L = 60 cm, d = 0 gives M = 1; d = 20 cm gives M = 1.5; d = 40 cm gives M = 3. A source of size s produces a penumbra of width ≈ s · d / (L − d): with the phone LED (s ≈ 4 mm) and d = 20 cm, the penumbra is 2 mm; with a 25 mm reflector torch, 12 mm. That is why a small, distant source is used with the figure close to the paper. Tracing paper is translucent: it scatters the light passing through it in all directions, so the audience sees the image from any angle. Placing the light at the height of the centre of the window and the hands below the bottom edge makes the projection of the hands fall below the window, hidden by the frame.
- opaque: a material that doesn't let light through (card, wood).
- translucent: lets light through but you can't see clearly through it (tracing paper).
- shadow: an area the light doesn't reach because an object is blocking it.
- penumbra: the blurred edge of a shadow, where only part of the light reaches.
- silhouette: the shape of a figure seen only by its outline.
By age
- 5–7 years: The adult cuts the box, the frame and the inner holes. The child sticks on the paper, cuts out large, simple silhouettes (tree, princess), tapes on the sticks and performs. Focus on «close to the paper = small and sharp; close to the light = big».
- 8–10 years: They build everything except the craft-knife work. They design their own character with a moving part and write a 3-scene play.
- 11–12 years: They measure the size of the shadow at different distances, draw the graph and check the formula M = L / (L − d). Challenge: characters with two joints and scenes with coloured cellophane.
In a group or in class
Teams of 4–5 children, one box per team (5 boxes for 25). Before the session the adult cuts windows, backs and frames and prepares the printed silhouettes. 90-min session: 10 min demonstration of the distance effect, 30 min assembly (screen + silhouettes), 20 min to write and rehearse a 2-minute play and 30 min of performances in turns with the classroom darkened. One phone per team is enough, or a single powerful LED torch for the performance stage.
Challenges
- Make a character with two joints (arm and leg) and three sticks.
- Create a scene with a yellow cellophane sun or moon shining in the sky.
- Get a character to «go into» the castle by passing behind the set.
- Make a shadow that changes shape when you turn the figure (a cube that looks like a square from the front and a line edge-on).
- Film the play with music and titles.